We use cookies for personalizing content and ads and providing social media features. Your usage information on our website will be used for social media, advertising, and traffic analytics, or shared with our partners. Clicking "Accept" means you agree to use our cookies .
iSunshare iOS Repair Genius is the easy to use iOS repair software which can easily repair more than 50 common system problems like stuck on Apple logo, black screen of death, stuck in spinning circle etc. This tutorial covers a full guide on how to use iSunshare iOS Repair Genius to get your iOS device back to normal in two repair modes – Standard Mode and Advanced Mode. Besides, if you cannot upgrade your iOS system or revert your iOS to a previous one, iSunshare iOS Repair Genius can help you to simply update your system or downgrade your iOS without iTunes.
Before performing the steps below, you need to download and install this tool on your Windows computer and make sure that your iOS device is connected to pc with USB cable all the time. Besides, iTunes should be installed on the computer.
Part 1: Fix the iOS device in Standard Mode
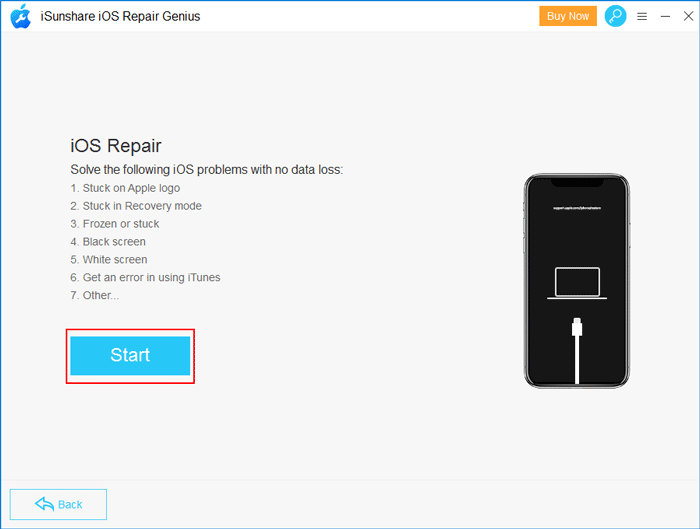
It is the first choice for repairing your faulty device. In this repair mode, you can quickly fix most common system problems like stuck on Apple logo and black screen of death without any data loss. Here are the detailed steps.
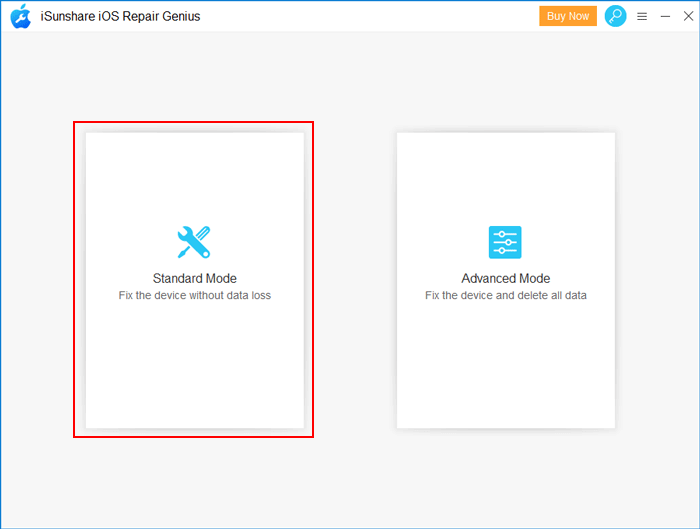
Step 1: Choose Standard Mode
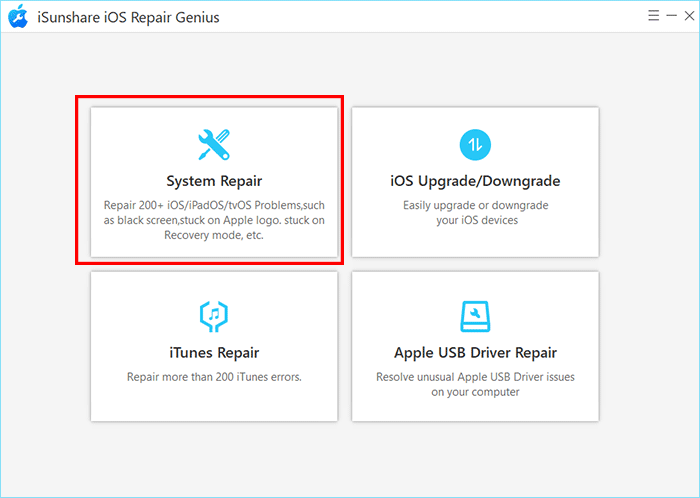
Open this tool and select System Repair option on the left.
After that, select Standard Mode on the left.
Click Start button to continue.
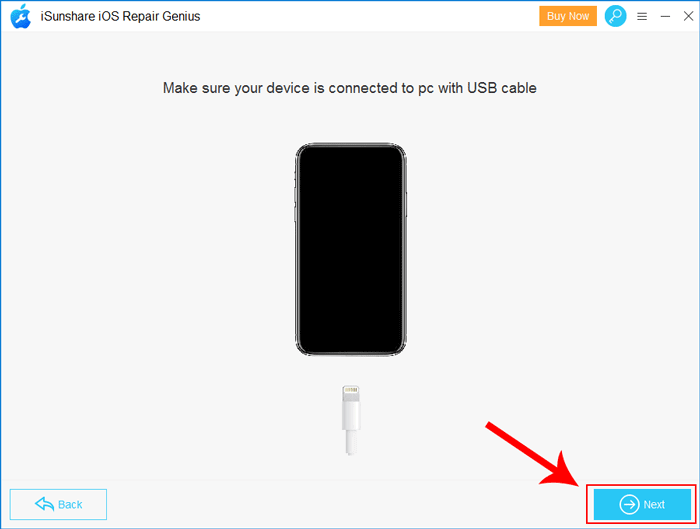
Make sure your device is connected to pc and click Next button at the bottom right of the interface.
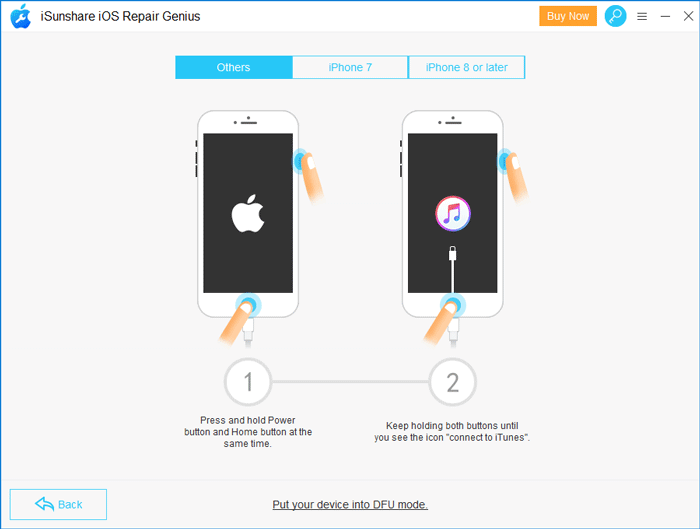
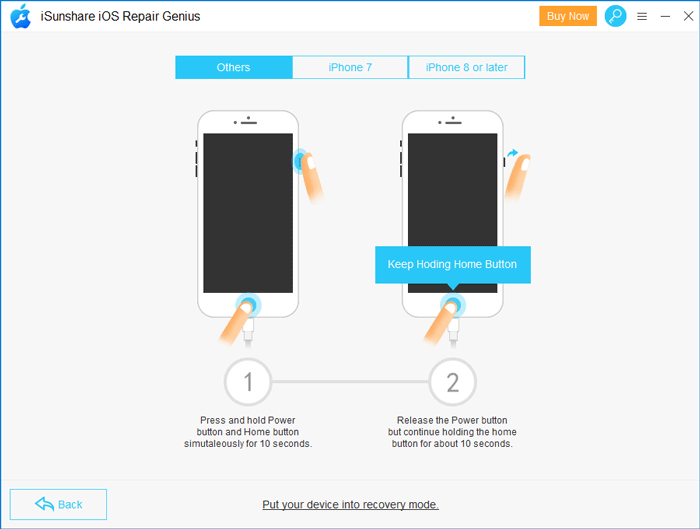
If your device cannot be detected, you need to put your device in DFU or Recovery Mode. On the screen you can see a very clear guide and follow it. Then the program will continue to the next step.
Put your device in Recovery Mode:
Put your device in DFU Mode:
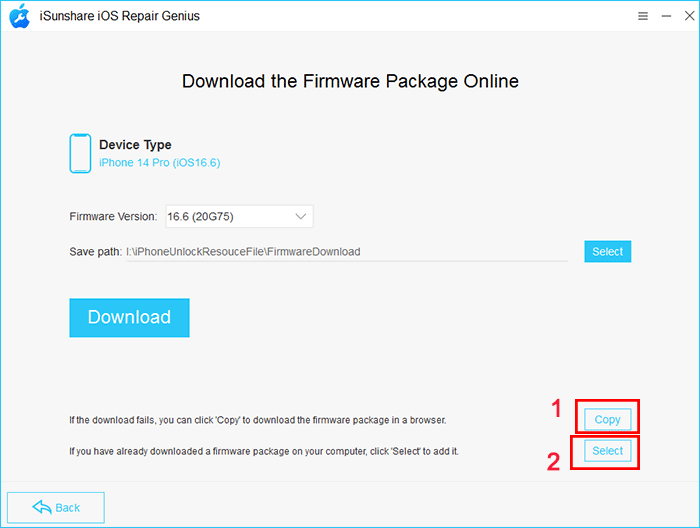
Step 2: Download a firmware package
The program will automatically identify your device model and show you the latest available version of firmware. Click Select button to choose the location to save the package and then click Download button to download a firmware package.
If it fails to download, you can click Copy button to download it on the browser. Then click Select button on the bottom to import it.
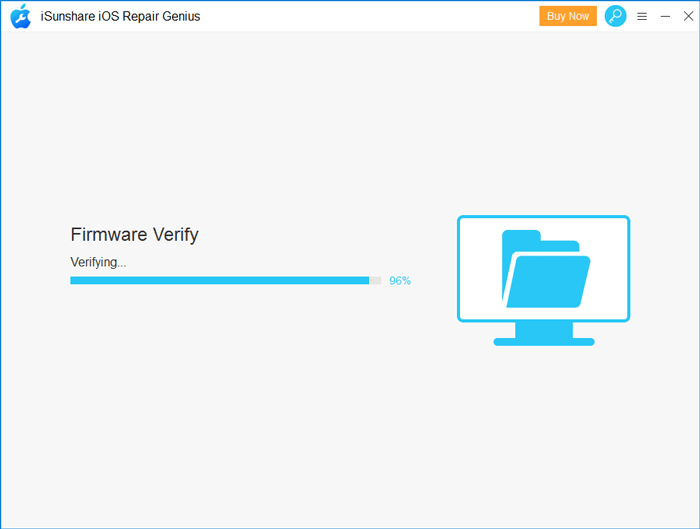
Wait for firmware verify.
Step 3: Start repairing
All preparations have been completed. Click Repair button to start repairing.
Wait for a while until a window pops up prompting that the device has been repaired successfully. Click OK to close the window.
At last, your device will work properly and boot up automatically.
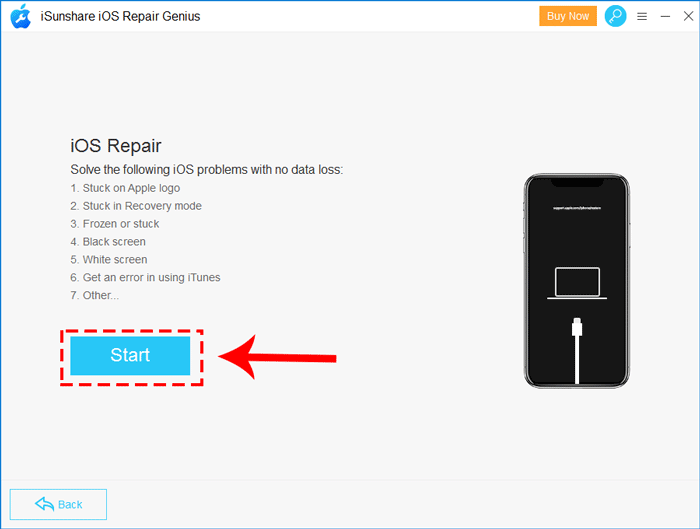
Part 2: Repair the iOS device in Advanced Mode
If Standard Mode can't fix your device, you can try to fix it in Advanced Mode. It can fix any system problem but the data will be erased. Here is how to repair iOS device in Advanced Mode.
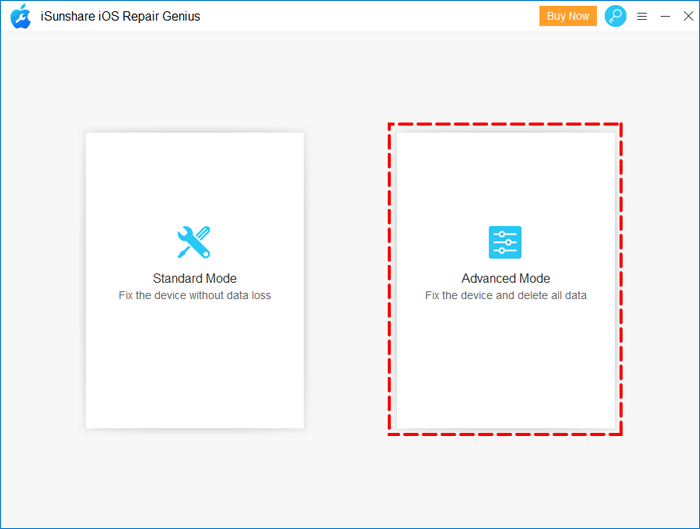
Step 1: Choose Advanced Mode
Launch this tool. In the interface of software, select System Repair >Advanced Mode on the right.
Click Start button to continue.
Make sure that your device is connected to computer and click Next button to continue.
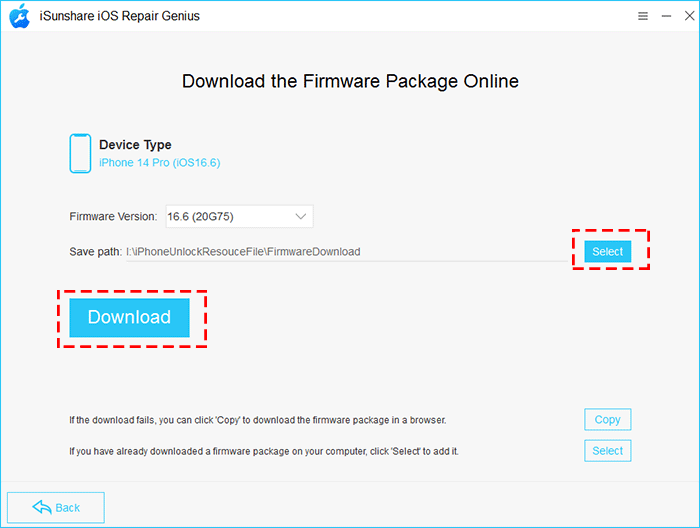
Step 2: Download a firmware package online
Your device model and the available version of firmware package will be displayed on this interface. Click Select button to set the Save path. Then click Download button to download the firmware package.
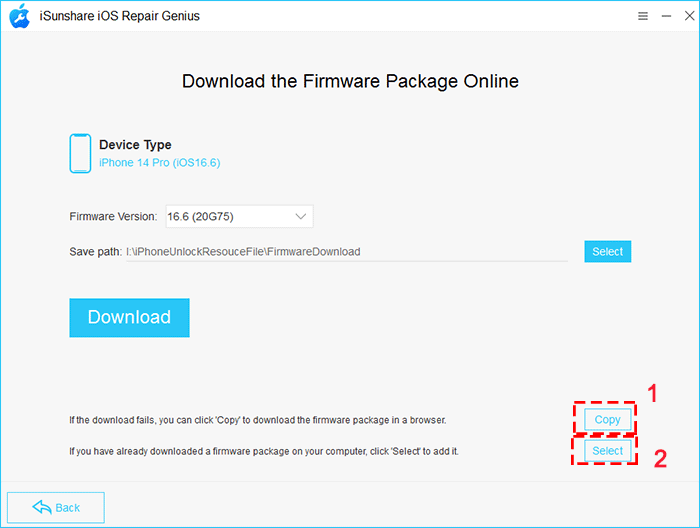
Alternatively, you can go to click Copy button to download the firmware package on a browser. Then click Select button on the bottom to import the firmware package.
Wait for the program to verify the firmware.
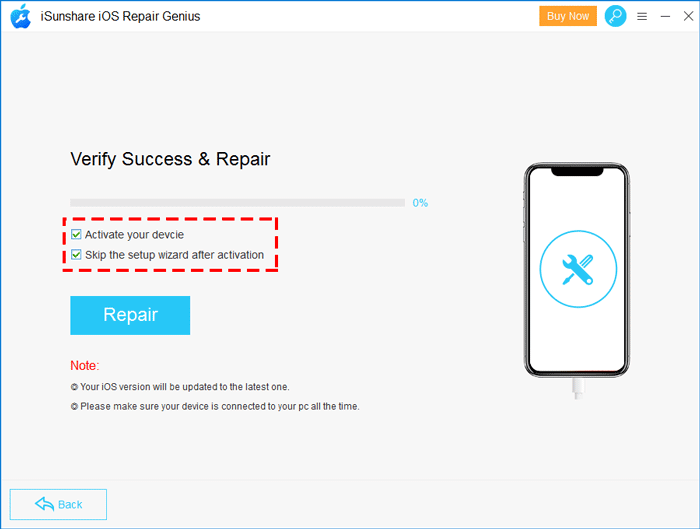
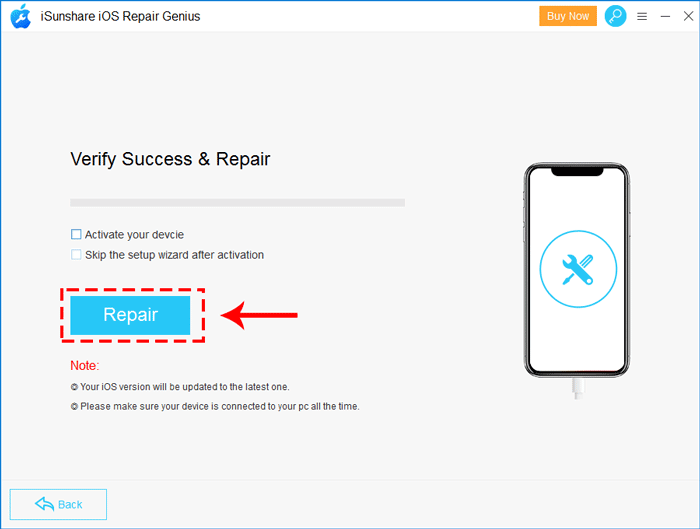
Step 3: Start repairing
Before you start repairing, you can check the checkboxes above the Repair button to activate the device after repairing and skip the setup wizard.
After that, click the Repair button to start repairing your device.
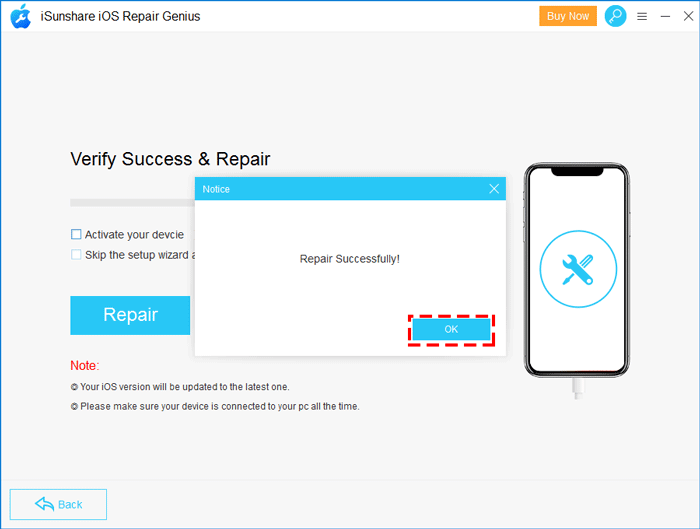
Finally, a window pops up prompting that the device has been repaired successfully. Click the OK button to close the window.
In the end, your device gets back to normal and all the data is erased.
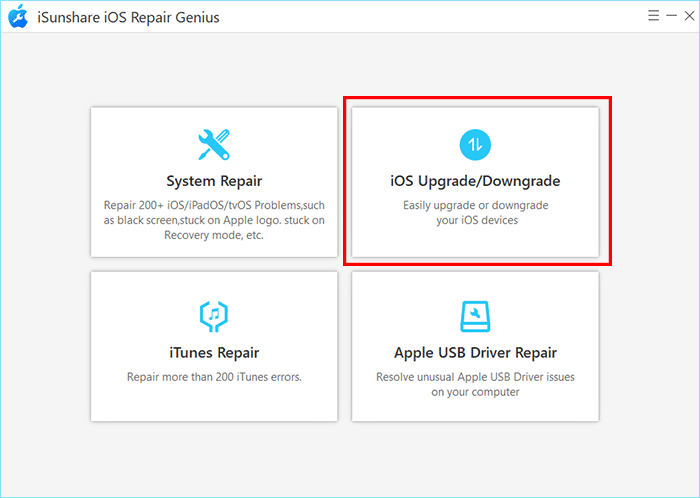
Part 3: Upgrade iOS/iPadOS to the Latest Version
With this software, you can upgrade iOS/iPadOS to the latest version if your iPhone model is supported.
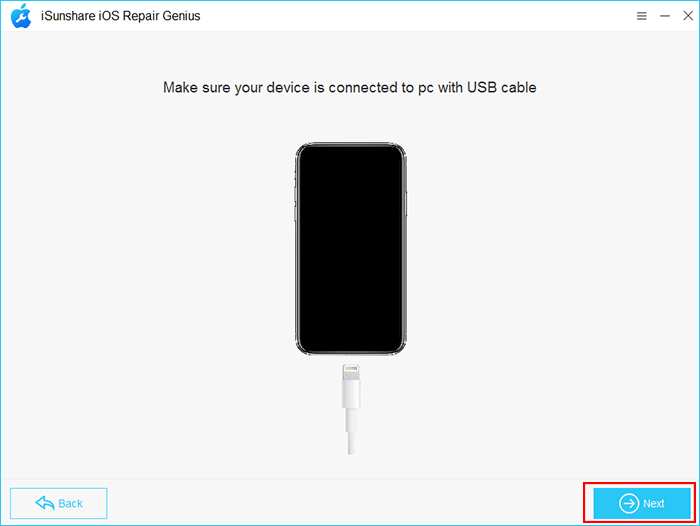
Step 1: Connect your iPhone to the computer.
Run iSunshare iOS Repair Genius and then choose the iOS Upgrade/Downgrade option. And you should connect the iPhone to your computer with the USB cable. Tap Trust on your compute to trust this connection.
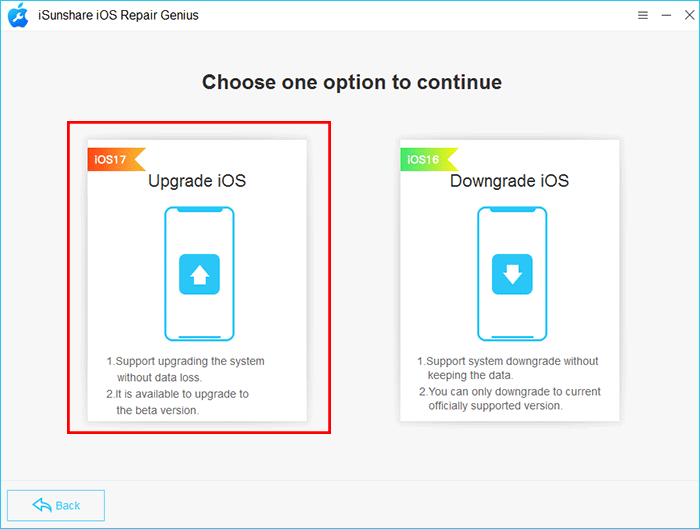
Step 2: Select the Upgrade option.
It supports to update the iOS to beta version. And there is no data loss during the entire process. You can choose the Upgrade iOS option on the left side to continue.
Step 3: Click Next
Make sure the iPhone is successfully detected by your software. Then click the Next button.
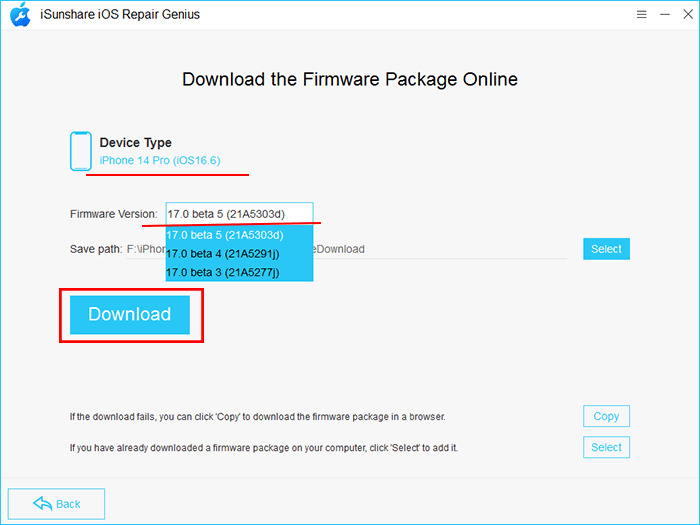
Step 4: Download the firmware package for your iPhone.
iSunshare iOS Repair Genius will load your iPhone details automatically. And you can check the upgradable iOS firmware by clicking the down-arrow icon in firmware version section. Just go to choose the firmware version and then click the Download button to get it.
Tips:
1. The unsigned iPSW cannot currently be restored via iOS Repair Genius. If the iOS version is not supported to upgrade, you will get the prompt that says your iOS version is the newest. No need to upgrade!
2. You can check whether the firmware Apple is signing or not in this page.
3. Only iPhone models that after iPhone 11 can be updated to the newest iOS 27 version.
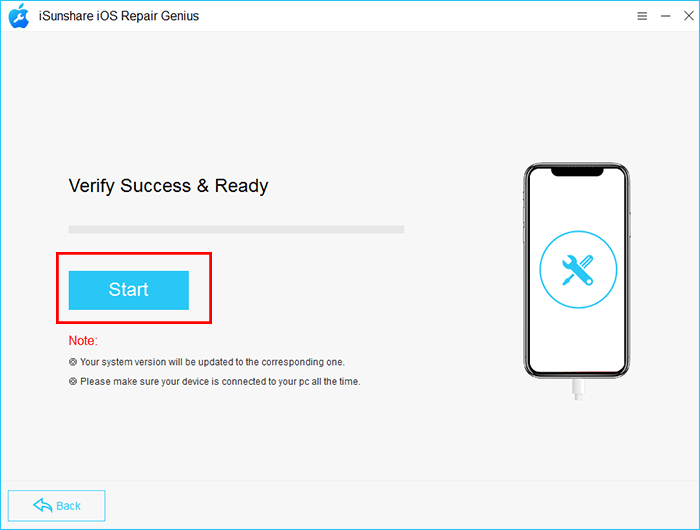
Step 5: Upgrade your iPhone system version
After the downloading, the software will automatically verify it. And you will be on the Verify success & Ready interface. Then you can click the Start button to update the iOS to the selected version.
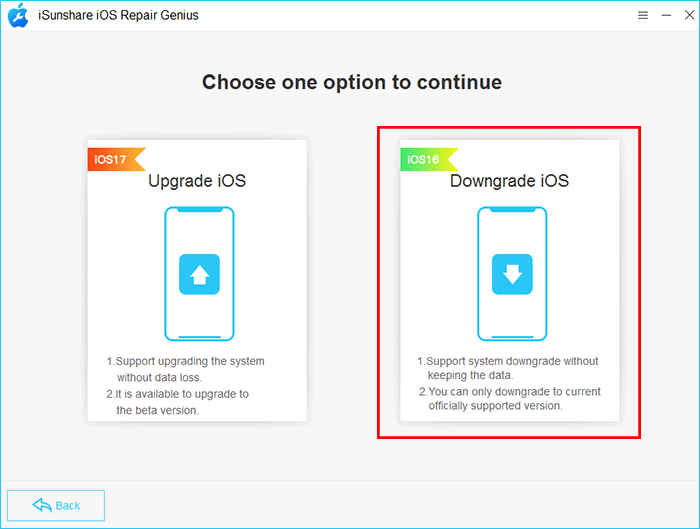
Part 4: Downgrade iOS/iPadOS to a Previous Version
When you cannot get used to using the newest iOS/iPadOS, such as iOS 27, is it possible to downgrade it to a previous version? Yes, you can make it done easily with iSunhare iOS Repair Genius.
Step 1: Plug the iPhone into your computer and run iOS Repair Genius.
You need to build the connection between the iPhone and your software. And tap Trust on the iPhone screen to trust this computer to access your iPhone data. After that, double-click to run iOS Repair Genius program and choose iOS Upgrade/Downgrade.
Then choose Downgrade iOS on the right side.
Step 2: Make sure the iPhone is well-connected and hit on the Next button.
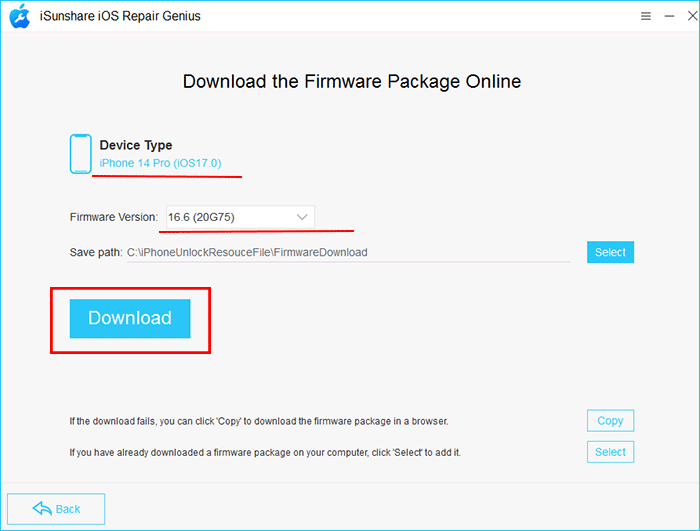
Step 3: Choose the firmware to downgrade
Then your iPhone model is detected here. You can also check the firmware version of the iPhone. After that, you can choose the firmware version you want to go back to and click the Download button to get it.
2. If there is only one option in the drop-down box, it means that there is only one IPSW that Apple is signing for this iPhone model for you to downgrade. If the firmware version is the same as your current iOS system, it means you are currently using the newest iOS for this iPhone. You can continue to reset the iPhone.
3. You can only downgrade the firmware version to a signed IPSW.
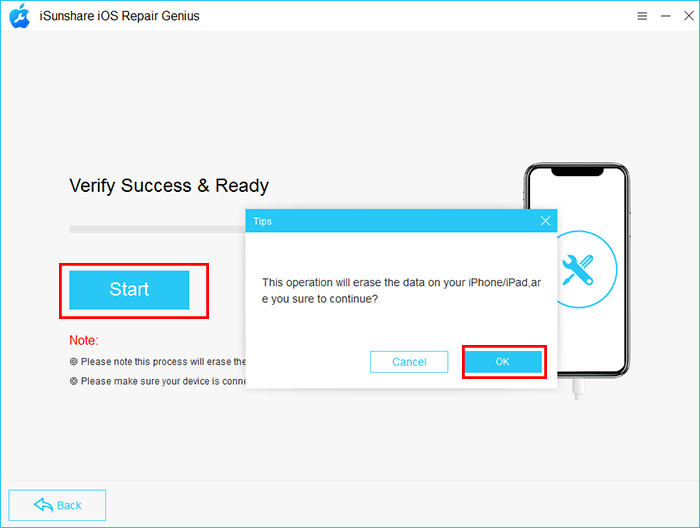
Step 4: Start to downgrade the system version
After the downloading, you can click the Start button to revert the iOS system to an older one. It will ask for your confirmation in a pop-out box. Click OK and then your device will be on downgrading process.
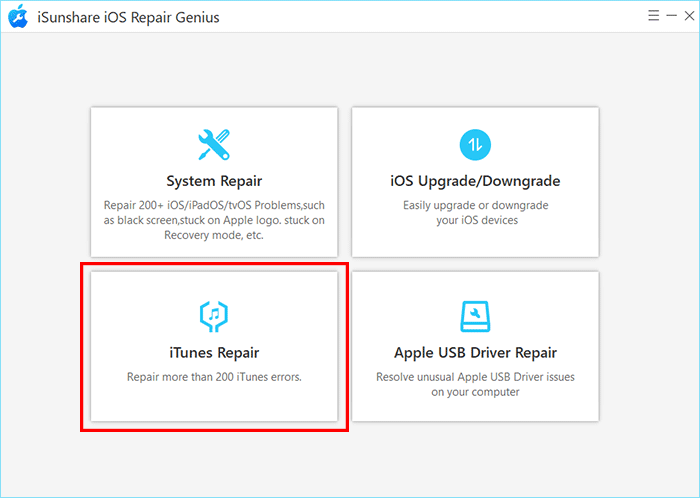
Part 5: Fix iTunes Errors and Issues with No Data Loss
iTunes is the essential tool to manage iOS devices on your computer. When you get the iTunes error message or encounter iPhone/iPad cannot connect to iTunes issues, how can you get the iTunes back to normal? iSunshare iOS Repair Genius can help you easily repair iTunes common errors and connection issues without data loss.
Step 1: Open iSunshare iOS Repair Genius and choose iTunes Repair option.
Step 2: Choose the particular iTunes error you want to resolve according to the issue you are facing.
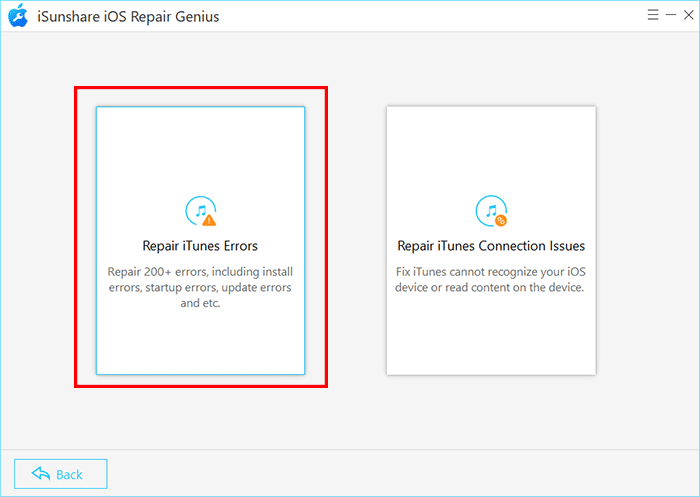
Option 1: Repair iTunes Errors—for Common Installation, Startup, and Update and etc. Error
Step 3: Choose the option—Repair iTunes Errors to continue.
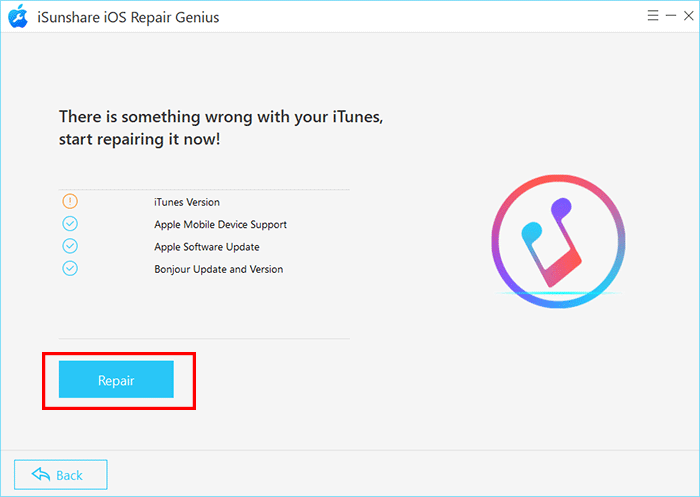
Step 4: In no time, the software starts checking your iTunes components. After that, click Repair to begin the repairing process of your iTunes.
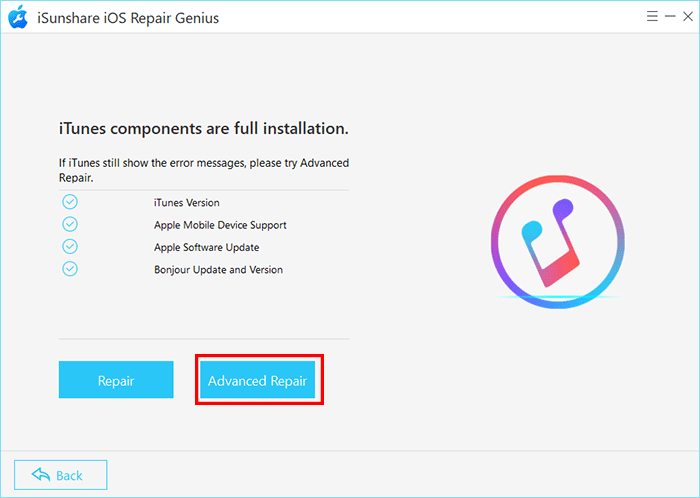
Tips: When there is no problem in iTunes components and the iTunes error still exists, you can click the Advanced Repair button to move forward.
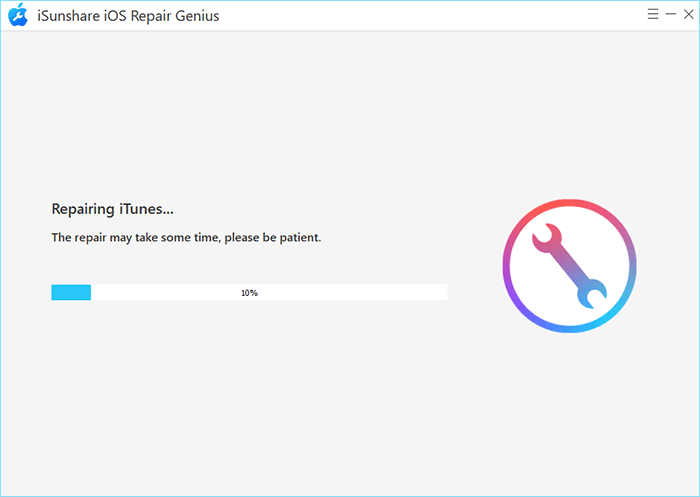
Step 5: The progress of iTunes Repair is ongoing.
Step 6: iTunes repair process ends and you can check whether it can work normally or not.
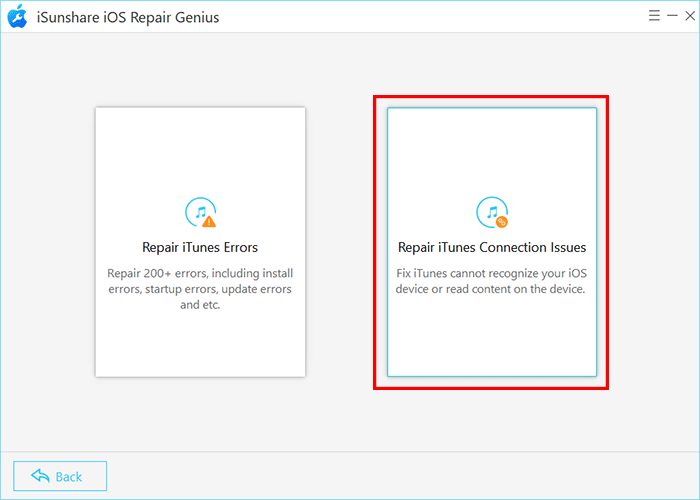
Option 2: Repair iTunes Connection Issues—for not Recognizing iOS Devices
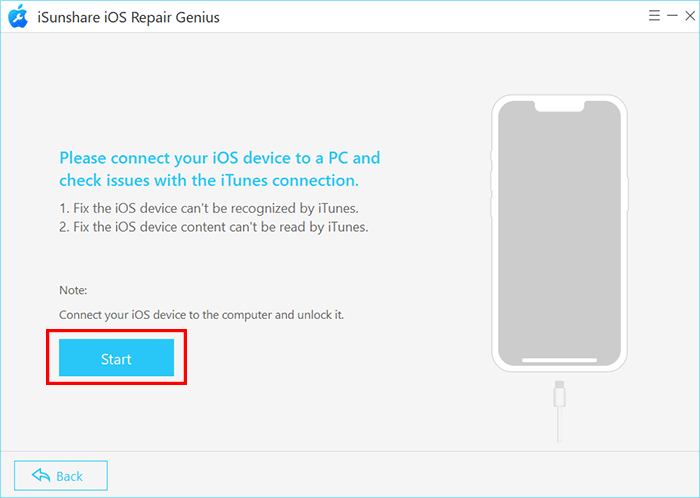
Step 3: If your iOS devices cannot be detected by the iTunes, or iTunes cannot read the content in iOS devices, you can choose Repair iTunes Connection Issues option to move forward. Before moving formward, the iOS device should be connected to your computer and unlocked if there is a screen lock.
Step 4: Hit the Start button to fix the iTunes connection issue.
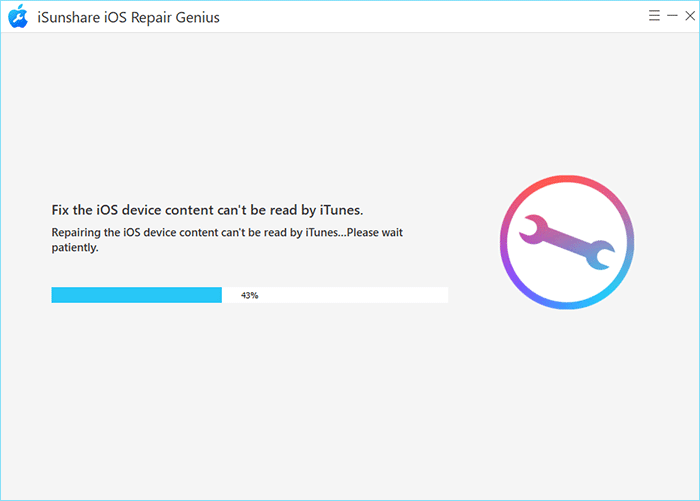
Step 5: Soon, the software starts the repair process automatically.
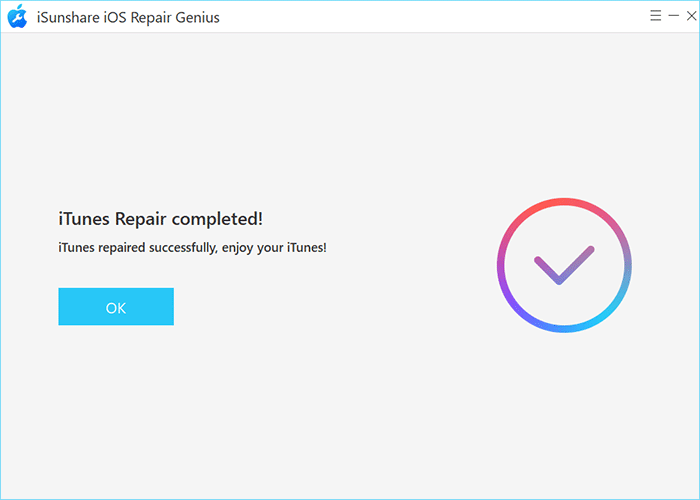
Step 6: You can see the iTunes Repair completed message on the software. Click OK to conclude the process.
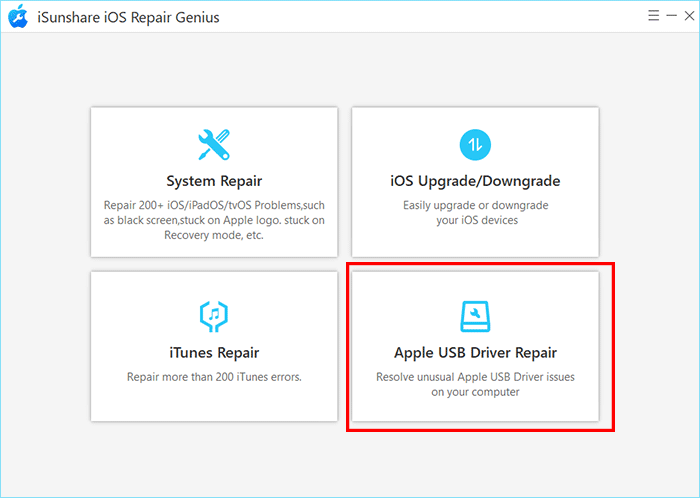
Part 6: Resolve Apple USB Driver Issues on Your Computer
If Apple Mobile Device USB Driver is corrupted or missing, your iOS device cannot be detected by the computer. How can you fix the Apple Mobile Device USB Driver issues? iSunshare iOS Repair Genius can repair it in a simple click.
Step 1: Open the software and choose Apple USB Driver Repair option.
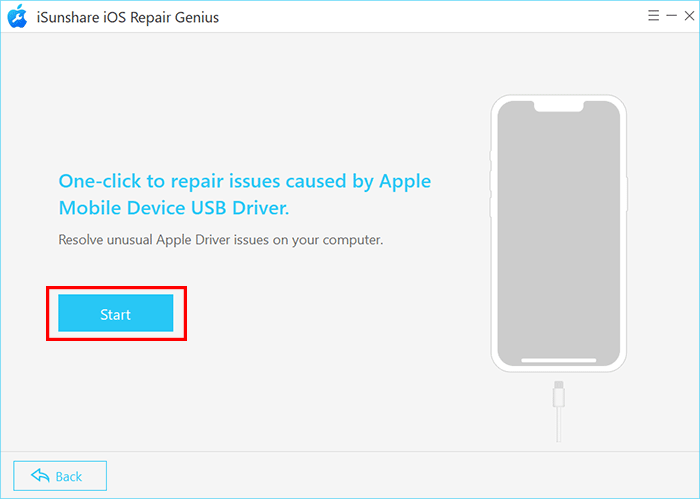
Step 2: Hit the Start button to fix Apple Mobile Device USB Driver back to normal.
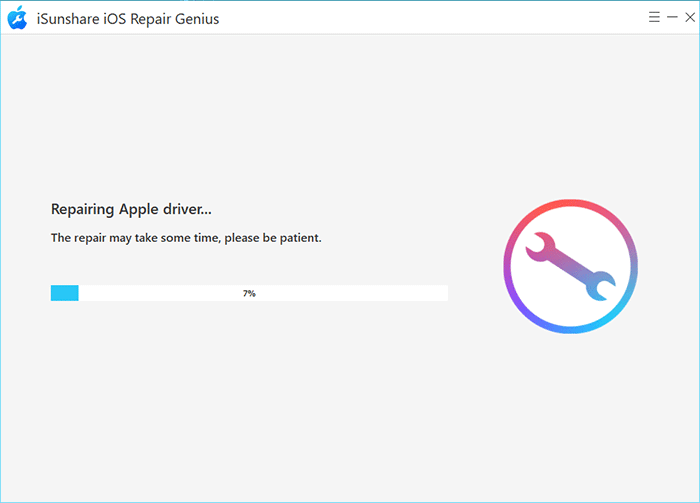
Step 3: The software is repairing the Apple Mobile Device USB Driver.
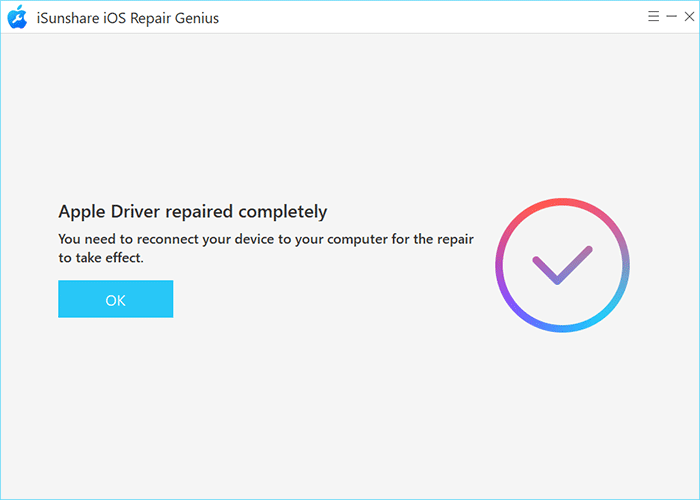
Step 4: The screen prompts that the repair process is completed. And you need to reconnect the iOS device so that the Apple Mobile Device USB Driver can work normally.