We use cookies for personalizing content and ads and providing social media features. Your usage information on our website will be used for social media, advertising, and traffic analytics, or shared with our partners. Clicking "Accept" means you agree to use our cookies .
Losing files from an NVMe SSD can feel catastrophic — especially when the drive is your primary system disk and the data you need has simply vanished. The good news is that in most cases, recovery is possible. The bad news is that the window of opportunity closes faster on NVMe drives than on any other storage device.
This guide walks you through everything you need to know: why NVMe recovery is uniquely challenging, which situations are recoverable, and the exact steps to get your files back.
Most people understand that recovering deleted files from a traditional hard drive is straightforward — the data stays physically on the disk until something new overwrites it. NVMe SSDs work very differently, and understanding why changes how you respond when data goes missing.
The TRIM Problem
NVMe drives use a background process called TRIM. Every time you delete a file, the operating system signals the SSD that those storage blocks are now free. Instead of waiting for new data to overwrite them naturally (as a hard drive would), the SSD immediately begins clearing those blocks so they are ready for future writes.
This means that on an NVMe drive, deleted data can be permanently erased within minutes — not hours or days. The longer you wait after discovering a data loss, the smaller your chances of recovery become.
Speed Works Against You
Part of what makes NVMe drives so fast — their direct PCIe connection to the CPU and multi-lane parallel write architecture — is exactly what makes recovery harder. Data operations happen at speeds exceeding 5,000 MB/s on modern drives. Background processes like Windows Update downloads, browser cache writes, and system logs can silently overwrite your deleted files before you even realize they are gone.
When Recovery Is Still Possible
Despite the challenges above, NVMe data recovery is absolutely achievable in the following scenarios:
Accidental file deletion— if caught early and TRIM has not yet cleared those blocks
Formatted partition — formatting rewrites the file system structure but often leaves underlying data intact
RAW or inaccessible partition— the drive is detected but the file system is unreadable
Virus or malware attack — files are hidden or flagged as deleted but not yet overwritten
Corrupted file system — caused by sudden power loss or improper shutdown
Accidentally deleted Recycle Bin contents — emptying the Recycle Bin does not immediately destroy data
Recovery becomes extremely difficult or impossible only in cases of physical hardware failure, severe controller damage, or when significant new data has already been written to the drive after the loss event.
Immediate Steps to Increase the Chance of NVME Data Recovery
To prevent the data loss, you should perform the below steps before trying the data recovery.
Step 1: Stop Using the Drive Immediately
The single most important thing you can do when you realize data is missing is to stop all activity on the affected NVMe SSD. This means:
- Do not save new files to the drive
- Do not install software on it
- Do not let Windows run updates on it
- If it is your system drive, try to minimize regular usage
Even browsing the internet or leaving applications open can trigger background writes that reduce your recovery chances. If possible, shut down the computer and plan your recovery steps before powering back on.
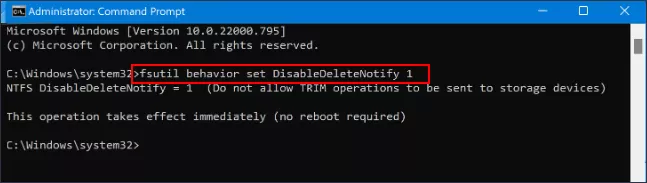
Step 2: Disable TRIM on Windows
Before scanning the drive, temporarily disabling TRIM gives you the best chance of finding recoverable data. Here is how to do it:
1. Press Windows + S, type cmd, right-click Command Prompt, and select Run as administrator.
2. Type the following command and press Enter:
fsutil behavior set DisableDeleteNotify 1
3. To confirm TRIM is now disabled, run:
fsutil behavior query DisableDeleteNotify
A result of **DisableDeleteNotify = 1** means TRIM is off. You can re-enable it after completing recovery with: fsutil behavior set DisableDeleteNotify 0
Note:
On macOS 11 (Big Sur) and later, Apple prevents users from disabling TRIM entirely. If you are on an older macOS version, run `sudo trimforce disable` in Terminal.
Methods to Recover Lost Data on NVME SSD
Method 1: Recover Data Using iSunshare BitGenius
iSunshare BitGenius is a Windows data recovery tool built to handle exactly these situations — accidental deletion, formatted drives, RAW partitions, and corrupted file systems across SSDs, HDDs, USB drives, and memory cards. It’s easy to scan and figure out loss files before recovering them.
iSunshare Reliable Data Recovery Software
Recover lost or deleted files like Words, photos and videos etc.
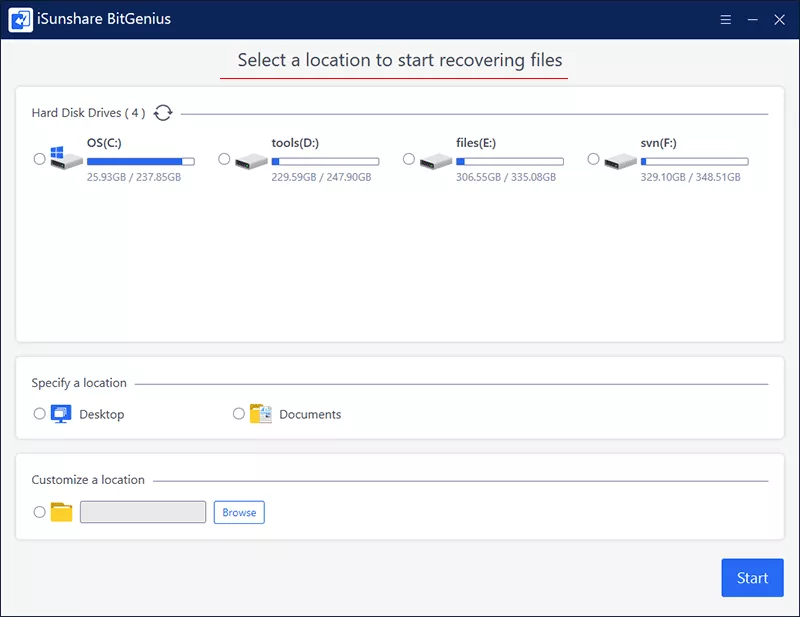
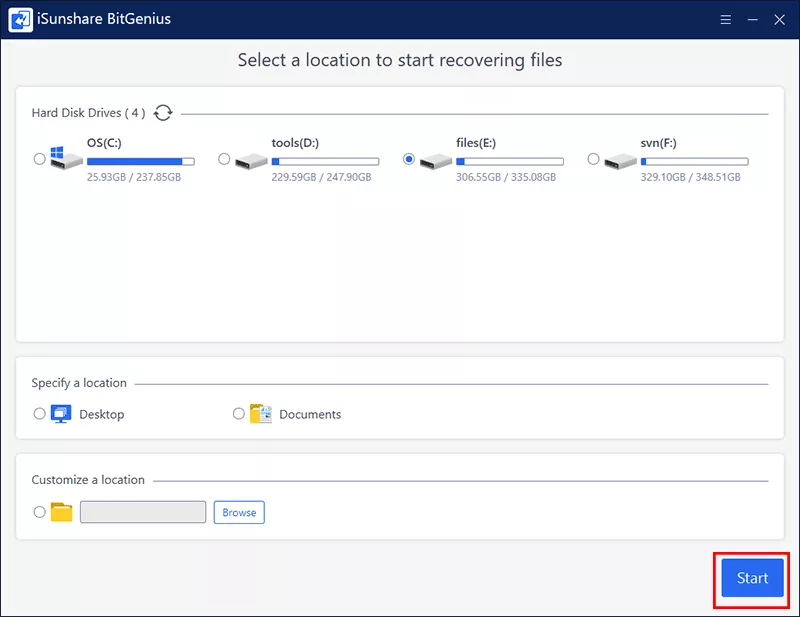
Launch BitGenius. The home screen displays all detected drives and partitions. Click on the NVMe SSD or the specific partition where your files were stored. If the partition is missing entirely, select the parent disk.
Step 2: Run a Scan
Click the Start button. BitGenius runs a quick scan first to find recently deleted files, followed by a deep scan that analyzes raw sectors for older or more deeply buried data. You can monitor progress in real time.
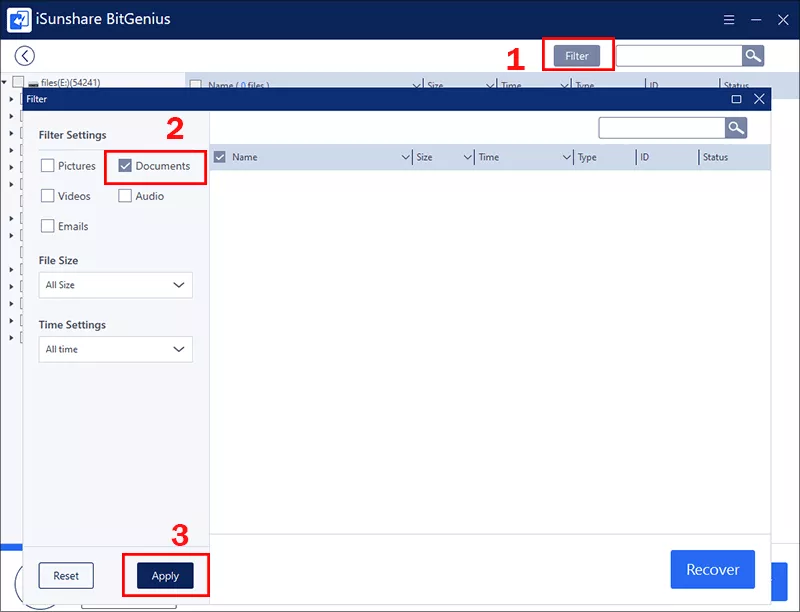
After the process, you can use the filter panel on the top right corner to narrow results by file type — Documents, Photos, Videos, Audio, and so on.
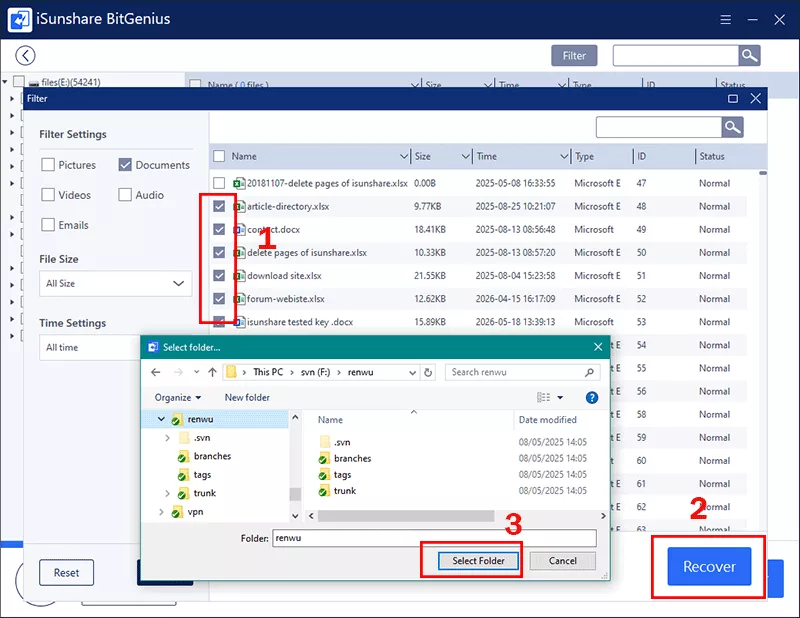
Step 3: Recover to a Different Location
Select the files you want to restore, click the Recover button, and choose a destination on a different drive — an external hard drive, USB stick, or another internal partition. Never save recovered files back to the same NVMe SSD you are recovering from. Doing so risks overwriting other files that have not yet been extracted.
Method 2: Use Windows Built-in Backup Options
If you had backups configured before the loss event, Windows has two native options worth checking.
Option 1: File History
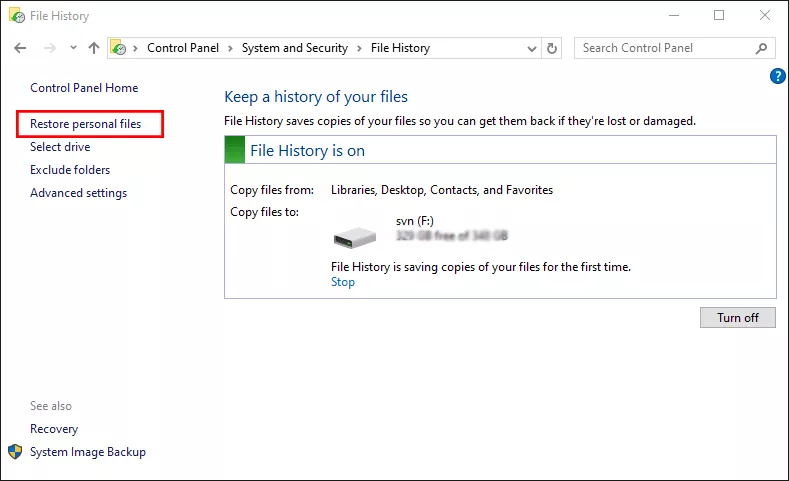
Windows File History automatically saves copies of personal files in libraries, the Desktop, Contacts, and Favorites folders. To check:
1. Go to Control Panel > System and Security > File History.
2. Click Restore personal files.
3. Browse available backup dates and restore the version you need.
Option 2: Previous Versions
Right-click any folder in File Explorer, select the Properties option, and open the Previous Versions tab. If System Restore was enabled, you may find earlier snapshots of folder contents here.
Note:
These options only work if they were configured before the data loss occurred — but they are worth a quick check before moving on.
Method 3: Call Professional Data Recovery Services
Professional data recovery services are the appropriate path when:
The NVMe SSD is not detected in BIOS or Device Manager
The drive makes unusual noises or behaves erratically when connected
The drive disappears intermittently under load (a sign of controller failure)
Water, heat, or physical impact has damaged the device
Professional labs use hardware-level tools that bypass the drive's controller and read raw NAND chips directly. This is expensive (typically $200–$1,500 depending on the complexity) but offers success rates of 70–95% even in severe cases where consumer software has no path forward.
Quick Tips to Maximize Recovery Success
Act immediately. Every minute the drive stays active after data loss is a minute TRIM and background processes have to erase your files. Speed matters more with NVMe than any other storage device.
Do not run multiple recovery scans. Each scan attempt involves read operations that can, in some edge cases, stress a failing drive further. Scan once with a capable tool, review the results thoroughly, and recover everything you need in one session.
Recover more than you think you need. Storage is cheap. If you are unsure whether a file is the right version or fully intact, recover it anyway and sort through later.
Set up backups before you need them. The real lesson every NVMe data loss story teaches is the same: automated, offsite backups are the only reliable protection. Windows File History, cloud sync services, and dedicated backup software all cost far less than a professional recovery service.
FAQs on NVME Data Recovery
Q1: Can you recover data from a dead NVMe SSD with software?
If the drive is completely undetected by Windows and BIOS, software tools cannot access it and will not help. You need a professional service. If the drive appears in Disk Management but shows as RAW or unallocated, BitGenius and similar tools can often recover the data.
Q2: How long does does NVMe SSD data recovery take?
The whole recovery process depends on the scan time. Scan times vary by drive capacity and the number of files. A 500 GB NVMe SSD typically completes a full deep scan in 20–45 minutes. Larger drives (1 TB and above) may take an hour or more.
Q3: How to recover data from NVMe SSD without software?
You can try manually restore the data backup via file history or previous versions if you have enabled them before the data loss.
Conclusion
Is NVMe data recovery possible? Most common NVMe SSD data loss (deleted files, formatted partitions, RAW drives, corrupted file systems) is recoverable. Act fast, avoid writing new data to the drive, and use an SSD-compatible recovery tool. iSunshare BitGenius lets you scan and preview files free before recovery. For unrecognized or physically damaged SSDs, seek professional recovery services.
Regular automatic backups remain the best way to avoid data recovery entirely.