We use cookies for personalizing content and ads and providing social media features. Your usage information on our website will be used for social media, advertising, and traffic analytics, or shared with our partners. Clicking "Accept" means you agree to use our cookies .
Deleting the wrong photo takes one click. Getting it back is usually possible too, because Windows does not erase the image data the moment you delete it. Whether you lost pictures from your Pictures folder, an SD card or a USB drive, the methods below run from the safest and simplest to the more technical, so you can stop once after you get back the photos.
Note:
Act fast and protect the drive. Stop saving, installing or downloading anything on the drive where the photos were stored. New data can overwrite deleted photos for good.
Do not save the photos to its original location or drive. Always choose a different drive as the destination.
If you just deleted the photos in File Explorer and have not done anything else with files, Windows can reverse the action.
Step 1: Head to the folder which your deleted photos were saved.
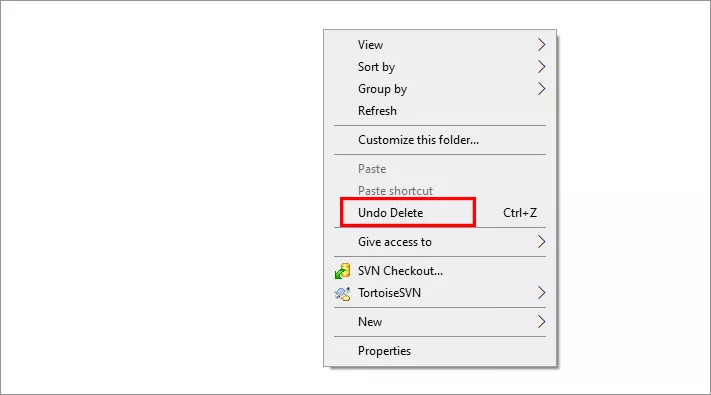
Step 2: Press Ctrl+Z. Alternatively, right-click an empty area of the folder and choose Undo Delete (click Show more options first if you only see the compact menu).
Step 3: Check that the photos have reappeared.
Method 2: Restore Photos from the Recycle Bin
Photos deleted normally from your PC's internal drive go to the Recycle Bin first.
Step 1: Double-click Recycle Bin on the desktop, or type "Recycle Bin" into the Start menu search.
Step 2: Find your photos. Sorting by Date deleted or Original location helps, and you can search by file name or extension such as .jpg.
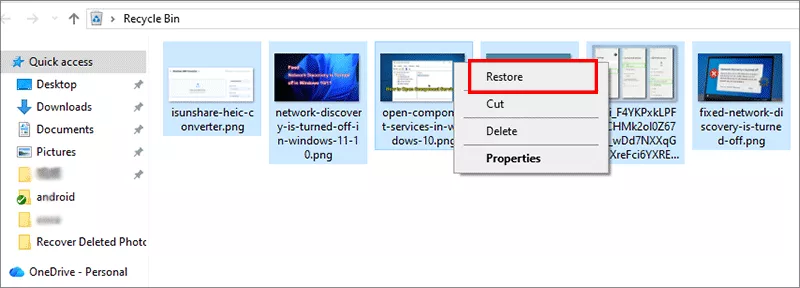
Step 3: Select the photos, right-click and choose Restore. They return to their original folder.
Photos that skip the Recycle Bin: files deleted with Shift+Delete, files deleted from USB drives, SD cards or network locations, and files too large for the bin. If you cannot find the photos from Recycle Bin, just move to other methods.
How long items stay: nothing is removed from the Recycle Bin until you empty it, it runs out of space, or Storage Sense (Settings > System > Storage) is set to clear it after 1, 14, 30 or 60 days.
Method 3: Use File History or Previous Versions
File History is not turned on by default in Windows 11, so this only works if you enabled it, or had restore points, before the photos were deleted.
Option A: File History
Step 1: Open Control Panel and go to System and Security > File History.
Step 2: Click Restore personal files in the left pane.
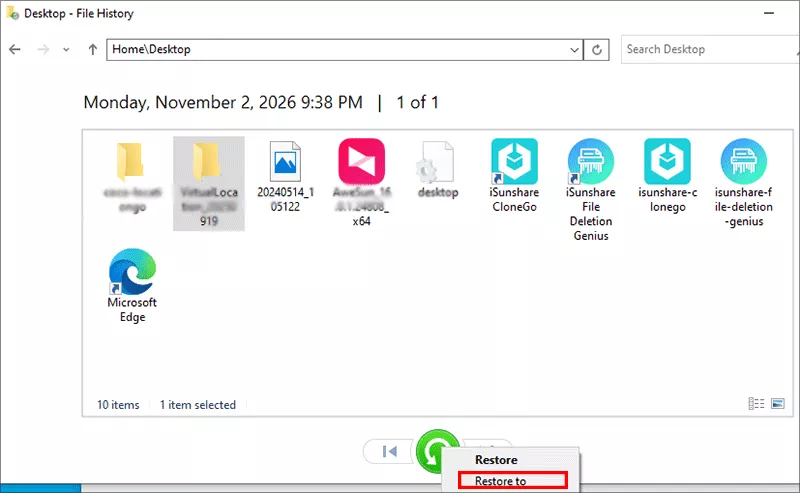
Step 3: Find where your photos were kept and right-click the Restore button on the bottom center, then choose Restore to retrieve the photo.
Option B: Previous Versions
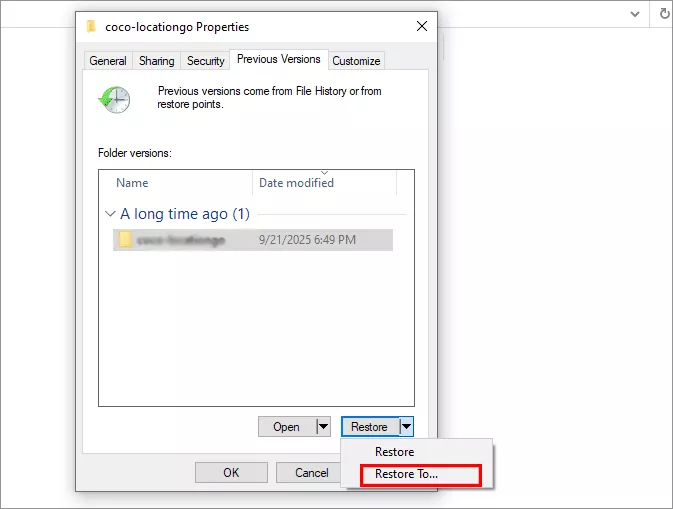
Step 1: Right-click the folder that contained the photos (not the photo itself) and choose Show more options > Properties.
Step 2: Hit the Previous Version tab and select your version which contains the deleted photos.
Step 3: Click Open to check it, then Restore or drag the photos out to a safe location.
Method 4: Restore from Backup and Restore (Windows 7)
Windows 11 still includes the older Backup and Restore tool. If you created a backup with it earlier, you can pull your photos back out.
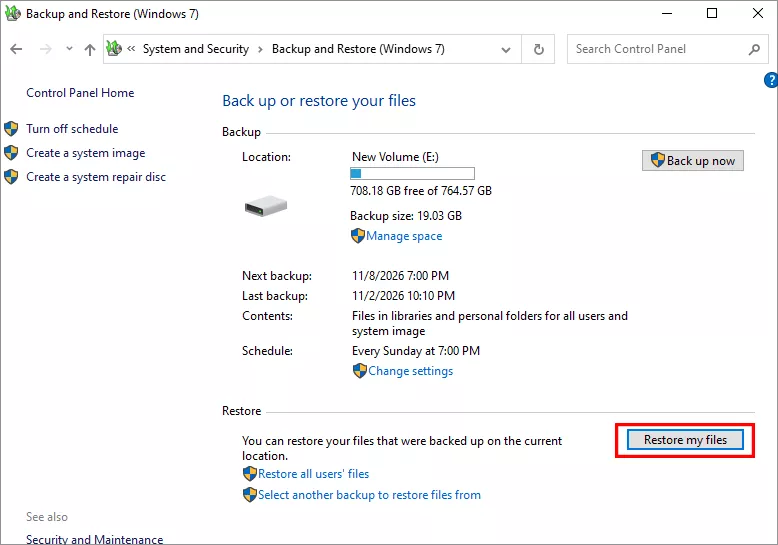
Step 1: Open Control Panel > Backup and Restore (Windows 7).
Step 2: In the Restore section, click the Restore my files button.
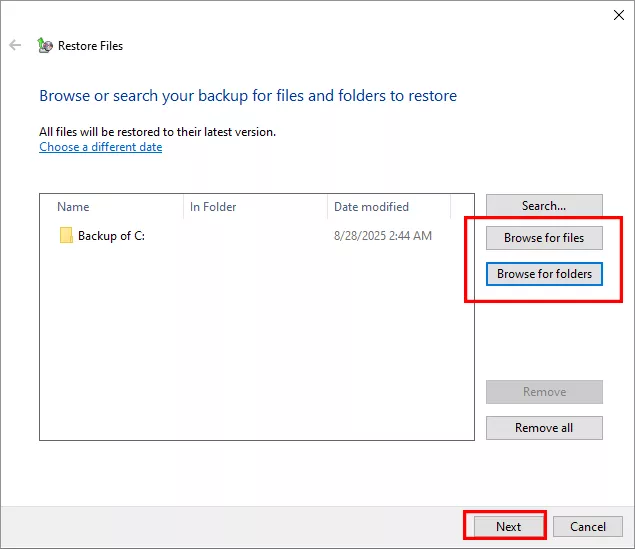
Step 3: Now click Browse for files or Browse for folders button. After that, click Next.
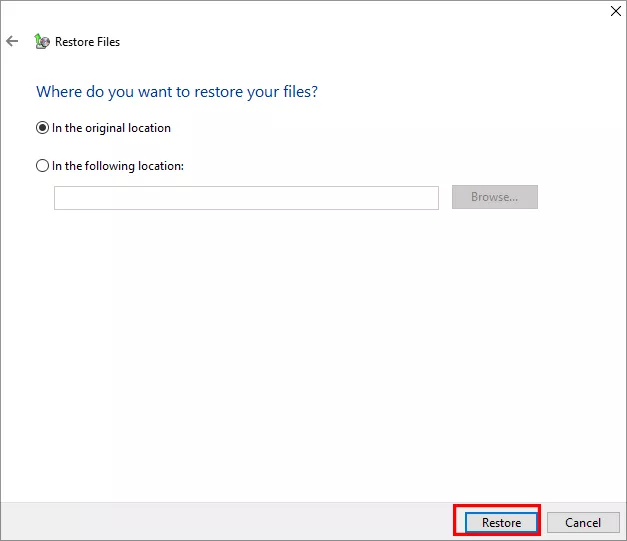
Step 4: Select the location to restore your files and click Restore. After that, your deleted photos would come back.
Method 5: Check OneDrive and Other Cloud Backups
If your Pictures folder was syncing to OneDrive, a copy may still be in the cloud even though it is gone from your PC.
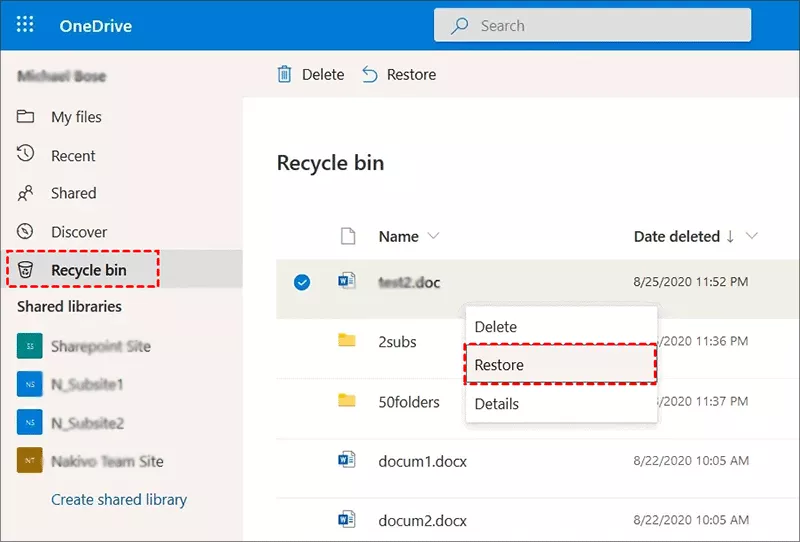
Step 1: Sign in to OneDrive in your browser and open Recycle bin in the left pane.
Step 2: Select the deleted photos and click Restore.
Step 3: Let OneDrive sync, and the photos will return to your PC.
Cloud trash has a limited lifespan. OneDrive typically keeps deleted items for 30 days on personal accounts, and Google Photos keeps trashed items for 60 days. Check these soon if you use either.
Method 6: Use Windows File Recovery (winfr)
Microsoft has released the free command-line tool to recover files. It needs no backup, but it has no preview window and you have to type commands carefully.
Step 2: Open it from the Start menu with Run as administrator.
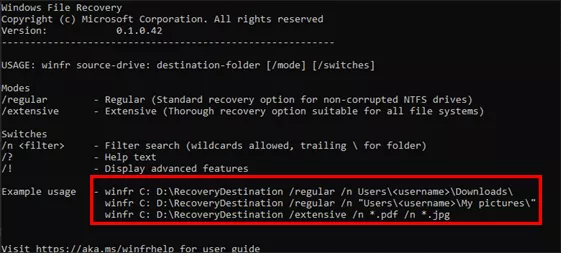
Step 3: Run a command in the format winfr source: destination: /mode /switches. The source and destination must be different drives. Examples are below.
Step 4: Press Y when asked to continue. Recovered files are saved to a Recovery_ folder (with the date and time) on the destination drive.
Regular mode suits recently deleted photos on an NTFS drive such as your C: drive:
Signature mode is for non-NTFS storage such as SD cards and USB drives formatted as exFAT or FAT32:
winfr E: D:\Recovered /x /y:JPEG,PNG
Method 7: Recover Photos with BitGenius
If you have no backup, the Recycle Bin has been emptied, or you want a visual scan instead of typing commands, data recovery software is the practical next step. iSunshare BitGenius scans a drive for deleted files that have not yet been overwritten and lets you restore the ones you need.
Step 1: Download and install BitGenius on a drive other than the one that held your photos.
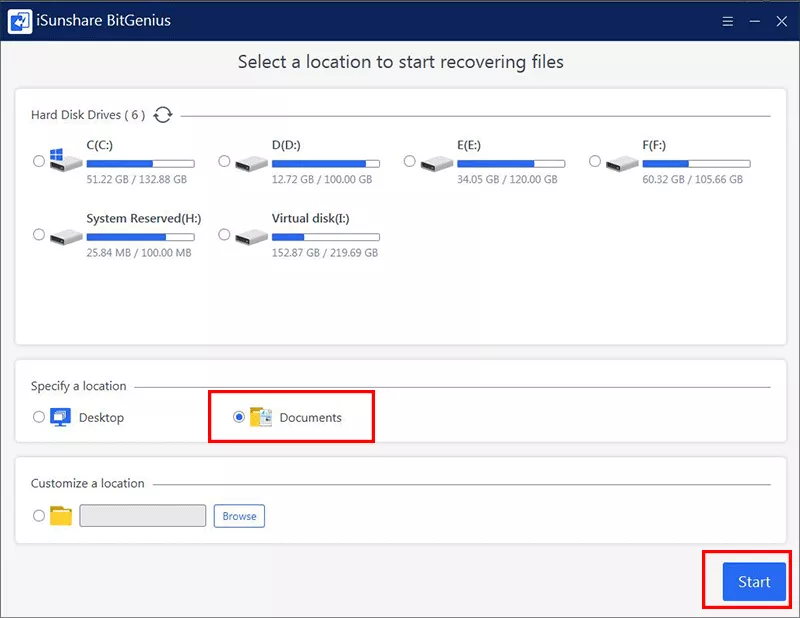
Step 2: Launch BitGenius and select the drive where the photos were stored. Then click the Start button.
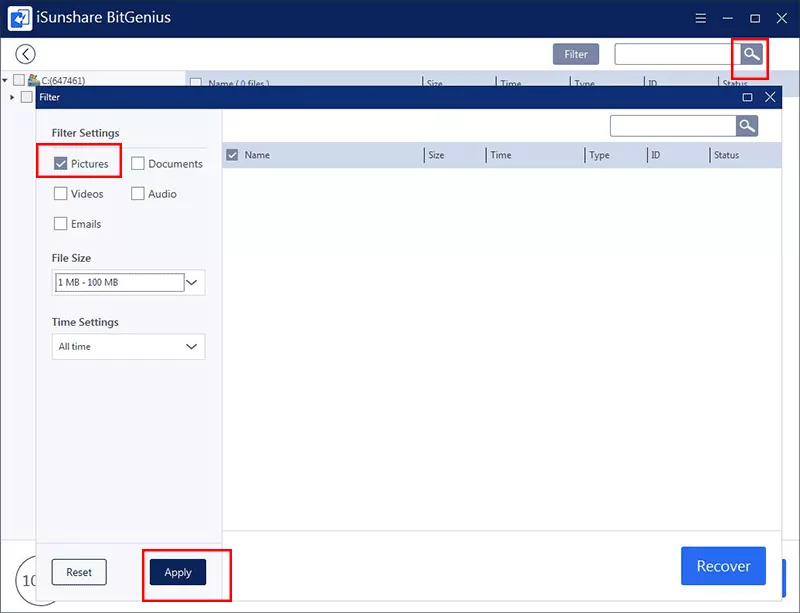
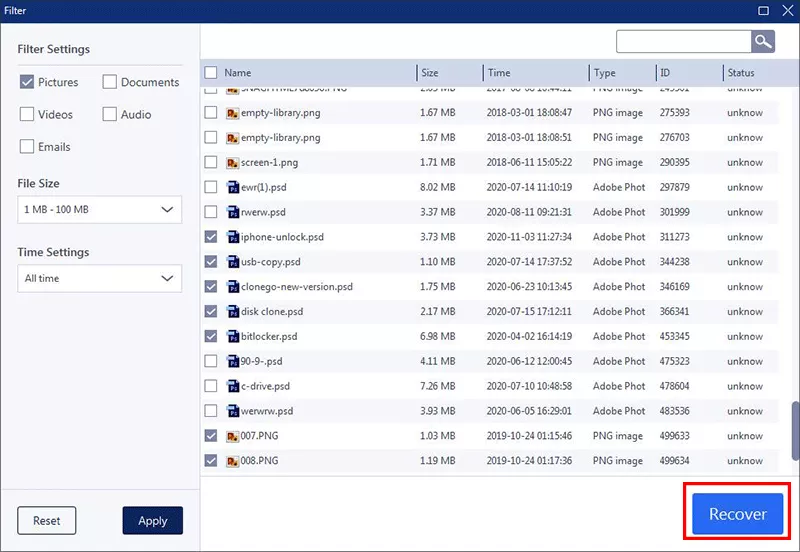
Step 3: Browse or filter the results for pictures. Then choose what you want.
Step 4: Choose your photos. Hit the Recover button and save them to a different drive, such as an external drive.
Comparison of the 7 Methods
Method
Works When
Setup Needed First
Difficulty
After Recycle Bin Emptied
1. Ctrl+Z
You just deleted the photos
No
Easy
No
2. Recycle Bin
Photos were deleted normally from the PC
No
Easy
No
3. File History / Previous Versions
File History or restore points were on
Yes
Easy
Yes
4. Backup and Restore
You made a backup earlier
Yes
Easy
Yes
5. OneDrive / Cloud
Photos synced and are within the trash period
Yes (sync)
Easy
Yes
6. Windows File Recovery
No backup, data not yet overwritten
No
Advanced
Yes, not guaranteed
7. BitGenius
No backup, data not yet overwritten
No
Easy
Yes, not guaranteed
Troubleshooting Common Problems on Photo Recovery
Problem
Likely Cause
What to Try
Photos are not in the Recycle Bin
Shift+Delete, removable drive, or bin already emptied
Check backups (Methods 3 to 5), then use Method 6 or 7.
File History shows no files or versions
File History was never turned on
Try Backup and Restore or OneDrive; otherwise use Method 6 or 7.
winfr will not run or reports an error
Not run as administrator, or source and destination are the same drive
Reopen as administrator and use a different destination drive.
winfr finds nothing on an SD card
Card is exFAT or FAT32, so regular mode does not apply
Use signature mode with /x /y:JPEG,PNG.
Recovered photos will not open or look corrupted
Parts of the photo were overwritten
Re-scan with a different method or tool; avoid writing to the drive in the meantime.
Nothing is found on an SSD
TRIM has already cleared the deleted data
Check backups and cloud copies; further scans are unlikely to help.
Thumbnails exist but the photo is gone
Thumbnails are small previews, not the original file
Treat the photo as deleted and use the methods above.
FAQs on Deleted Photos Recovery on Windows 11
Q1: Where do permanently deleted photos go on Windows 11?
They aren't moved anywhere. When a photo is permanently deleted, Windows marks the space it occupied as available, but the image data usually stays on the drive until new data overwrites it. That is why recovery is often possible, and why you should stop saving files to that drive right away. On SSDs, the TRIM feature can clear that space sooner, so recovery is less likely.
Q2: Can I recover permanently deleted photos without software?
Yes, if a copy exists. Check the Recycle Bin, File History or Previous Versions, Backup and Restore, and cloud services such as OneDrive or Google Photos. If you have no backup, Microsoft's free Windows File Recovery tool can sometimes recover photos without third-party software, but it runs from the command line and offers no preview.
Q3: How long does Windows 11 keep deleted photos in the Recycle Bin?
Photos stay in the Recycle Bin until you empty it, until the bin runs out of space and removes older items, or until Storage Sense (if you have turned it on) clears them after a set number of days. Storage Sense offers 1, 14, 30 or 60 days.
Q4: Can I recover photos after emptying the Recycle Bin?
In many cases, yes. Emptying the Recycle Bin removes the entries but not necessarily the photo data. Restore from a backup or cloud copy if you have one. Otherwise, run Windows File Recovery or a recovery tool such as BitGenius before the space is overwritten.
Q5: Why should I recover photos to a different drive?
Saving recovered files to the same drive can overwrite the very data you are trying to recover, including photos you have not restored yet. Always send recovered photos to a different drive, such as an external drive or another partition.
Conclusion
Start with the simple fixes, since Ctrl+Z, the Recycle Bin and your backups cost nothing and carry no risk. If none of them bring your photos back, Windows File Recovery or BitGenius can scan for deleted files that have not yet been overwritten. In every case, stop writing to the affected drive and save recovered photos somewhere else.