We use cookies for personalizing content and ads and providing social media features. Your usage information on our website will be used for social media, advertising, and traffic analytics, or shared with our partners. Clicking "Accept" means you agree to use our cookies .
Here, you will not only get the step-by-step tutorial on how to copy, backup and restore Windows system or the partition with CloneGo, but also learn the way to use CloneGo to clone the whole drive in Windows.
Before you launch this cloning software, you should connect an external hard drive with enough space and select its volume as the target partition of the system or set an empty volume (target partition) to store the copied partition. It would be better if you choose a volume in the new SSD/HDD as the target partition.
Step 1: Click Copy in the left panel of the interface.
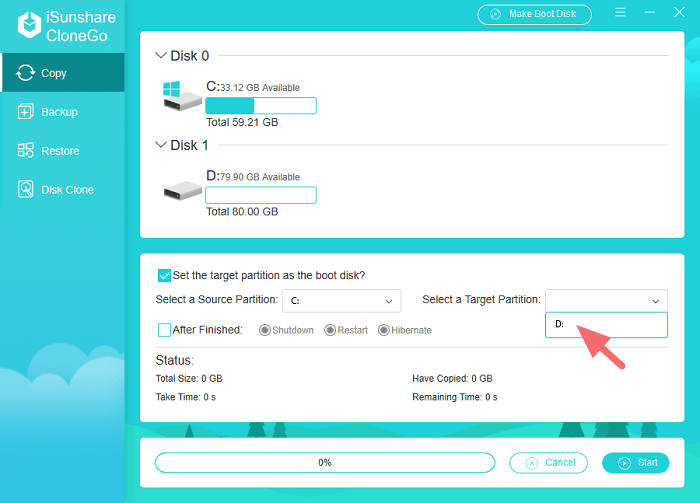
Step 2: Select the source partition which is a non-system partition or the Windows OS partition (it's usually the local disk C) to copy in the Select a Source Partition option.
Step 3: Choose a partition of your SSD/HDD as the target partition to store the copied system or partition. As CloneGo will format the selected target, you have better backup the partition data in advance.
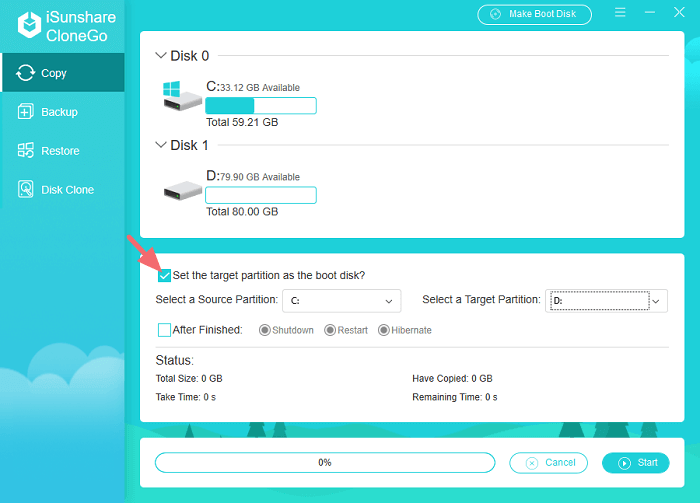
Step 4(optional): If the source partition is the system volume, you can check the box of Set the target partition as the boot disk to make the target partition bootable. If the source partition is not, you can skip to step 5.
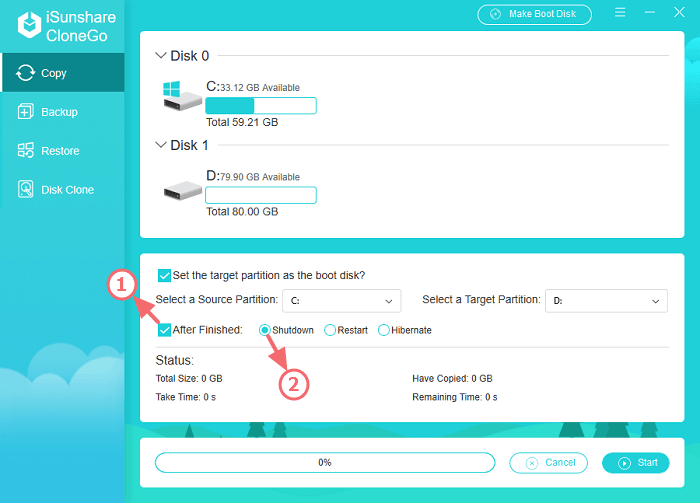
Step 5(optional): Set your computer to shutdown/restart/hibernate after the copy operation is finished by checking After Finished > selecting the related option.
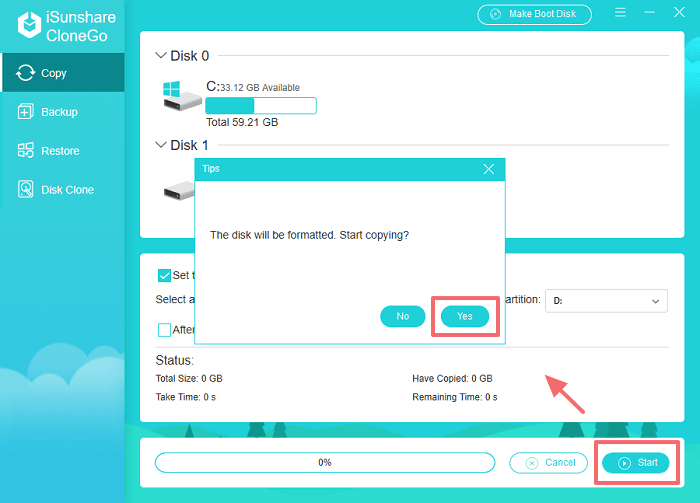
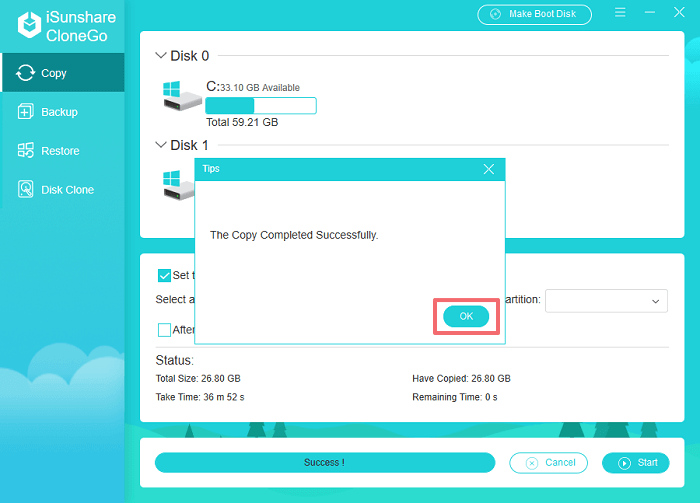
Step 6: Click Start button in the lower right corner of the interface and tap Yes when a small window is popped out to ask for your confirmation.
Step 7: Hit OK when a pop-out window is shown to tell you that the operation is finished. To run the copied system (Option-Set the target partition as the boot disk has been checked before), you can set the current computer or another laptop to boot from the SSD/HDD in the boot menu or the computer setup program(BIOS/UEFI). Or you can connect the SSD/HDD to other PCs to view and use the content of the copied partition/system.
2. How to Backup and Restore Your Windows System or Partition
Guide to Backup Windows System or Partition
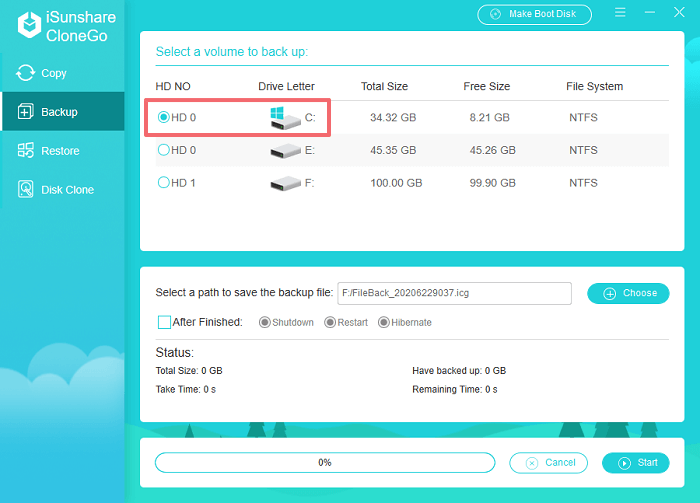
Step 1: Choose Backup in the left function menu.
Step 2: Select a partition or the Windows system ( the partition with the Windows logo ) to backup under the Select a volume to back up option.
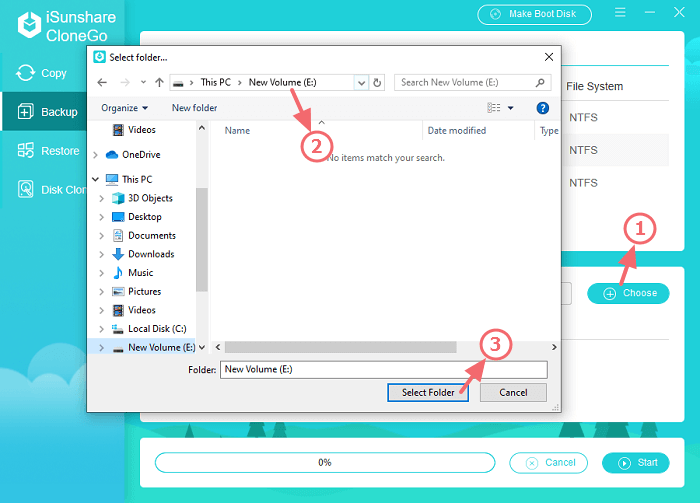
Step 3: Click the Choose button at the end of Select a path to save the backup file and choose a large enough partition or a specific folder in the partition to save the backup file.
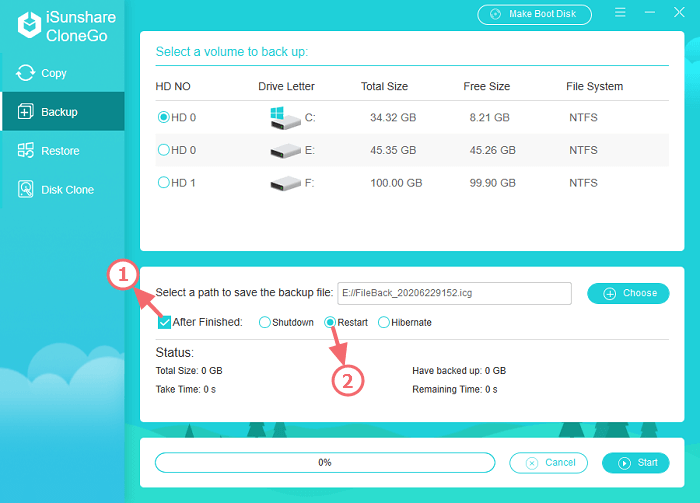
Step 4(optional): Check After Finished and select its option to make your computer shutdown/restart/hibernate when the backup process ends.
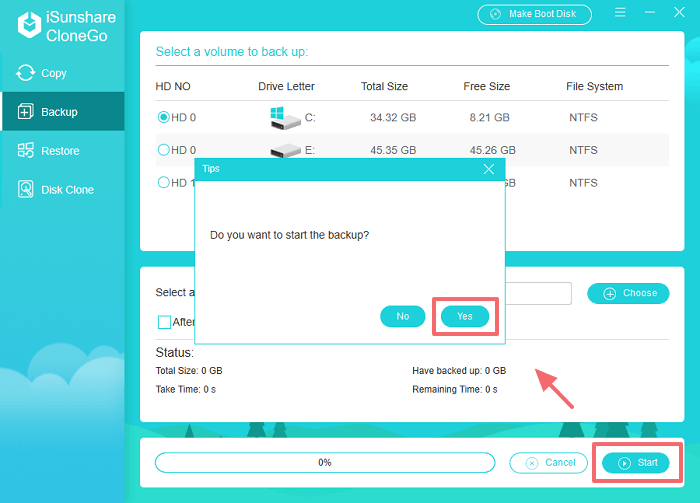
Step 5: Click Start button in the lower right corner of the interface and tap Yes when you see the pop-out: Do you want to start the backup.
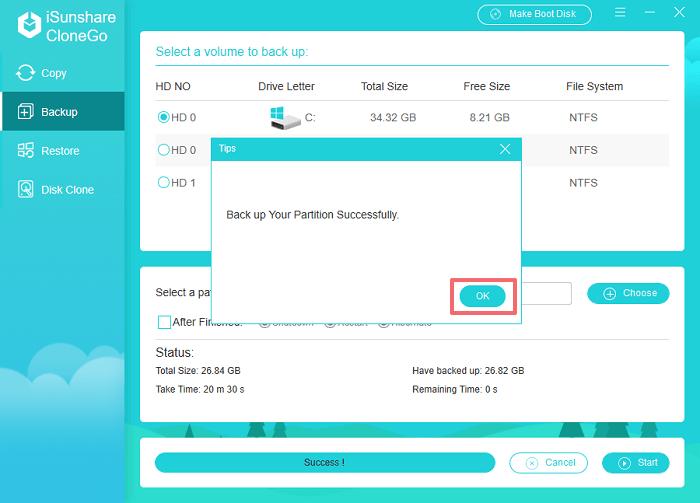
Step 6: Hit OK when the backup process is finished. It means that the partition or Windows system has been backed up successfully. But if you want to run it, you need to restore the icg file firstly.
Steps to Restore the Backup Windows System or Partition
To restore the backup Windows system, the restoration destination must be the partition of another disk(e.g. an external SSD). It is better for you to choose the empty partition in the new hard drive as the restore operation will format your restoration destination at first.
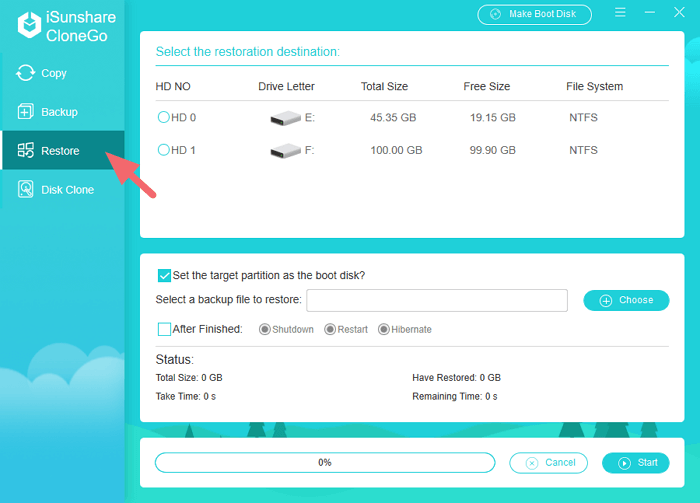
Step 1: Access the Restore function by clicking it.
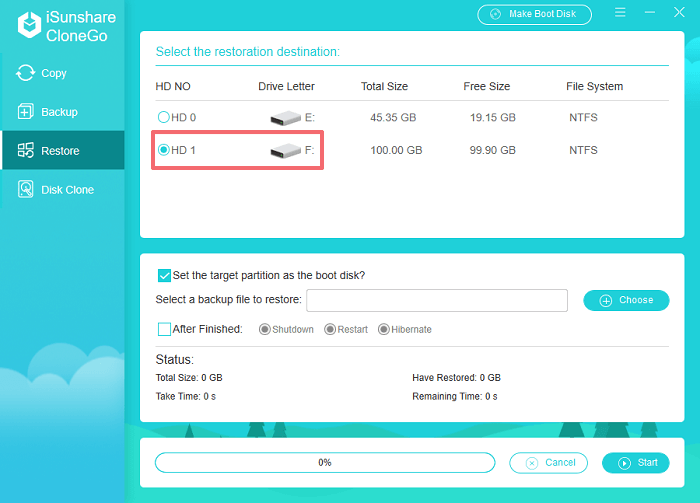
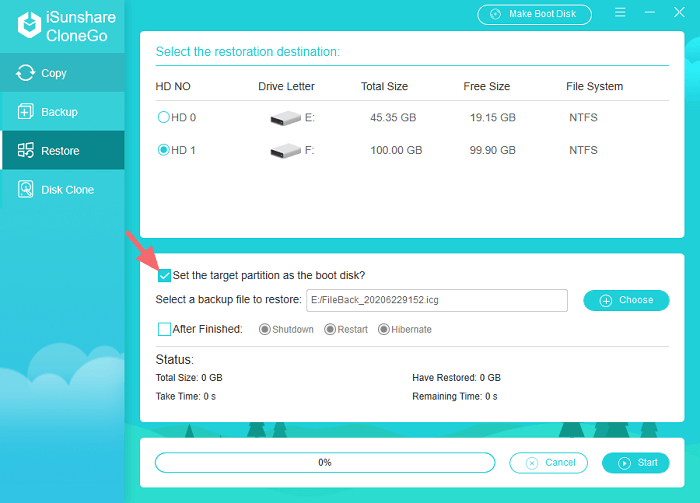
Step 2: Select a partition with enough space as the restoration destination of the backup file under the Select the restoration destination option.
Note:
The restoration destination for the backup partition can't be the partition where the current operating system is installed or the partition that the backup file is saved in.
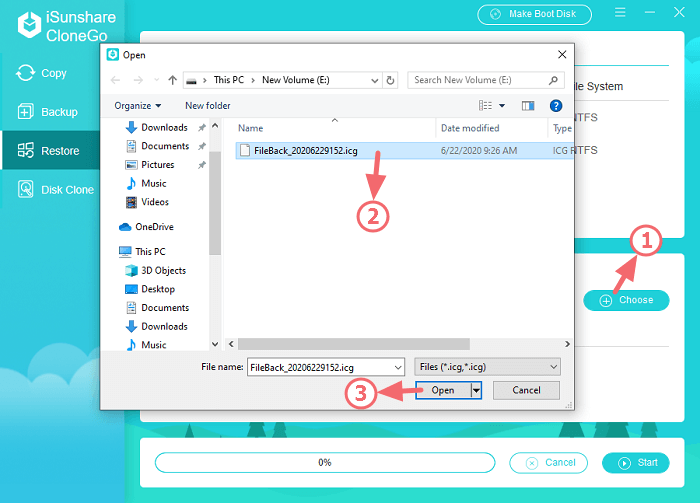
Step 3: Open the image file you backed up before to restore by clicking the Choose button to import the icg file directly.
Step 4(optional): When you need to restore the system backup, it's available to make the restoration destination bootable by choosing Set the target partition as the boot disk.
Step 5(optional): Choose what the software does after it completes the restoration: shutdown your PC, restart the computer or put your device into hibernate mode.
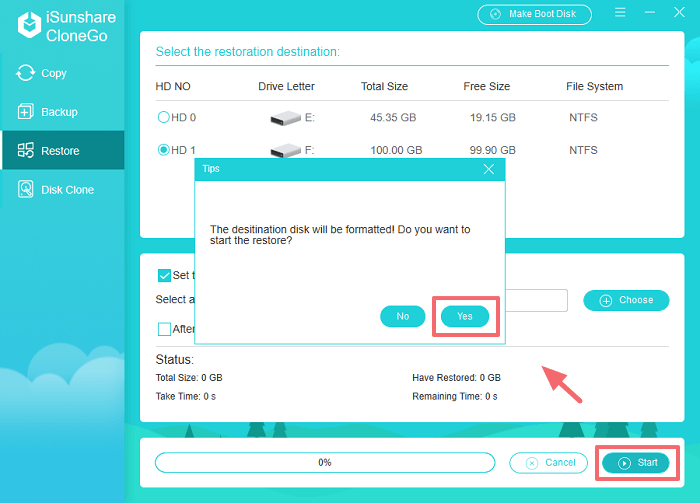
Step 6: Click Start button and hit Yes to allow the software to format the destination disk for restoring the backup.
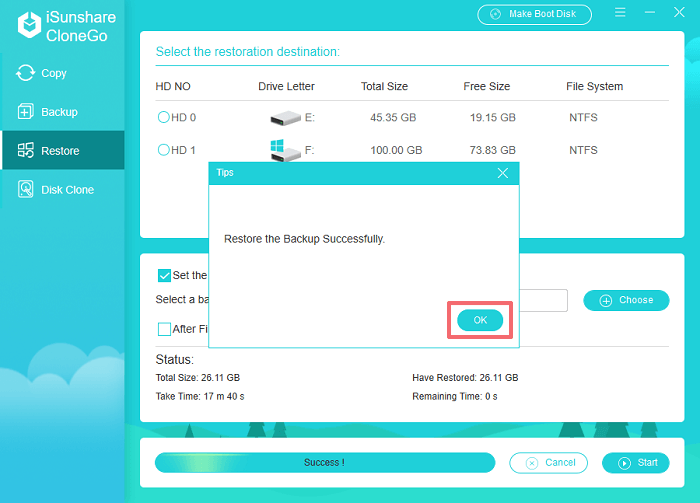
Step 7: When the restoration is done, you will get a successful notification. At that time, you can go to check the backup system or partition.
Tips: If you had selected Set the target partition as the boot disk before restoring the system backup, you can operate the system by accessing the boot menu or BIOS/UEFI wizard firstly and then configuring the target disk as the boot option.
3. Clone the Whole Disk to another Larger Disk
Firstly, build a right connection between the larger drive like SSD and your Windows computer. If the larger drive is not empty, you are highly suggested to back up its data because it will be overwritten during the cloning process.
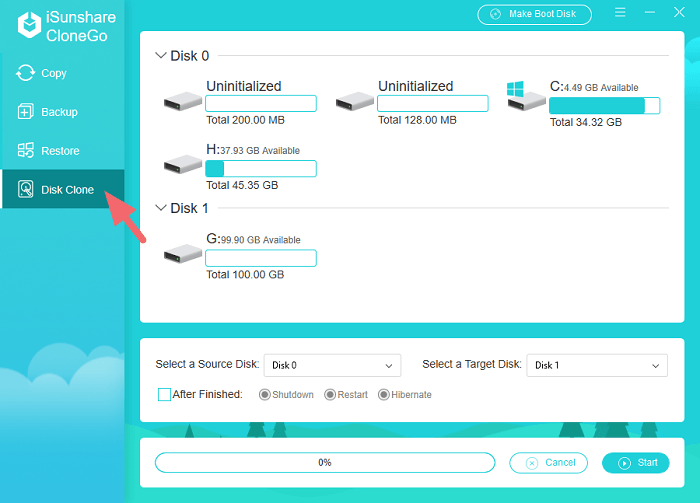
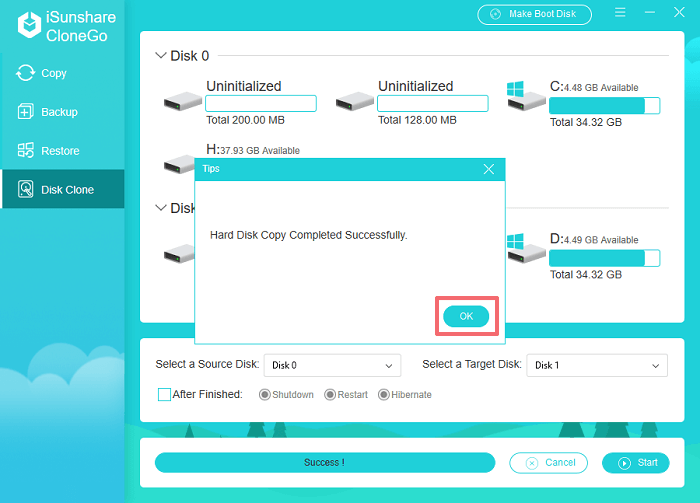
Step 1: Switch to Disk Clone section on the software screen.
Tips: Under the source disk(Disk 0 here), you can see 2 uninitialized partitions which are the hidden volumes of the Windows OS.
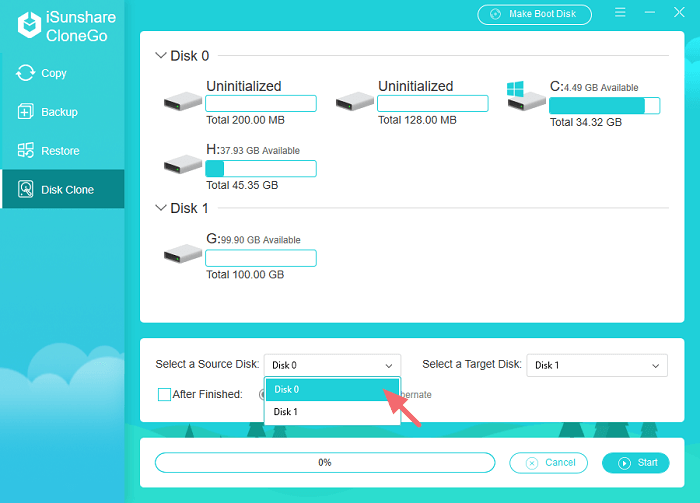
Step 2: Click the down arrow of Select a Source Disk to choose the wanted entire disk to clone.
Step 3: Choose the connected drive as the target disk, which is used to save the cloned drive later.
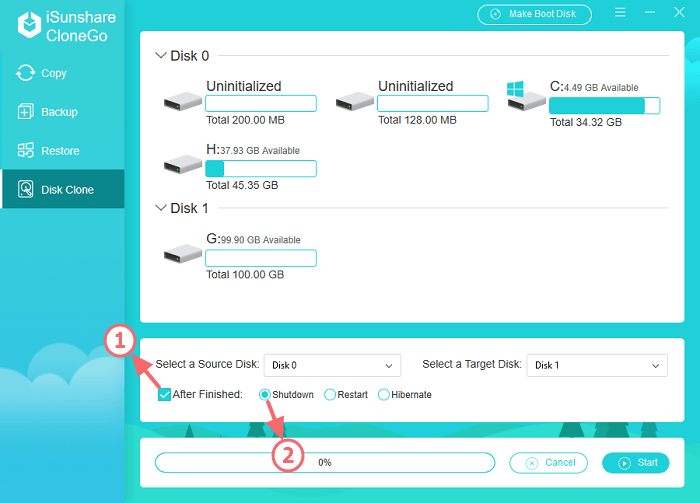
Step 4(optional): It's available to shutdown, restart or hibernate your PC after cloning with 2 steps in the following screenshot.
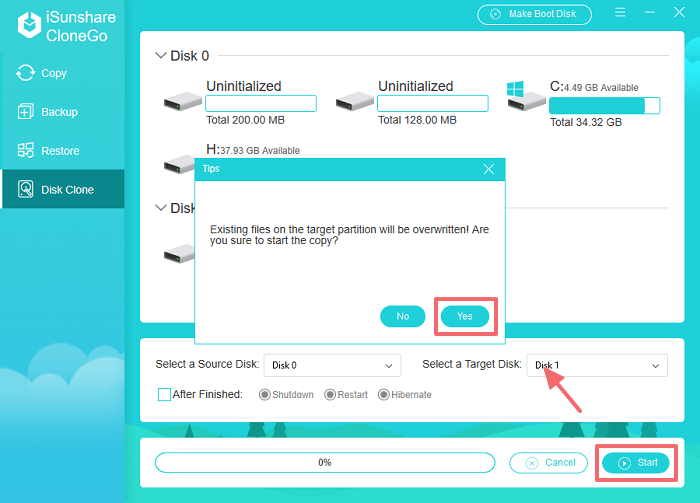
Step 5: Click Start button in the lower left corner of the interface to get a prompt which informs you the target partition will be overwritten and choose Yes to move on.
Step 6: Hit OK in the successfully-clone box and you can set your computer to boot from the larger drive now.
Note:
If the cloned disk is a dynamic one, the source target and destination target cannot be shown in your computer at the same time. Furthermore, some partitions in the target disk may not work normally when the source target is a dynamic disk.
With CloneGo, it's easy and convenient to copy, backup and restore Windows system/the partition data or clone the entire disk in Windows. Why not download and try it now?
4. Create WinPE to copy, backup and restore Windows partition
You can create WinPE with USB on any Windows computer so as to boot another computer in PE mode. After that, you can use iSunshare CloneGo to copy, backup and restore the Windows data without logging in.
Solutions to the cloned system error in Windows computer
Fixed— the Cloned Windows 10 not Shut Down Properly
If you use the cloned system and can not shut it down properly, you can try the following operations.
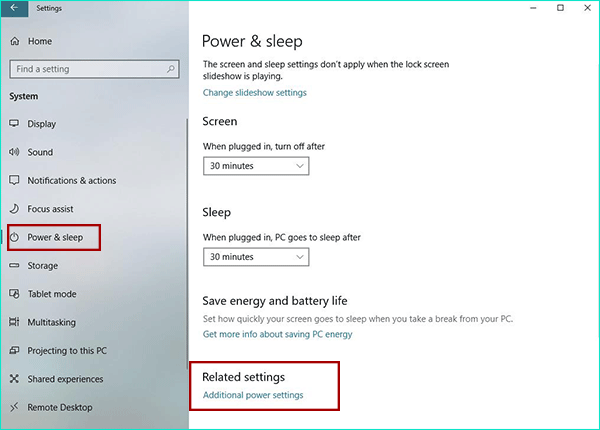
1. Go to access Windows Settings > System > Power & Sleep > Additional power settings.
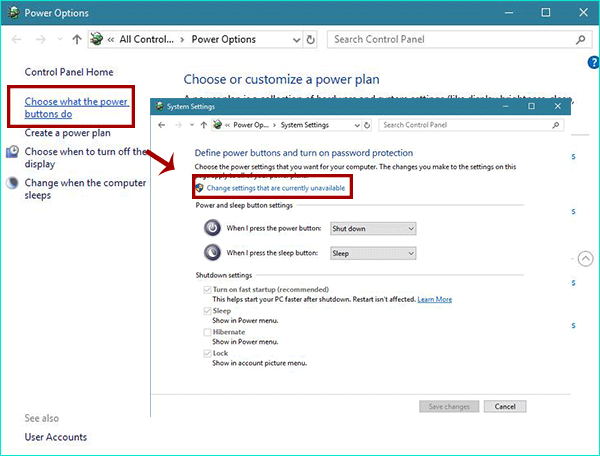
2. Click Choose what the power button does, then in this window, you need to click Change settings that are currently unavailable.
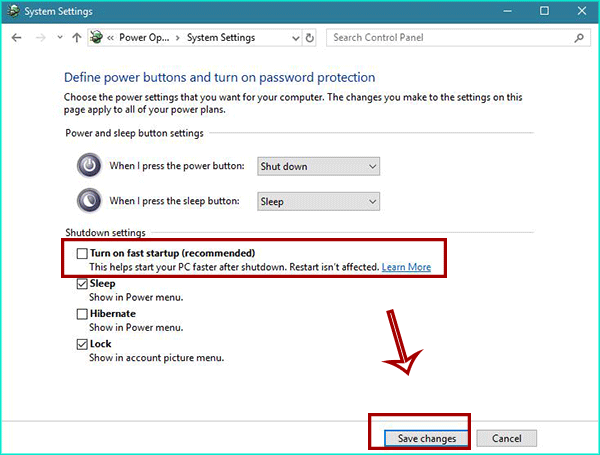
3. Uncheck "Turn on fast startup" and then select "Save changes".
4. Shut down the PC to check whether the issue has been fixed or not.
The Cloned System Needs to Reactivate, What to Do?
If you cloned the Windows system to another hard drive (HDD/SSD), and you ran the computer from the HDD/SSD for a long time, everything works normally but it asked you to reactivate the system one day, what would you do?
Sometimes, after the hardware change, you need to verify that your copy of Windows is genuine so that you are required to reactive Windows to get it run normally. To solve this issue, you can find answers from Windows official site: Windows 10 reactivating after hardware change.
What's the Next?
Get CloneGo full version to copy, backup or restore the partition and Windows system.