We use cookies for personalizing content and ads and providing social media features. Your usage information on our website will be used for social media, advertising, and traffic analytics, or shared with our partners. Clicking "Accept" means you agree to use our cookies .
Since the iOS15/16 internal mechanism adds Apple's SSV (Signed System Volume), which means its file system does not allow writes, the iPhone jailbreak for iOS15/16 differs from all the previous ones. When going from iOS 12 to iOS 14.8, you just need to use checkra1n or checkn1x jailbreak after that you can get unlimited access.
There are two types of iOS15/16 jailbreak: rootful and rootless, as rootless has fewer permissions to operate, in order to be available for mounting as read/write and bypass activation locks, now you need to use rootful and create the fakeFS file system. Today in this guide we are going to share new tutorials about iOS 15/16 jailbreaks.
Win 11 Pro x64 (UEFI+GPT). The Motherboard's UEFI is enabled for secure boot.
Notes:
1. Do not run the program on a virtual machine or it will cause the iPhone jailbreak to fail.
2. It is best to perform iOS 15/16 jailbreak on a computer with Intel or other CPU.
3. Turn off the device lock screen password and don't set any password for your iPhone.
4. 16GB capacity of the iPhone/iPad neet to choose to create BindFS, but BindFS does not support iOS16 or above.
5. Supported iPhone devices and systems: arm64 devices on iOS 15.0-16.7.
Way 1: Jailbreak iPhone iOS 16/15 with Palera1n [Free]
If you are searching for a free way to jailbreak the iOS 15/16 devices, you can try Palera1n free tool. But the process will be a little complicated and costs time if you are not good at this.
Get the tools ready: Palen1x and Ventoy. Besides, you need the USB disk.
Step 1: Download the palen1x image and Ventoy program file
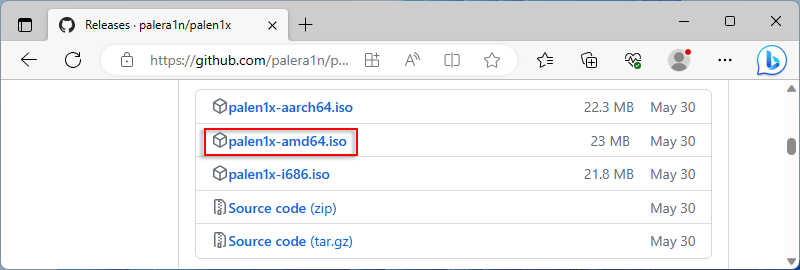
1. Click on the link and then click on the "palen1x-amd64.iso" option to download the file to D drive or other drive.
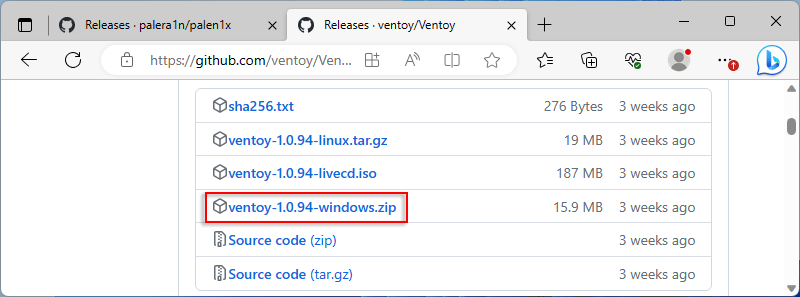
2. Visit this site on your browser and click on the "ventoy-1.0.94-windows.zip" option to download the Ventoy program tarball to your D drive or other drive.
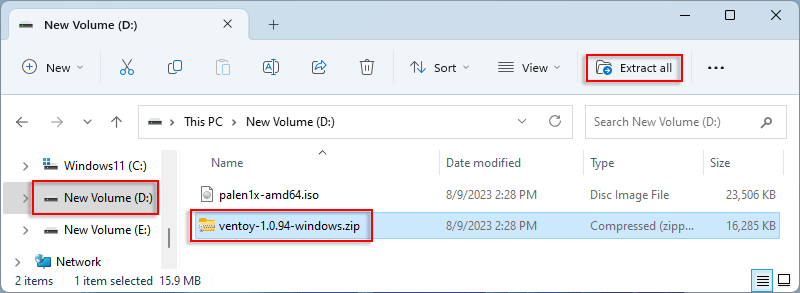
3. Extract the Ventoy program zip archive. Open the D drive in File Explorer, then select "ventoy-1.0.94-windows.zip" and click "Extract all" in the taskbar.
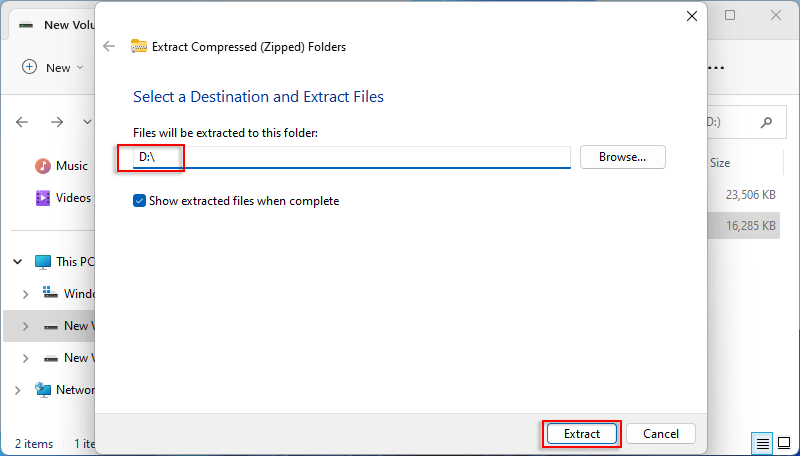
4. Modify the decompression path to: D: \, and then click "Extract". Wait for the file decompression to complete.
Step 2: Burning a USB flash drive
Plug a USB flash drive into your computer and use ventoy to burn "palen1x-amd64.iso" to the USB flash drive to support UEFI secure boot, both UEFI and BIOS boot.
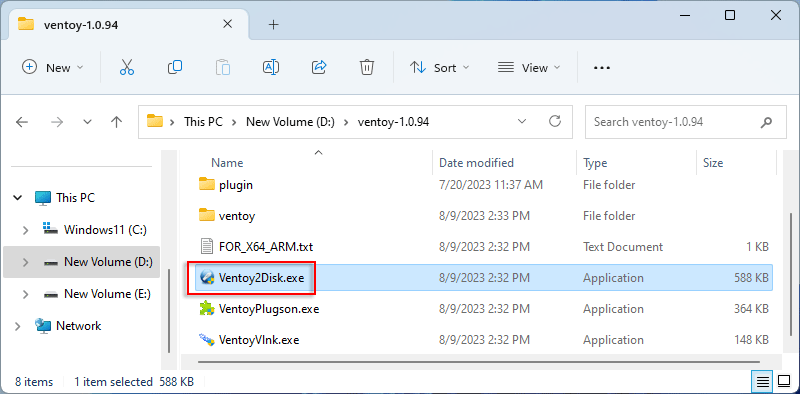
1. Plug in a USB flash drive on your computer and open the "ventoy-1.0.94" folder, then run the "Ventoy2Disk.exe" program.
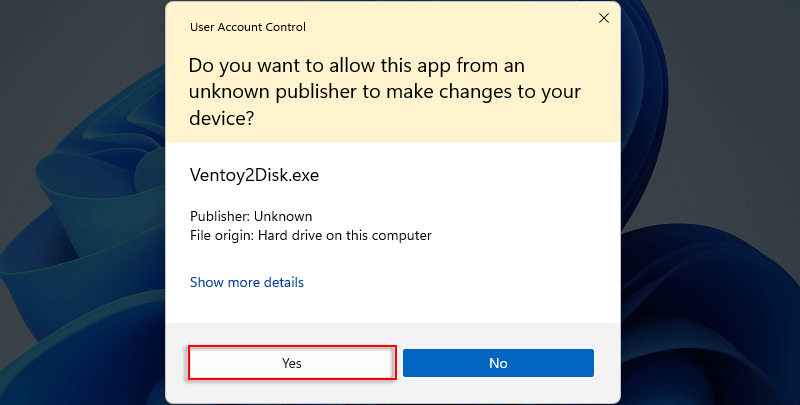
2. Click "Yes" to allow the running program to make changes to the device.
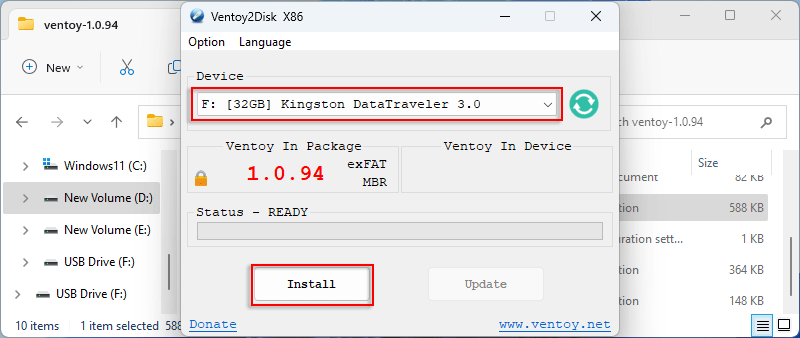
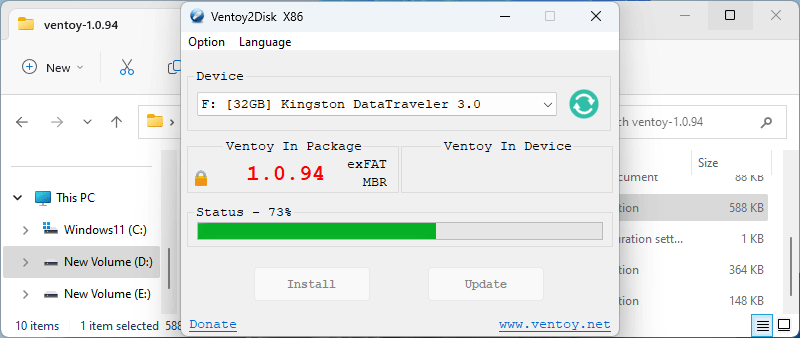
3. The Ventoy use the default mode: enable secure boot support, format the USB flash drive as MBR, the partition where the ISO file is stored as exFAT. Select the USB flash drive and click "Install".
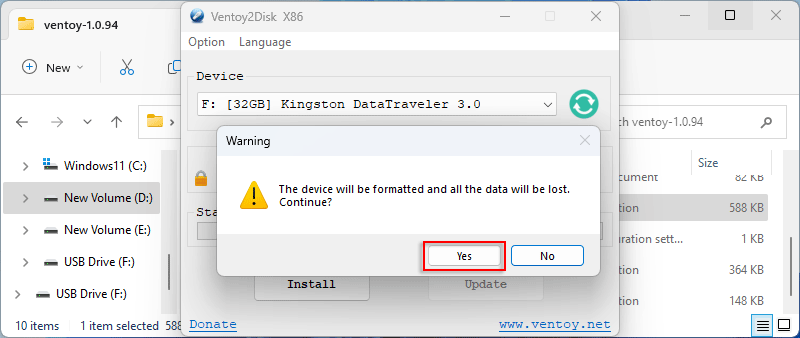
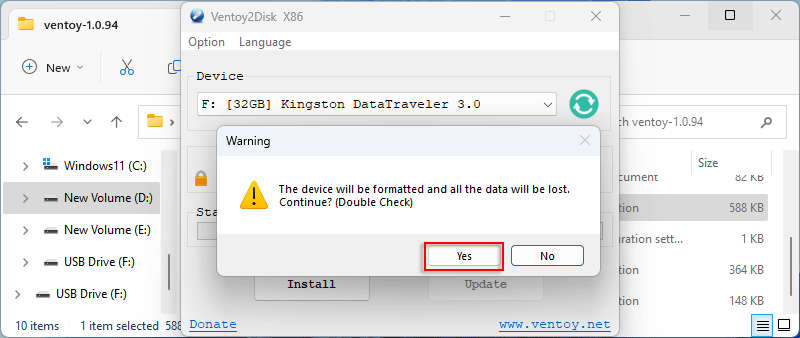
4. Click "Yes". Note that this action will delete all data on the USB flash drive.
5. Click "Yes" again to double check.
6. Start the installation.
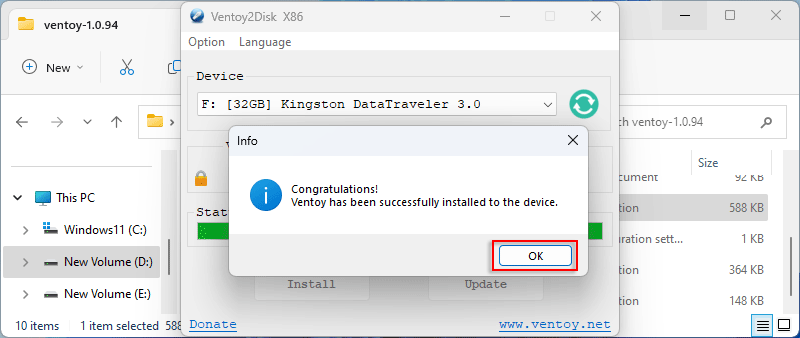
7. After completing the installation, click "OK" and close the program.
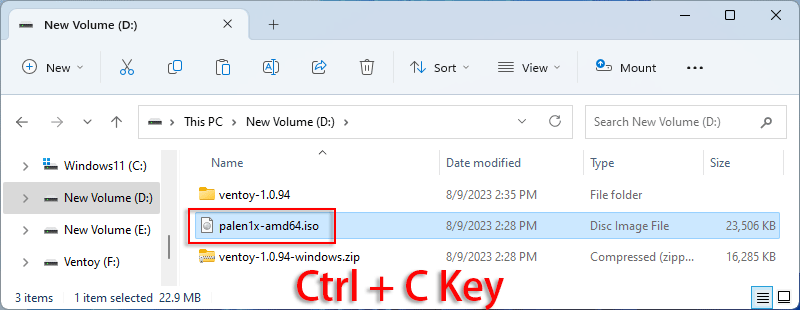
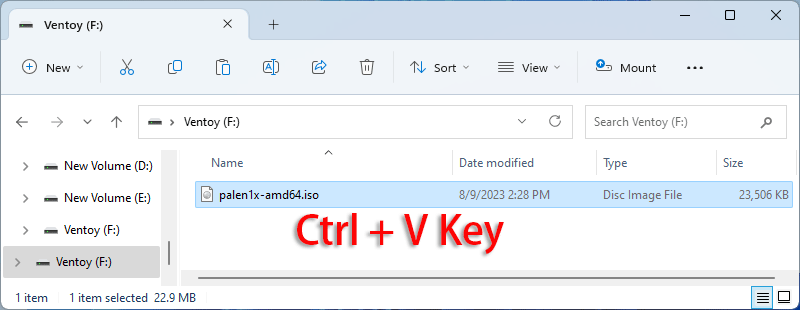
8. Select palen1x-amd64.iso on D drive and press "Ctrl+C" on your keyboard to copy the file.
9. Open a folder named "Ventoy" in the F drive and press "Ctrl+V" to paste the palen1x-amd64.iso image file. The process of burning the palen1x-amd64.iso image file to a USB flash drive is complete.
Part 2: Jailbreak the iPhone/iPad with USB Drive
Step 1: Enter BIOS menu and boot from USB flash drive to palen1x
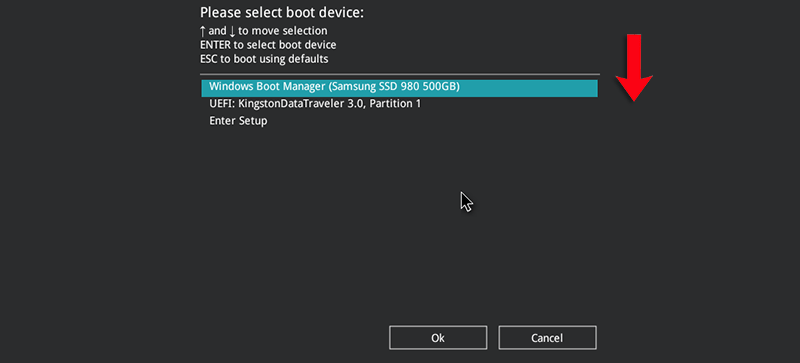
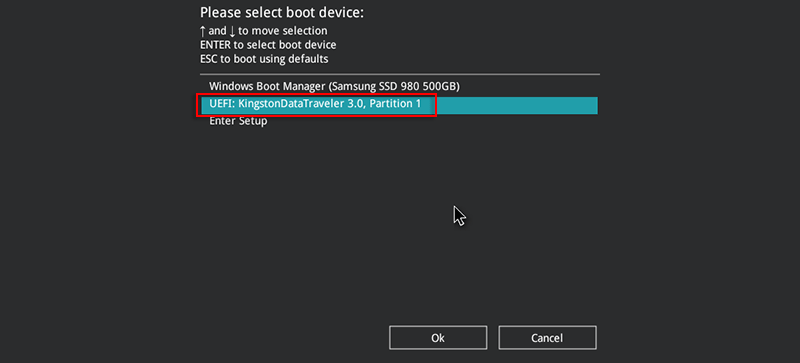
1. Quickly press the "F8" key or "F12" key shortcut (depending on your computer model) after your computer reboots, and press the up and down arrow keys to select the USB flash drive.
2. After selecting the USB flash drive, press the "Enter" key to confirm booting to the palen1x.
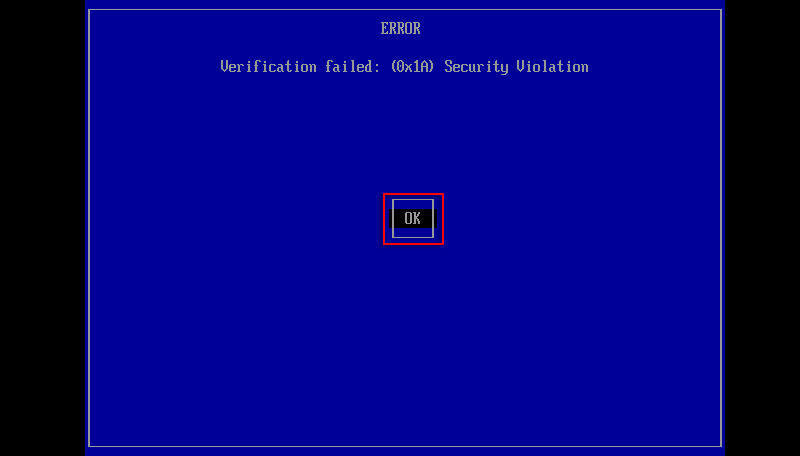
3. (Optional) Turn on support for Secure Boot. This step can be ignored if the computer already has the Secure Boot option turned off.
If the computer has Secure Boot enabled under UEFI and cannot be turned off, you can use Ventoy's Secure Boot feature, or enable CSM compatibility mode on the motherboard to boot the USB drive in BIOS mode.
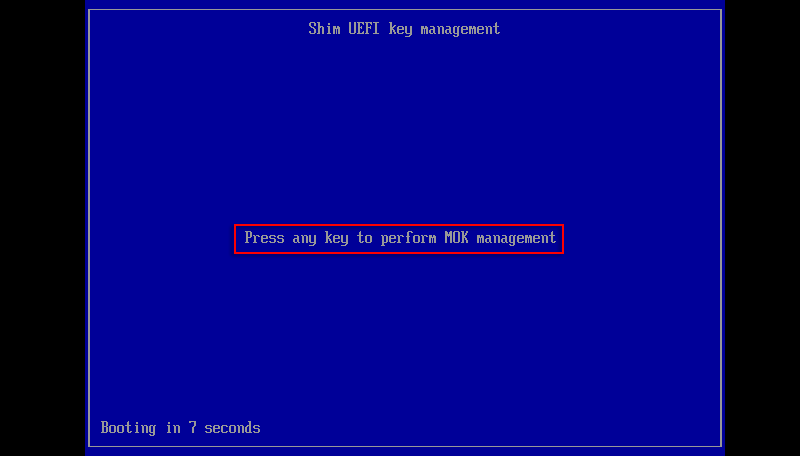
• After the computer has turned on "Secure Boot" and booted to the USB flash drive, there will be an error message as shown in the figure below, press the "Enter" key to confirm or click "OK".
• Press anykey to perform "MOK" management. Be sure to press the key within 10 seconds or the error will be prompted again.
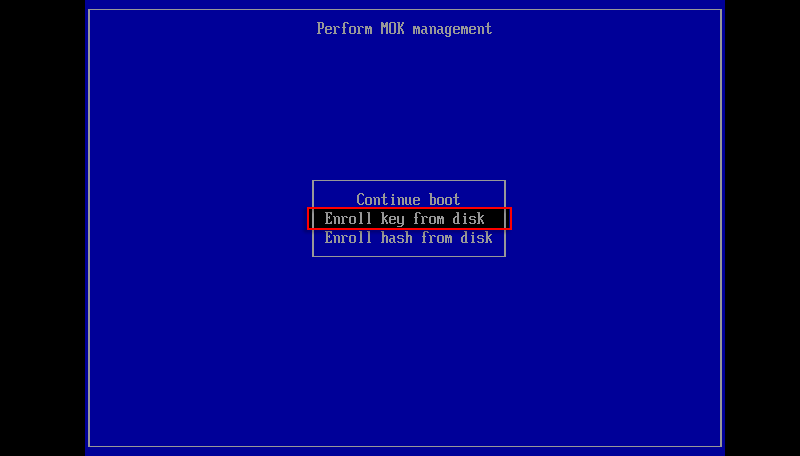
• Press the up and down arrow keys on your keyboard to select the "Enroll Key From disk" option and press the Enter key.
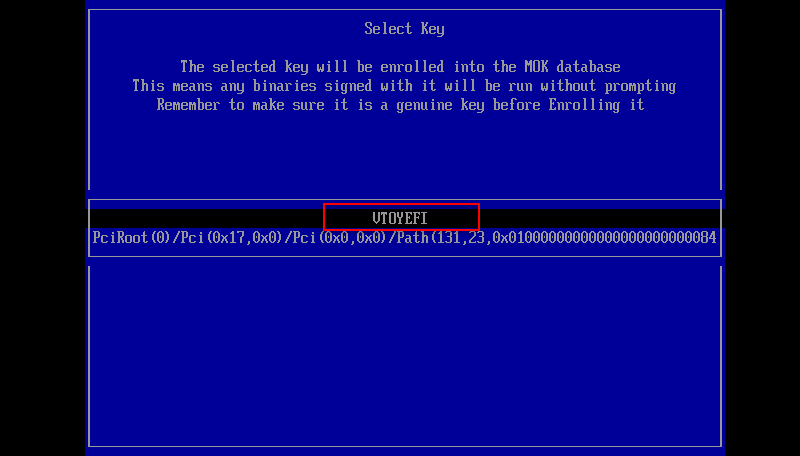
• Select "VTOYEFI" and press the Enter key.
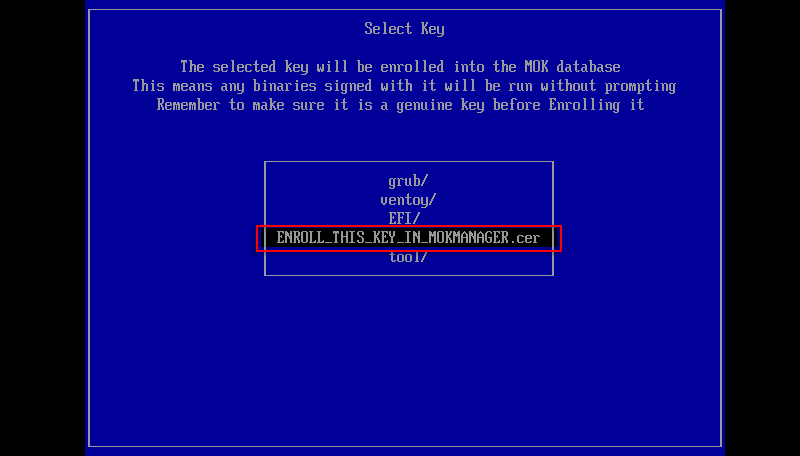
• Select "ENROLL_THIS_KEY_IN_MOKMANAGER.cer" and press Enter.
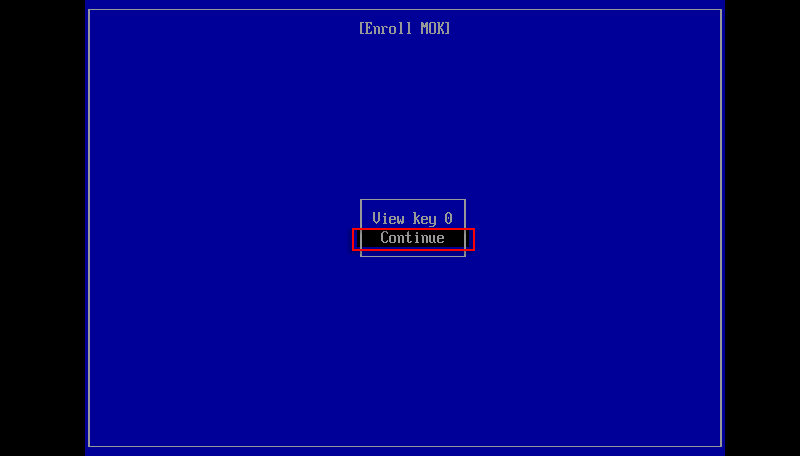
• Select "Continue" and press the Enter key.
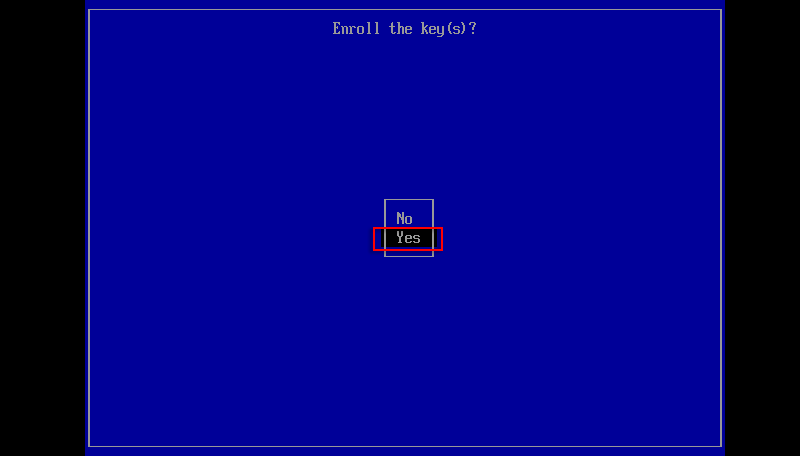
• Select "Yes" and press the Enter key.
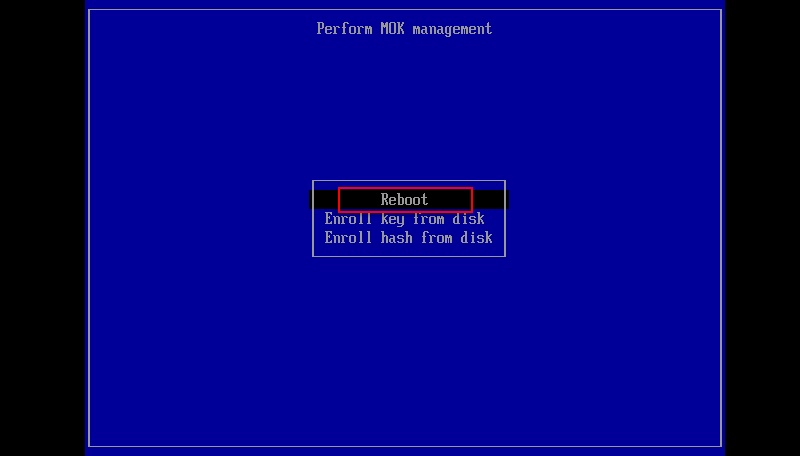
• Finally, select "Reboot" and press Enter to restart your computer.
Step 2: Connect iPhone to computer with a USB cable.
If your iPhone cannot be jailbroken, try a different USB port, the best option is the USB 2.0 port on the back of your computer's motherboard.
Step 3: Rootful the iPhone device using palen1x and create fakeFS file system.
1. Once you have finished registering the Secure Boot Key, reboot your computer again and then quickly press the F8 or F12 shortcut to select Boot from USB Flash Drive to palen1x.
2. Select "palen1x-amd64.iso" and press enter.
3. For secure boot compatibility, we need to select the "Boot in grub2 mode" mode, press the up and down arrow keys on the keyboard to select it and press enter to boot the palen1x.
4. After booting to palen1x, select "1 palera1n" and press enter.
5. Select "2 Options" and press the Enter key.
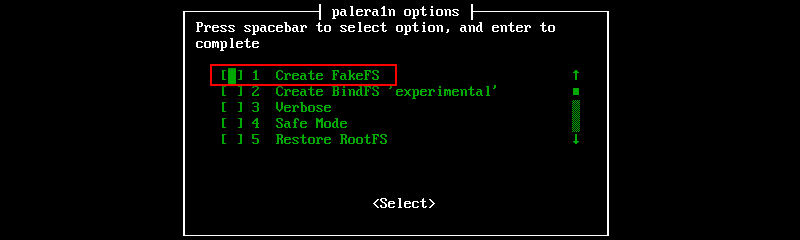
6. Press the space bar to select "1 Create FakeFS" and press the Enter key.
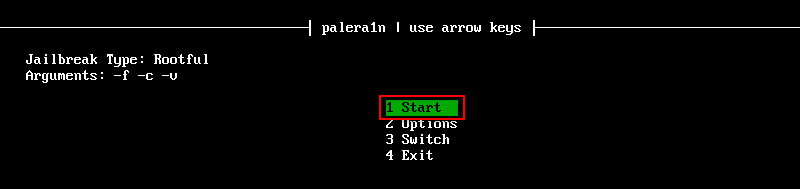
7. Confirm the Jailbreak Type is: RootFul; Arguments is: -f -c -v, select "1 Start" and press the Enter key.
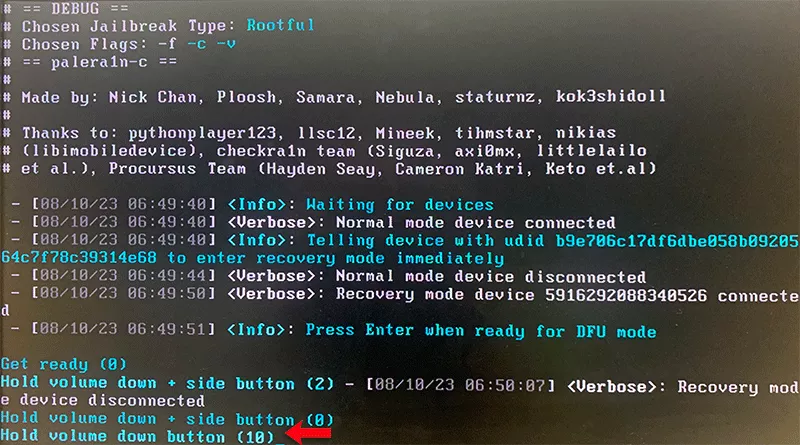
8. After the iPhone is successfully connected to the computer, the palen1x program will automatically switch the iPhone to recovery mode and try to reconnect the device, it will prompt: "Press Enter when ready for DFU mode". Press Enter to put iPhone into DFU mode.
9. Be ready to go into DFU mode manually.
10. Press the Volume Down and Side button simultaneously and hold for 4 seconds.
11. Release the Side button and continue to press the volume down button for 10 seconds. If the device cannot enter the DFU mode, you can try a few more times.
12. After the iPhone enters DFU mode, the palen1x program will execute Rootful and create a fakeFS file system, and the whole process will last about 10 minutes.
13. After completing Rootful and creating the fakeFS file system, the iPhone will automatically restart to the setting interface. Sometimes the palen1x program may not exit automatically, you can press the "Ctrl+C" key to forcibly exit the palen1x program.
14. Then you can restart and enter the command (reboot) to restart the palen1x program to prepare for the next Rootful boot to the fakeFS file system. Or enter the command (palera1n -f) to directly open the -f type of the palera1n program to guide Rootful to the fakeFS file system.
Step 4: Rootful boot into the fakeFS file system.
Note: After Rootful and the fakeFS file system are created, you cannot create the fakeFS file system again, otherwise it will prompt an error or get stuck, just boot Rootful to the fakeFS file system. If you boot directly to the fakeFS file system without creating a fakeFS file system, the program will prompt an error or get stuck.
1. After restarting the palen1x program, select "1 Palera1n" and press Enter.
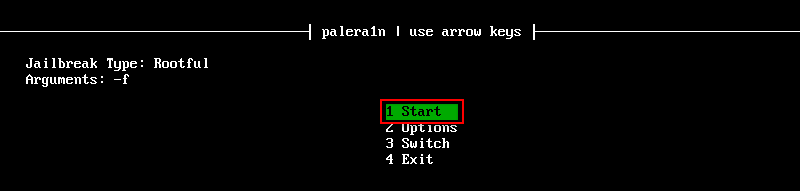
2. Confirm Jailbreak Type is: RootFul, Arguments is: -f, select "1 Start" and press Enter.
3. After the iPhone is successfully connected to the computer, the palen1x program will automatically switch the iPhone to recovery mode and try to reconnect the device. It will prompt: "Press Enter when ready for DFU mode", press the Enter key to put your iPhone in DFU mode.
4. Get ready to enter DFU mode manually.
5. Press volume down + side button at the same time for 4 seconds.
6. Release the side button, continue to press and hold the volume down button for 10 seconds. If it fails, you can try a few more times.
7. The process of Rootful booting to the fakeFS file system will start, and the iPhone will automatically restart to the setting interface after completion. Now that the iPhone has rooted to the fakeFS filesystem, it can be remounted as read-write and can be used to bypass Activation Lock.
Way 2: Easily Jailbreak iOS 16/15 and Bypass Activation Lock with iSunshare iBypass Genius
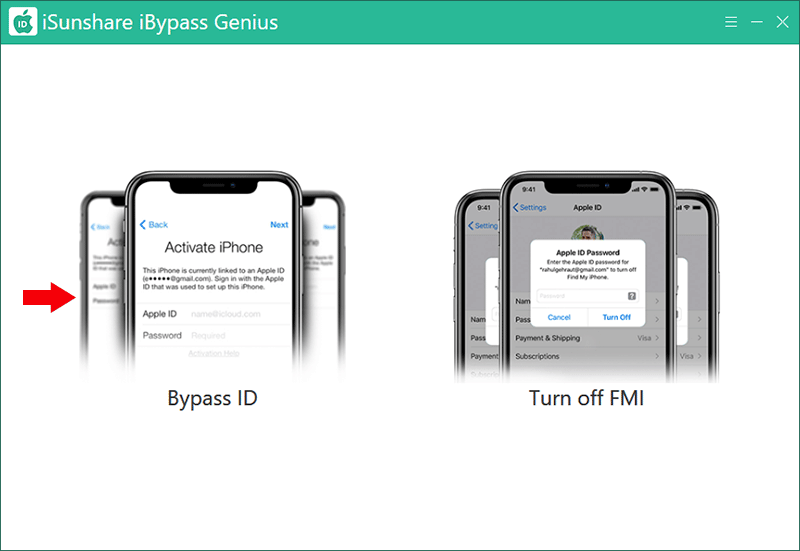
How can you jailbreak the iOS 16/15 devices without complicated operations and bypass the activation lock on iPhone? iSunshare iBypass Genius can help you to jailbreak the iPhone is in iOS 15-16.7 within simple clicks. Besides, it enables you to bypass the activation lock on iPhone after the iPhone is jailbroken.
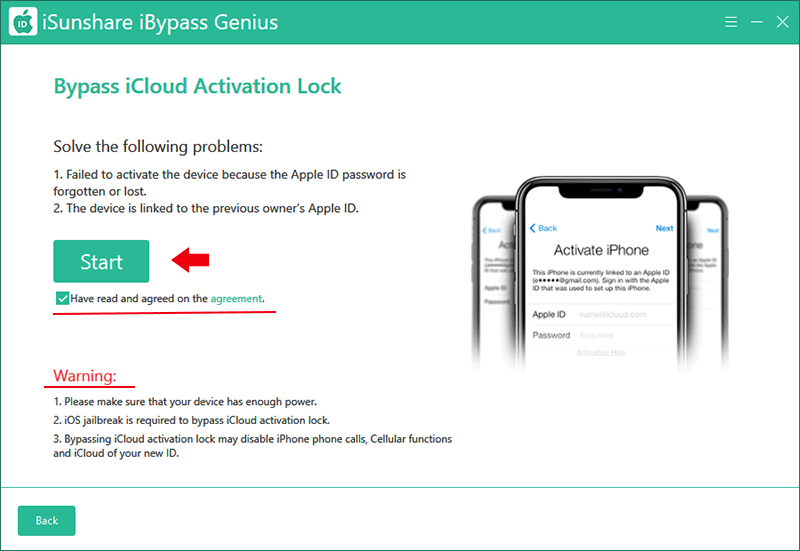
Step 1: Download, install and run iSunshare iBypass Genius on your computer. After that, choose "Bypass ID" option to proceed.
Step 2: Read the warning terms and agreement items. Then hit "Start" to jailbreak the iPhone.
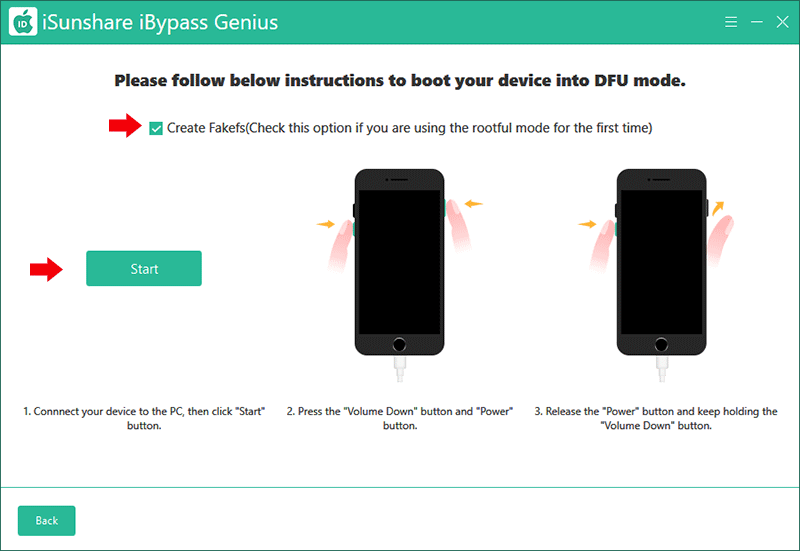
Step 3: First of all, if it is the first time for you to jailbreak the iPhone, you should make sure Create Fakefs option is ticked. After that, click the Start button and follow the guides to make iPhone into DFU mode.
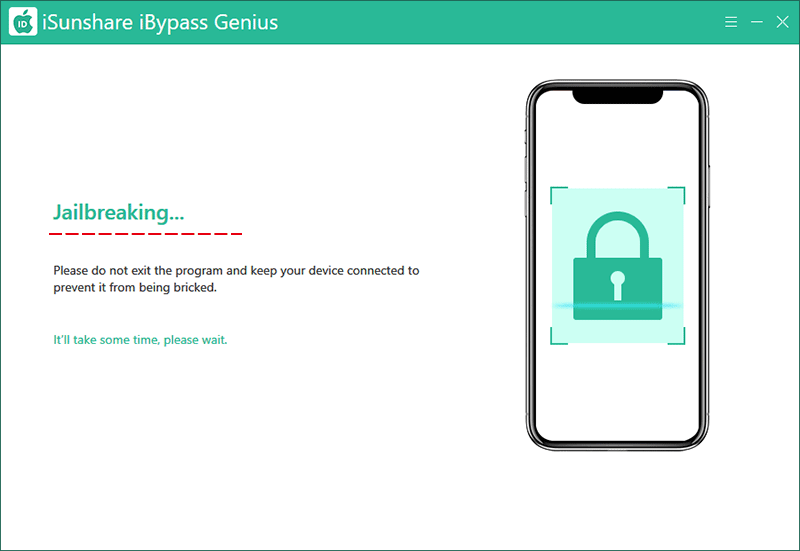
When the iPhone enters DFU mode successfully, iBypass Genius starts to create Fakefs on the iPhone.
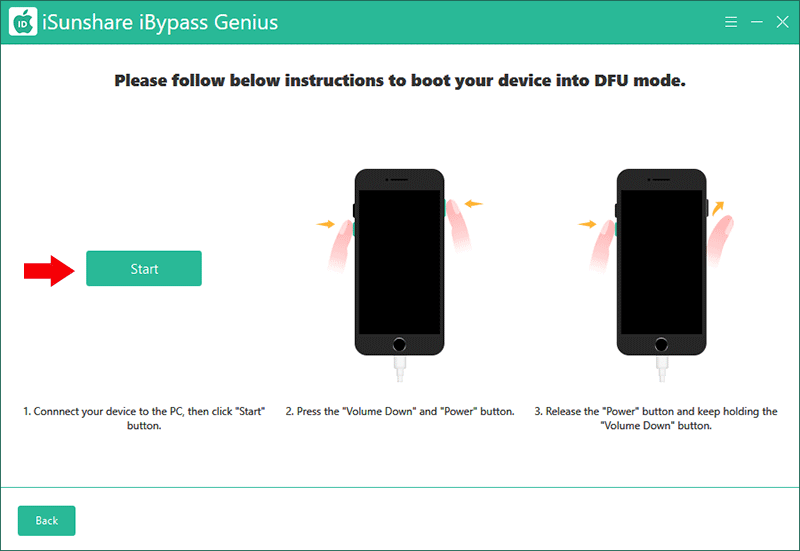
Step 4: Minutes later, it requires you to boot the iPhone into DFU mode again.
After that, the software will start jailbreaking your iPhone.
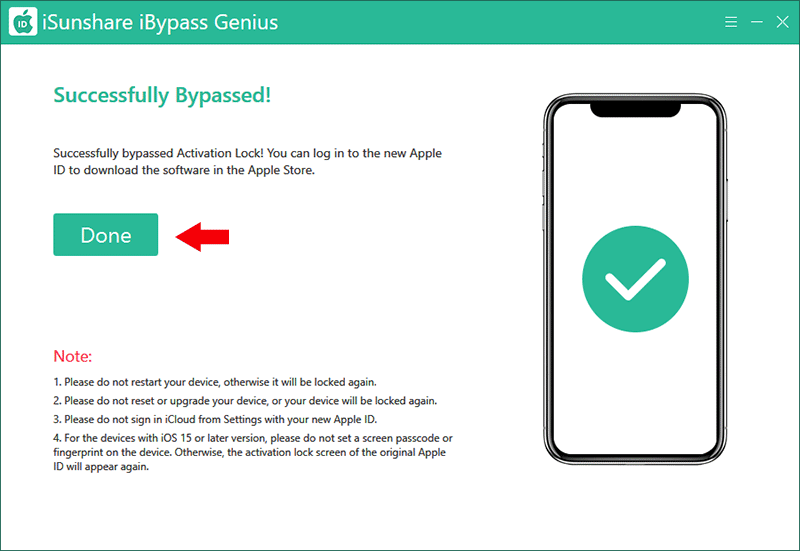
When the iPhone is jailbroken, it will automatically remove the activation lock on your iPhone. In the end, you can get the successful message. And the iPhone is jailbroken without the linked Apple ID.