Sometimes it is critical to ensure that files stored on USB drives are protected from any future changes or tampering. One way to accomplish this is through the write-protect or read-only feature. You cannot change, delete, move or manipulate files on a write-protected USB drive, and a warning message such as "This disk is write-protected" will be displayed. If at some point you no longer need the data stored in that particular USB and want to format it, you will need to unprotect it first. Therefore, in this article, I will show you how to fix the disk is write-protected on your USB drive.
Many USB drives and SD cards have a dedicated physical switch that protects the data stored on them. Check your USB to see if it does have such a switch, then move it to the appropriate location to unlock it. After that, you can format the device using the usual methods.
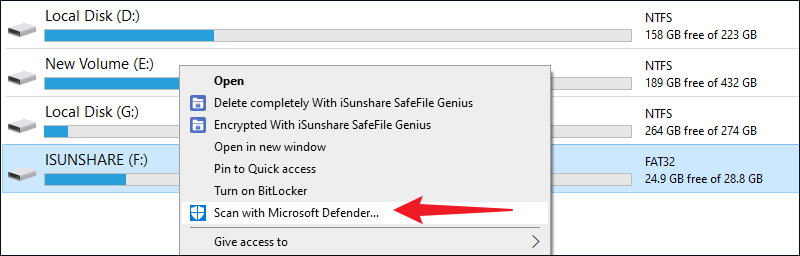
Way 2: Scan your USB drive with Microsoft Defender
Every time you plug a USB drive into your computer, you should automatically scan it for viruses. If you have used it on a public computer, the virus may fill your USB drive with meaningless files, which can cause a write-protect error on your USB drive. So how to perform a virus scan? You can navigate to the USB drive in File Explorer, right-click on it and select Scan with Microsoft Defender from there. If you find a virus, use your antivirus software to eliminate it.
Way 3: Make sure the USB drive is not full
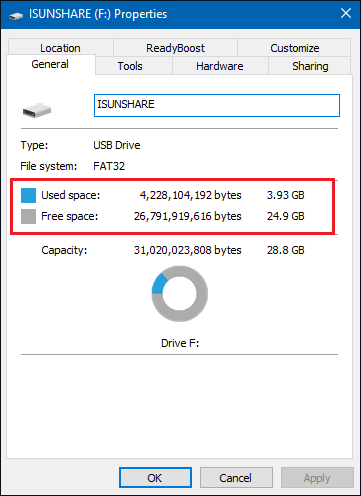
If your USB flash drive is full, you may receive a "write protect" error message. So how to check whether the capacity of the USB flash drive is full or not? Simply locate This PC, right-click on your USB drive and select Properties from it. Under the General tab, you will see the Used space and the Free space. As shown in the image below, my USB drive still has free space. If your USB drive is completely full, it may return a write protect error message.
Way 4: Bypass write protection with the Registry Editor
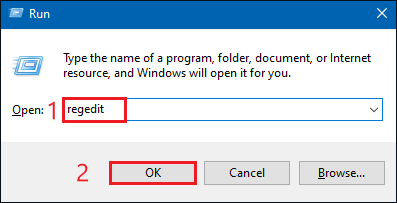
Step 1: Press the Windows key + R on your keyboard at the same time. In the Run dialog window, type regedit and press Enter.
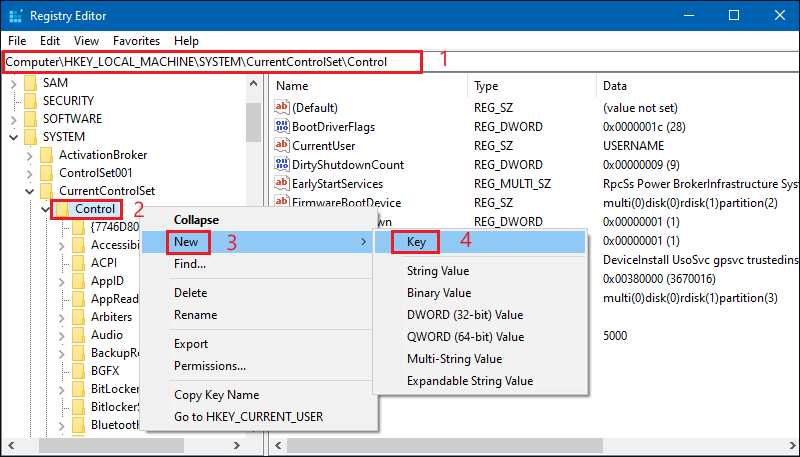
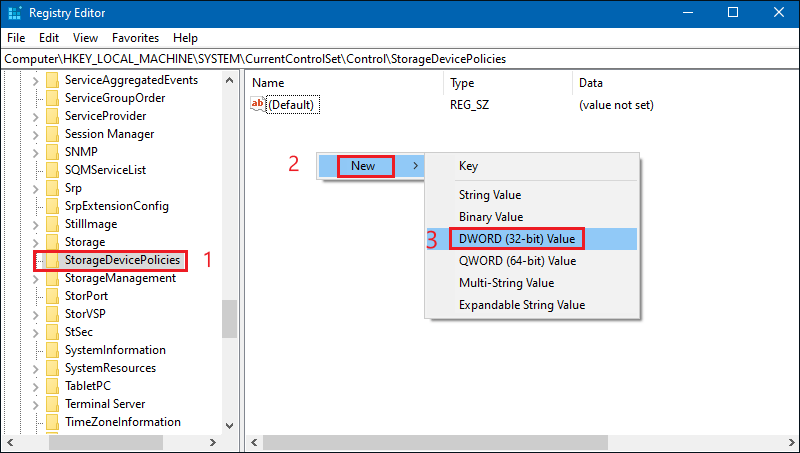
Step 2: In the Registry Editor, navigate to the following path. Right-click Control and select "New" from the available options, then select "Key".
Step 3: Name the new key as "StorageDevicePolicies". Right-click it and go to "New". Then select "DWORD (32-bit) Value".
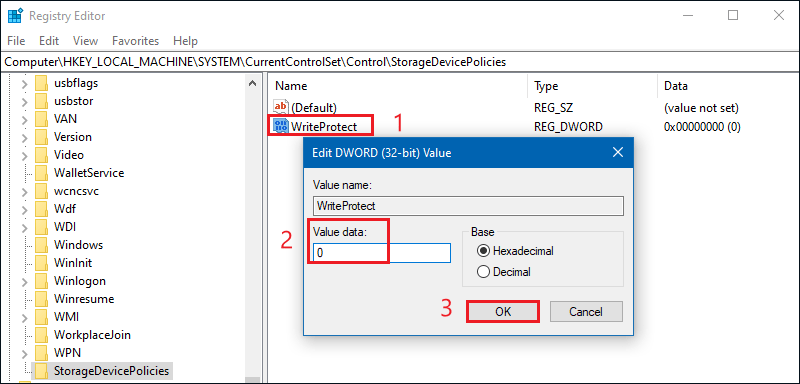
Step 4: Name it "WriteProtect" and set the value data to 0. Click OK to complete the setup. 0 means do not write protect your USB storage device.
Way 5: Remove write protection from USB via Diskpart command
In this way, you can clear any remaining read-only file attributes on the USB drive.
Step 1: Type cmd in the start menu bar. Click Run as administrator to start the command prompt.
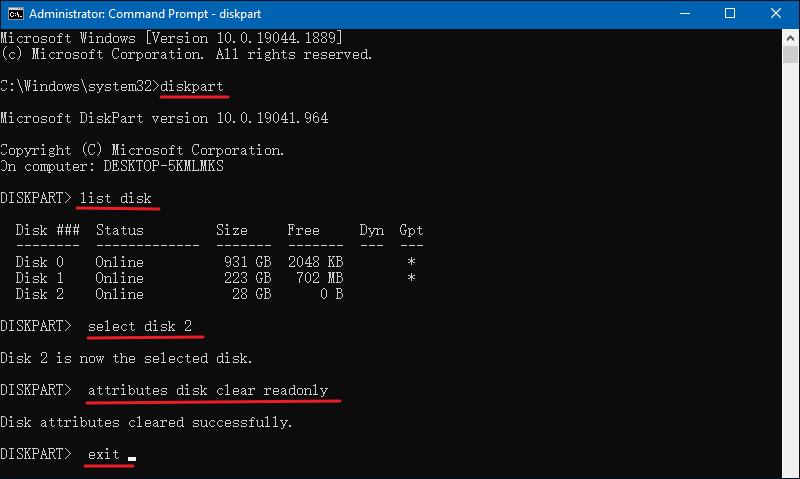
Step 2: Type diskpart at the command prompt and press Enter, then type list disk and press Enter to see the available disks, then type Select Disk 2 and hit the Enter key, then type attributes disk clear readonly and click Enter. After completing write protection removal, type exit to leave Diskpart.
Step 3: Reboot your PC and check if you can access and use the data saved on the USB.
Way 6: Format your USB Drive
Before you perform this method, make sure you back up all your files and information from your USB drive to your PC. Once you format the USB drive, all data will be lost.
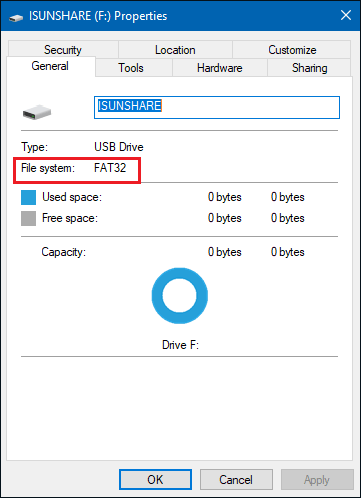
Step 1: Before formatting a USB drive, we have to determine what kind of file system it already has - NTFS or FAT32. usually, the existing file system is the most appropriate file system for that drive. So how to check the file system of the USB drive? Simply open This PC, right-click on your USB drive and select Properties from it. You will be able to see the File system of your USB drive.
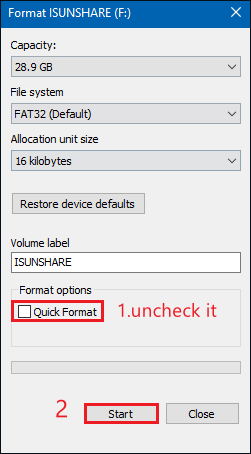
Step 2: Right-click on the USB drive again and select Format. The Format window contains several customizable options, such as the File System, Allocate Unit Size, Volume Label, and Format options. Since we are dealing with a potential hardware issue, uncheck the Quick Format option. This will force the formatting to do more than just erase the files. Then click on the Start option and wait patiently for the formatting process of the USB drive to complete.
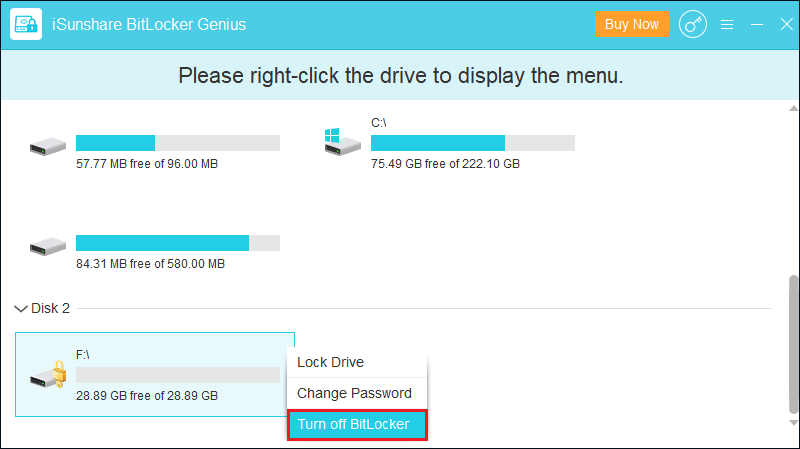
Way 7: Turn off BitLocker or remove encryption
If you have been using BitLocker, make sure it is turned off before attempting to make changes to files on a locked partition or drive. So is there reliable software to turn off BitLocker? iSunshare BitLocker Genius is a great choice. It can turn off BitLocker encryption on your USB drive within a click. When it is done, you can edit and save the file without any more error messages popping up. So why not download it and give it a try?