When there is not enough space on iPhone, you can transfer photos from iPhone to external hard drive to release more storage space. It is easy to backup photos to external hard disk no matter you are using Windows or Mac. You can check specific steps to transfer iPhone photos to external hard drive below.
Part 1: Transfer Photos from iPhone to External Hard Drive with iSunshare iDevice Genius
It is super easy to transfer all photos from your iPhone to the external hard drive with iSunshare iDevice Genius. You can export the photos and large files to the external hard drive in clicks. Thus, more available space is released.
Here are some must-do preparations before you can proceed to backup iPhone photos to the external hard disk.
1. A PC with iTunes installed.
2. A USB cable to build the connection between your iPhone and PC.
3. Download and install iSunshare iDevice Genius.
To transfer or backup iPhone photos to external hard drive on Windows:
Step 1: Connect your iPhone and make it trust your computer. Also, plug the external hard drive into the PC. Then launch iSunshare iDevice Genius and click the Scan button.
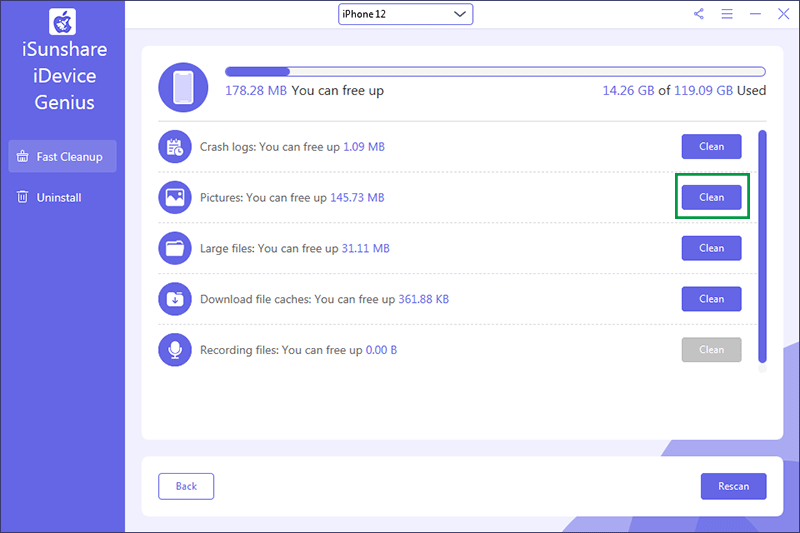
Step 2: In minutes, the scanning process ends. Check the Pictures section and click the Clean button.
Step 3: Now all photos are displayed. Tick the Check all option and then click the Export button on the lower right center.
Step 4: Select a folder in your external hard drive to save the photos. After that, the exporting process begins.
Step 5: Minutes later, all your photos are successfully exported to the external hard drive. Click Yes to view the photos. Or you can choose the No option and then you can delete them from the iPhone via the Delete button so as to release the iPhone storage.
Part 2: Move Photos from iPhone to External Hard Drive Using PC
If you do not want to use the third-party tool, there are two free ways for you to move photos from iPhone to external hard drive. You can check details below:
Way 1: Move Photos from iPhone to External Hard Drive via File Explorer
Step 1: Use the lightning cable to connect your iPhone to a USB port on a PC. If prompted, tap Trust on your iPhone and enter the screen passcode to unlock it.
Step 2: Press Windows + E key to access the File Explorer. Then find your iPhone storage under This PC or Devices in the left sidebar.
Step 3: Click your iPhone and then choose Internal Storage which houses your photos.
Step 4: Open the folder and select the photos you want to transfer to the external hard drive and then copy them.
Step 5: Access your external hard drive and then paste the photos.
Way 2: Move Photos from iPhone to External Hard Drive via Windows Photos App
Step 1: Make sure the iPhone and external hard drive is well connected to your PC.
Step 2: Open the Windows Photos app and then click Import and the select the Apple iPhone option.
Step 3: Soon, the photos on your iPhone are detected. It is required to select the photos you want to import.
Step 4: Click Import settings> Change the import destination. After that, define the location on your external hard drive as the target destination.
Step 5: Click Import Selected to begin the importing process. Minutes later, you can check whether the photos are saved on the external hard disk or not.
Part 3: Backup Photos from iPhone to External Hard Drive on Mac
If you are using a Mac computer, you can also backup iPhone photos to external hard drive easily.
Option 1: Backup iPhone Photos to External Hard Drive on Mac with Photos App
Step 1: Plug your iPhone and the external hard drive into the Mac and ensure they are well detected by the Mac.
Step 2: Run Photos app on your Mac. Then click your iPhone in the Devices section on the right sidebar.
Step 3: Click the Import to or Add to option and change the location to your external hard drive.
Step 4: Hit Import All New Photos. Soon, the photos will be transferred to your external hard drive. You can delete them on your iPhone to get more available space.
Option 2: Backup iPhone Photos to External Hard Drive with Image Capture
If you are using Mac OSX 10.10.3, you can transfer photos from iPhone to external hard drive with Image Capture—the built-in app for users to upload photos to Mac.
Step 1: Ensure iPhone and external hard drive is connected to your Mac. Then open Image Capture.
Step 2: Find your iPhone under DEVICES category. Click it and click Import to on the prompt. After that, set the pictures to save on the external hard drive.
Step 3: Click Import All on the lower right corner and then wait for the process to end.
Part 4: Transfer Photos from iPhone to External Hard Drive without Computer
Is it possible to transfer photos from iPhone to external hard drive without a computer? Yes, you need a USB-C connector to build the connection.
Step 1: Connect your external hard drive with the iPhone.
Step 2: Open your iPhone, tap Photos and then the Select option on the top right corner to select the photos you want to transfer.
Step 3: After that, tap the Export icon on the lower left corner and choose Export Unmodified Original.
Step 4: Choose your external hard drive under Location category. After that, tap Save to export the photos to your external hard disk.
Tips: External hard drives usually require an external power source when used with an iPhone.
Conclusions:
It is a reliable solution to transfer your iPhone photos to external hard drives when you want more space on iPhone. No matter you’re using a PC, a Mac or prefer to transfer photos without a computer, you can get the comprehensive guide in this article.