We use cookies for personalizing content and ads and providing social media features. Your usage information on our website will be used for social media, advertising, and traffic analytics, or shared with our partners. Clicking "Accept" means you agree to use our cookies .
You must have encountered the phenomenon of USB selective suspend, but you've probably never heard about this noun. Don't worry. Read on to learn what USB selective suspend is. In additon, we will show you how to disable USB selective suspend in Windows 7/10 in only 5 steps. Now let's get started.
What is USB Selective Suspend?
If you reuse your mouse or any other USB device in Windows 7/10 after a long time departure, you may find it has a little pause or the USB device is not working correctly with your computer. This phenomenon is what we called USB Selective Suspend. Why does this happen? Relax, because there is nothing trouble with your computer. When you are using power saver plan in Windows 7/10, the USB ports will get into hibernation after a long time without using it. It is designed to save more power for your computer. However, someone dislikes this. So, in that case, you can choose to disable USB selective suspend in your computer.
How to Disable USB Selective Suspend?
In this part, we will discuss how to disable USB selective suspend on your Windows 7 computer and Windows 10 computer respectively. Now follow the simple five steps below to address the issue.
Option 1: Disable USB Selective Suspend in Windows 7
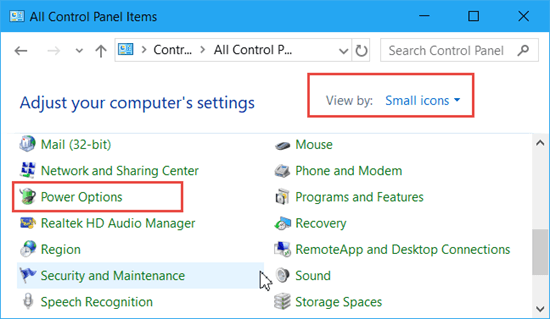
Step 1: Go to Control Panel on your Winodws 7 computer.
Step 2: At the top-right corner, click on the down arrow next to view by and select Small icons. Find out and click Power Options.
Step 3: In the right sidebar, click on change plan settings next to the plan you're currently using.
Step 4: Tap on Change advanced power settings to continue.
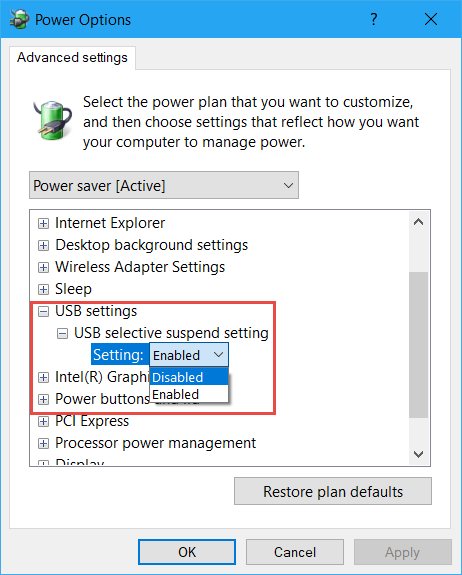
Step 5: Then a new window will show you, expand the USB settings USB selective suspend settings. Next to Settings, change the setting status from Enabled to Disabled from the drop-down menu. Then tap Apply and OK to save changes.
Option 2: Disable USB Selective Suspend in Windows 10
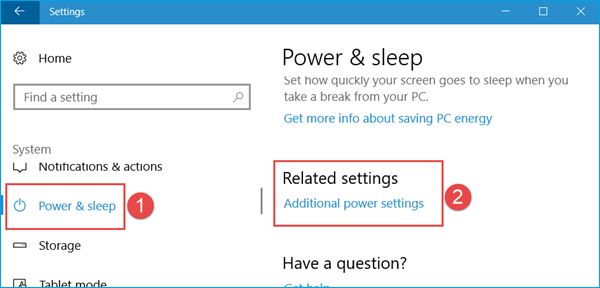
Step 1: Click Start > Settings. When the Settings window popups, tap on System to proceed.
Step 2: In the left pane, click on Power & sleep tab. Then scroll down and click on Add addition power settings under Related settings section.
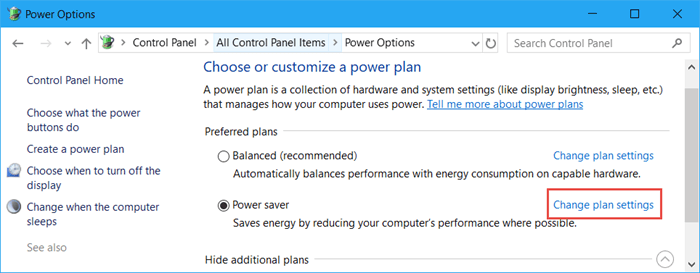
Step 3: Under "Preferred plan", click the Change plan settings link for the plan you're currently using.
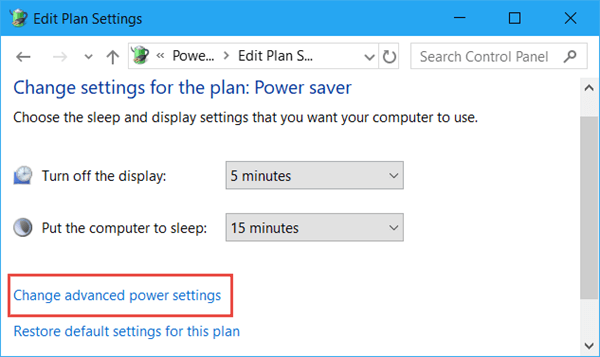
Step 4: Click on the link of Change advanced settings to go on as the image shows below.
Step 5: In the Power Options window, expand USB settings > USB selective suspend settings. Behind Settings, select the option of Disabled. Tap on Apply and OK to save changes.