We use cookies for personalizing content and ads and providing social media features. Your usage information on our website will be used for social media, advertising, and traffic analytics, or shared with our partners. Clicking "Accept" means you agree to use our cookies .
BIOS does not have a password by default. However, some users add a security password when setting BIOS. Because the BIOS administrator password is rarely used, it tends to be forgotten after a long time, which leads to that the BIOS can't be accessed. If you do the same, worry not, this article shows you how to remove BIOS administrator password in HP laptop.
If you have the tools and are familiar with laptop disassembly, then you can delete the forgotten BIOS administrator password by removing the CMOS battery. This is a traditional and effective method, but you have to be careful during the process to avoid damaging the hardware.
Note: This method will not only remove the password, but also the entire BIOS setup.
Step 1: Turn off your HP laptop and make sure to disconnect all external power sources.
Step 2: Open the bottom cover of the laptop, find and remove the CMOS battery (it looks like a coin).
Step 3: After removing the battery, wait for a few minutes to make sure the BIOS settings are cleared.
Step 4: Reinstall the CMOS battery, reassemble the laptop and reboot the system, then you can reset and access the BIOS now.
Option 2: Remove HP Laptop BIOS Password on freeDOS
If you lack confidence in completely dismantling your HP computer hardware device, you can choose to remove the BIOS administrator password from your HP laptop in freeDOS by using commands. Usually, this method can successfully reset the BIOS password of your HP computer without reinstalling the OS or damaging the hardware.
Step 1: Check or make a backup of the configuration of BIOS system.
The BIOS configuration contains hardware and system settings that are vital to the proper operation and performance of your system, so check or back up the BIOS system configuration is an important step in resetting the BIOS administrator password. Below are three different methods that can help you perform this task with ease:
Way 1: Using HP ProtectTools Suite (only for win7 system)
1. Download and install BIOS Configuration for HP ProtectTools and HP ProtectTools Security Manager Suite.
2. Download and install the requisite programs.
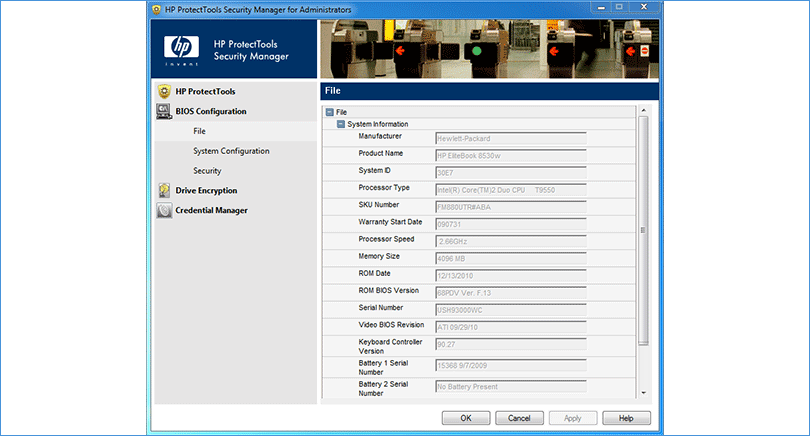
3. Open HP ProtectTools Security Manager Suite and select the BIOS Configuration option, then click File. After that, the information of BIOS can be seen on the right, you can make a screenshot to save it.
Way 2: Use BiosConfigUtility64.exe from NbDmiFit-2.10.zip (for win7 system or winpe system)
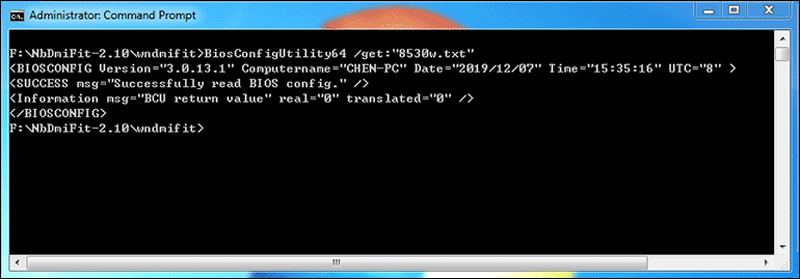
1. Extract the NbDmiFit-2.10.zip file and use CMD to enter the NbDmiFit-2.10\wndmifit folder.
2. Run the command: BiosConfigUtility64 /Get: "8530w.txt" to backup the configuration file to 8530w.txt.
Way 3: Use HPSET152.EXE from NbDmiFit-2.10.zip (requires FreeDOS system to operate)
1. First, make sure your computer can boot into FreeDOS.
2. Extract the NbDmiFit-2.10.zip file to a USB flash drive and boot FreeDOS on your computer.
3. In FreeDOS system, run the command: Hpset152 -s, it will backup the BIOS configuration information to the connected USB flash drive.
Step 2. Use Rufus to create a FreeDOS bootable USB drive.
1. After running Rufus, select a USB drive, select FreeDOS as the Boot selection, and then click START to create the FreeDOS bootable USB drive.
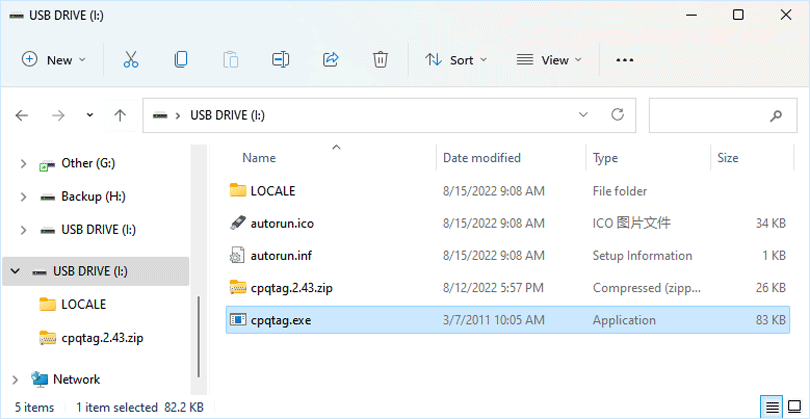
2. Decompress cpqtag.2.43.zip to the root directory of the USB drive.
Step 3. In freeDOS, use the commands of cpqtag.exe to clear all the data of BIOS and set the information of mainboard.
1. Restart computer and press F9 key, select the USB drive as the boot drive to enter FreeDOS, and then enter the command cpqtag write defaults to clear all the data of BIOS.
2. Commands of setting the information of the mainboard:
cpqtag write model "HP EliteBook 8530w" cpqtag write sku "FM880UTR#ABA" cpqtag write serial "USH93000WC"
Or you can use Hpset152 -r command to select the profiles you just backed up using Hpset152 -s command to restore.
Important: After restart, the BIOS password has been removed, but you may find a red warning in the upper left corner of the screen like: WANING!!-Machine is not in committed state! This is because there is not vPro status on the computer.
A method to remove the red warning:
1. Run CPQTAG in FreeDOS. Command: cpqtag read VPRO.
2. Check the output results. Generally, the computers that have not activated vPro will display the following message: VPro Enable Descriptor locked DesManagement Engine enable Flash Protection Override disable
3. Unlock Descriptor locked. Before doing this step, you need to shut down your computer. It is better to unplug the power supply and battery and then connect them again after 5 seconds.
4. Press Win, ← and → key simultaneously and don't release, and then press the power button to boot. You can release the three keys after starting.
5. After boot, press F9 to select the USB drive to enter FreeDOS, run CPQTAG in FreeDOS, and then enter cpqtag read VPRO again. The following message will be displayed if successful: VPro Enable Descriptor unlocked DesManagement Engine enable Flash Protection Override disable
In short, the word behind "Descriptor" should be changed to "unlocked" but not "locked".
6. Enter the below commands one by one to remove the red warning: