We use cookies for personalizing content and ads and providing social media features. Your usage information on our website will be used for social media, advertising, and traffic analytics, or shared with our partners. Clicking "Accept" means you agree to use our cookies .
A sluggish startup can delay your day. Fortunately, a few targeted tweaks—both simple and advanced—can significantly reduce boot time. Follow this streamlined process to achieve a faster, smoother launch experience:
Way 1: Enable the Fast Startup Feature via Control Panel
How to make Windows boot faster? The most direct way to speed up Windows 10 startup is turn on the feature of Fast Startup on your Windows system. You can execute this method through Control Panel. This hybrid shutdown feature combines hibernation and shutdown for quicker boots.
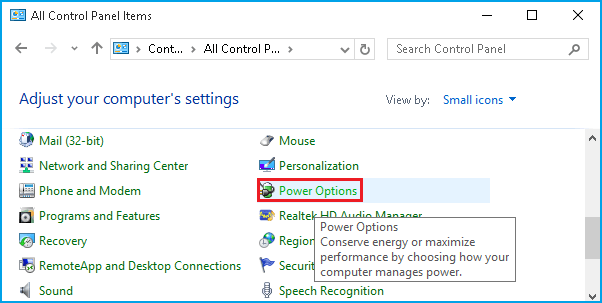
Step 1. Open Control Panel, choose to view by large icons or small icons, and then select Power Options.
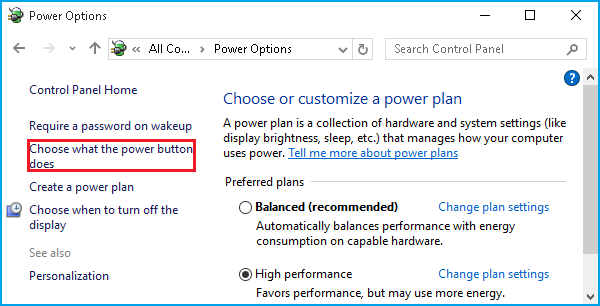
Step 2. Select Choose what the power buttons does in the Power Options window.
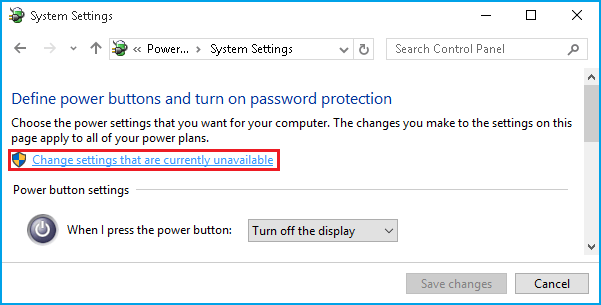
Step 3. Click Change settings that are currently unavailable.
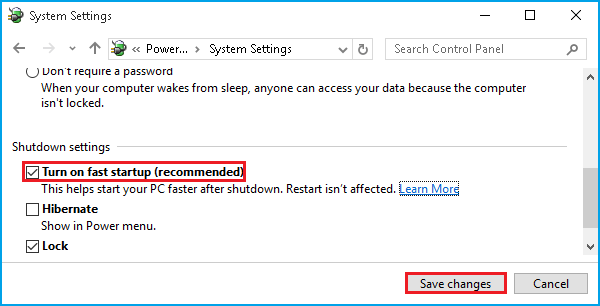
Step 4. Go to the part of Shutdown settings and check the box next to Turn on fast startup (recommended). This helps your PC start faster after shutdown.
Step 5. Click Save changes to keep the modification.
Way 2: Disable Startup Programs through Task Manager
If you enable too many programs to start themselves automatically on Windows startup, of course, it will take longer time to boot your computer. So in order to speed up the boot time of your Windows 10, you can turn off unnecessary auto-starting programs from the Startup tab of Task Manager. This direct method often yields the biggest startup speed gains.
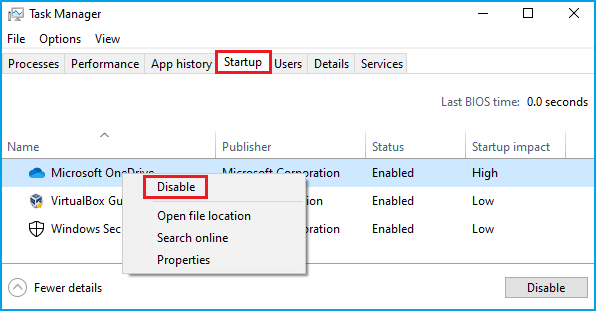
Step 1. Right click the Start icon and choose Task Manager from the drop-down menu.
Step 2. Go to the Startup tab and you will see all programs which will start automatically when computer boots.
Step 3. Right click the unnecessary program and choose Disable to turn off its starting mode.
Repeat the same steps to all the programs that you think they are unnecessary. And next time when you start your computer, they won't be opened automatically, which will make your computer startup faster.
Way 3: Manage Auto-Starting Programs with iSunshare System Genius
Too many auto-starting programs will influence the boot speed of Windows 10. There is a good third party tool for you to manage these programs more easily and intuitively --iSunshare System Genius. It is a multifunctional cleanup tool which can be used to clear junks files and registries and manage auto-starting programs for your computer. Now follow the below steps to manage auto-starting programs with iSunshare System Genius.
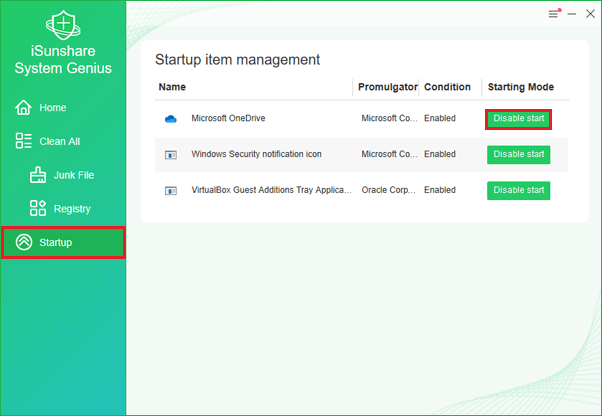
Step 1. Download the software of iSunshare System Genius on your computer, launch it and select the function of Startup on the left.
Step 2. You can check all the programs which will start automatically when computer boots in the Startup item management page. Look for the program that you don't want it to open automatically and click the Disable start button to disable its starting mode.
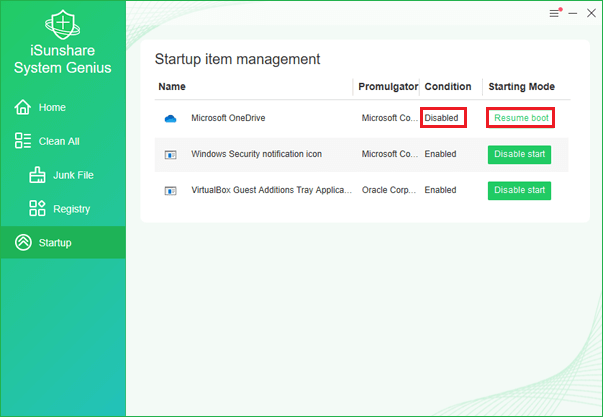
Then you will find that its staus is turned from Enabled to Disabled. If you want to recover its auto-starting mode, click the Resume boot button.
Step 3. Close the software after your setup.
Way 4: Uninstall Unwanted Applications to Increase Boot Speed
You may find there are some unneeded applications that you hardly used but still installed solidly in your computer. You can uninstall these applications in order to free up space for your computer. Then the boot time will be speeded up.
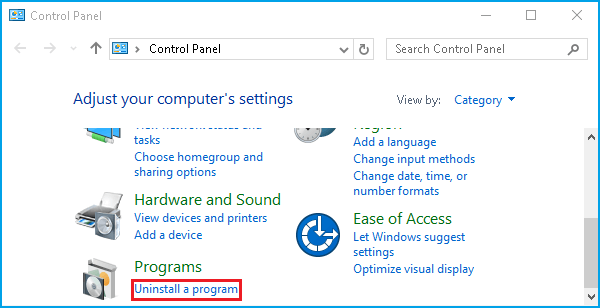
Step 1. Open Control Panel and click the link of Uninstall a program under the Program section.
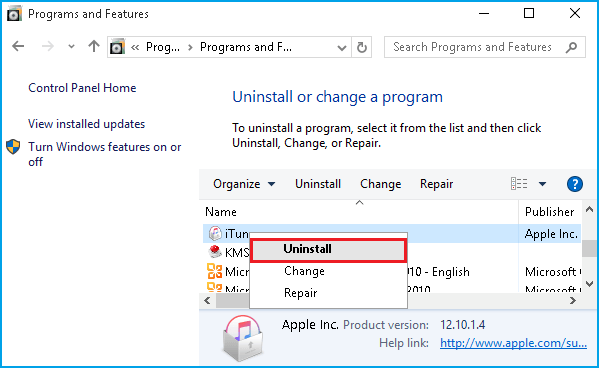
Step 2. Then all the applications installed in your computer will appear. Look for unwanted applications or those that you hardly use, right it and select Uninstall.
Step 3. Wait for the process to complete. And then close Control Panel.
Way 5: Shorten the Boot Menu Time-Out
When Windows starts up, you will find that the Boot Menu appear before the operating system loads. So as for how to reduce boot time in Windows 10, you can try to shorten the boot menu timeout to achieve this.
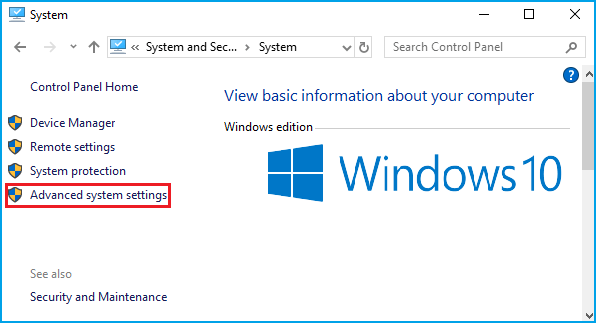
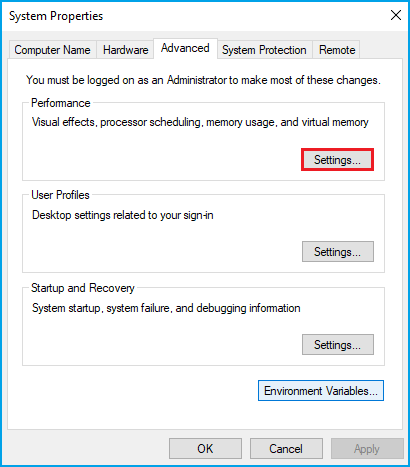
Step 1. Go to Control Panel > System and Security, choose System and then click Advanced system settings to open the System properties panel.
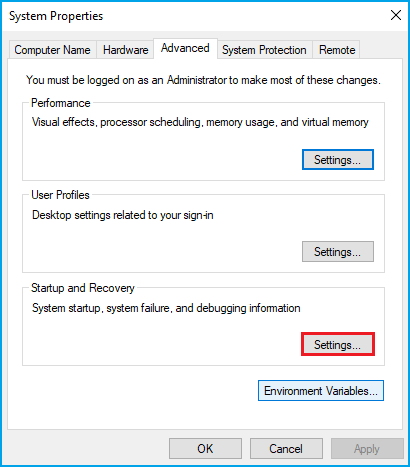
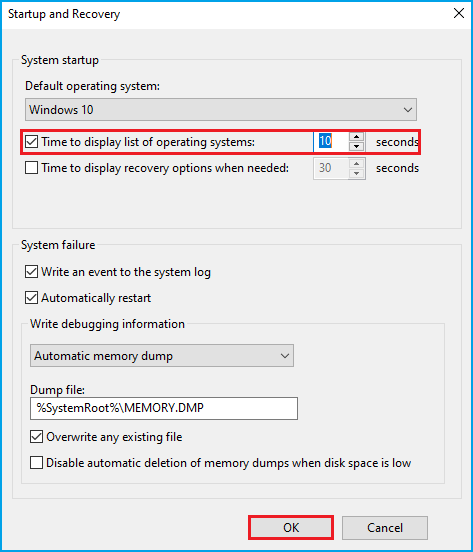
Step 2. In the tab of Advanced, click Settings under Startup and Recovery.
Step 3. Check Time to display list of operating systems. The Boot Menu displays are for 30 seconds by default. You can reduce the time to a lower value between the range from 1 to 30 seconds. Then click OK.
Way 6: Adjust Windows for Best Performance
You can adjust your Windows for best performance to make your computer startup faster. This way can also be executed in the System properties panel.
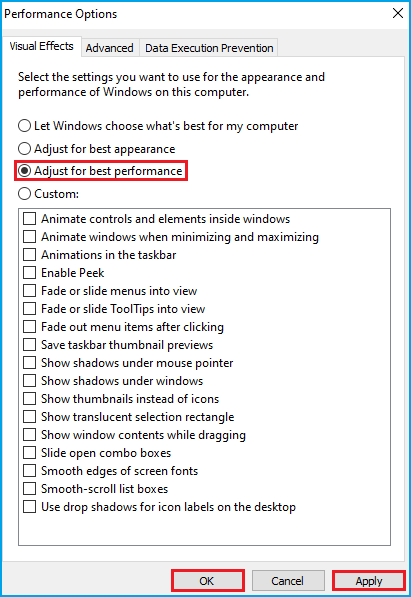
Step 1. After you open the System properties, in the tab of Advanced, click Setting under Performance section.
Step 2. Select the option of Adjust for Best Performance and click Apply > OK to save changes and confirm.
You can also try some methods to speed up the running speed of your PC. Then your computer can maintain a secure and stable status. In that way, the boot speed will be faster also.
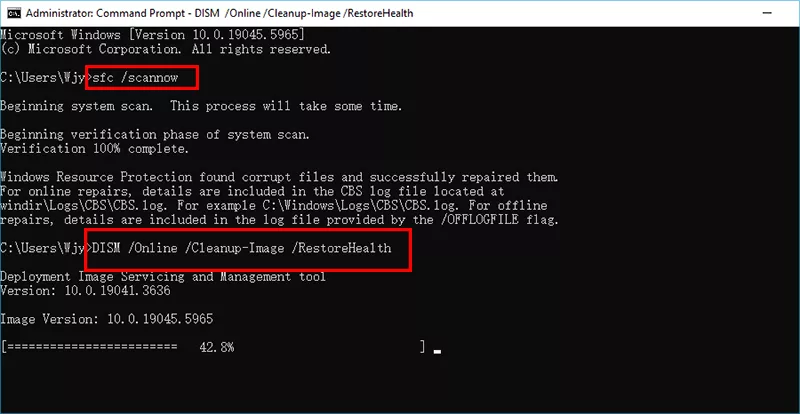
Way 7: Run System Maintenance
This method can help repair system files that may slow or stall your boot sequence.
If none of the above helps and your system is still sluggish, you can take a clean install or reset into consideration. But before doing this, you need to back up the computer data to external hard drive.
To Reset the computer, navigate to Settings > Recovery > Reset this PC.
To clean install Windows 10, you can download the Windows 10 media to refresh your system to factory settings and removes accumulated bloat.
FAQs on How to Make Start up Faster
Q1: Will disabling startup items hurt performance later?
No—they only prevent apps from running at startup. You can still launch them manually after boot.
Q2: Is Fast Startup safe?
Yes, for most systems. However, it may cause conflicts with dual-boot setups or encrypted drives.
Q3: Can system resets fix slow boot issues?
Yes. Reset or clean install removes all accumulated software problems that degrade performance.
Conclusion
By following these steps—from startup app cleanup and Fast Startup activation to disk optimization and repair—you should experience noticeably faster Windows 10 startup times.