We use cookies for personalizing content and ads and providing social media features. Your usage information on our website will be used for social media, advertising, and traffic analytics, or shared with our partners. Clicking "Accept" means you agree to use our cookies .
Do you have issues with thumbnails? Windows keeps a copy of all your files, folders, documents, pictures and videos thumbnails in a cache on your computer. It is like a database, which can be used to display a preview of a folder or give you a glimpse of the folder so that you can get the general idea of the content every time you open it. However, sometimes the thumbnails become corrupted, which causes that thumbnails for files and folders can't be displayed correctly. Under this circumstance, you may have the need to clear thumbnail cache in Windows 10. Now learn how to delete thumbnail in Windows 10 according to the below methods.
Windows 10 stores thumbnail images in a cache for faster file previews. The cache contains small image representations of files that are frequently opened or viewed.
While this speeds up browsing and file navigation, a bloated or corrupt thumbnail cache can lead to: sluggish file explorer performance, incorrect thumbnail previews, corrupt or missing image icons.
Method 1: Make Use of Disk Cleanup to Clear Thumbnail Cache
Disk Cleanup can help remove all cached thumbnails, and your system will rebuild them as needed.
Step 1. Type Disk Cleanup in the Windows search blank and click the result in order to open it.
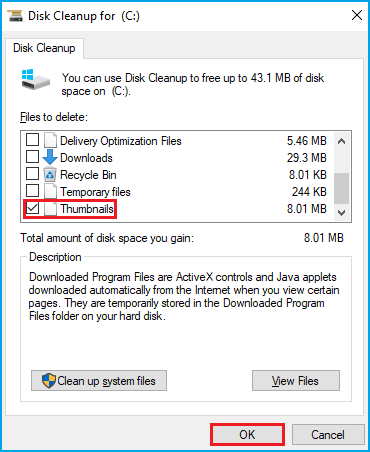
Step 2. Select a drive (usually the drive where Windows 10 is installed) that you want to clean up in the drive selection window and click the button of OK to continue.
Step 3. Scroll down and select the option of Thumbnails only and uncheck all the other options under the section of Files to delete. Then click OK to go on.
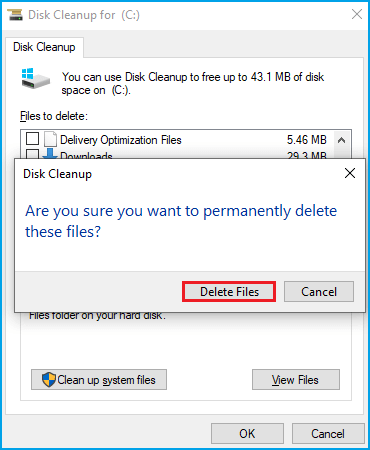
Step 4. Hit the button of Delete Files to confirm the warning message when a small window asking "Are you sure you want to permanently delete these files" pops up.
Method 2: Clear the Thumbnail Cache Manually via File Explorer
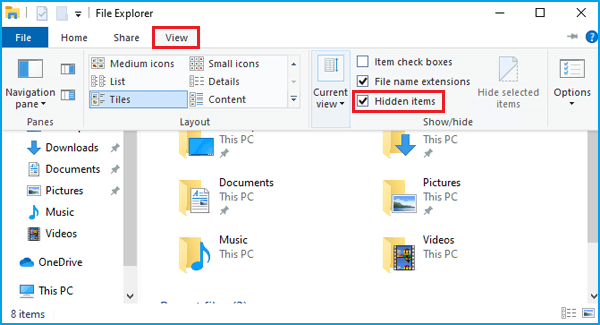
Step 1. Enter File Explorer in the Windows search bar and press Enter to open it.
Step 2. Go to the tab of View in the ribbon and check the box of Hidden items.
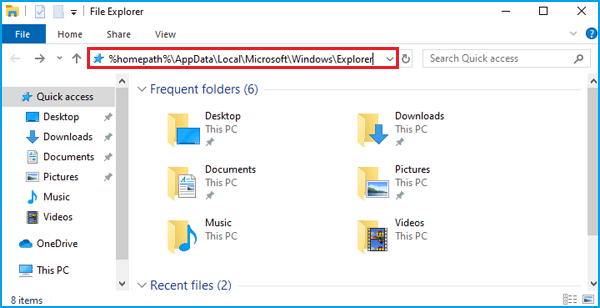
Step 3. Copy %homepath%\AppData\Local\Microsoft\Windows\Explorer and paste the code in the address bar, and then hit the Enter button.
There you can view thumbnail cache in Windows 10. Then learn how to delete thumbs db in Windows 10 as per below steps.
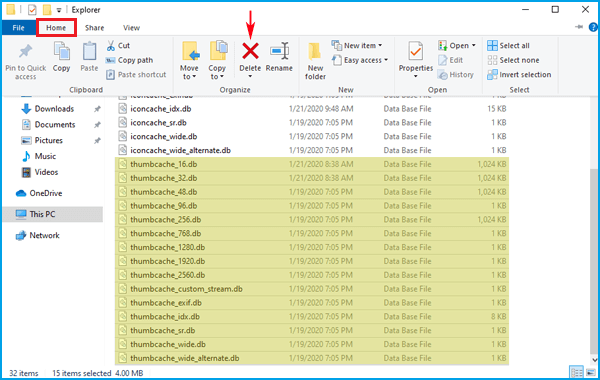
Step 4. Select all files with names starting with thumbcache which are usually named thumbcache_*.db. Go to the Home tab and click Delete.
Step 5. Empty the recycle bin in order to permanently delete the thumbnail cache.
Method 3: Delete Thumbnail Cache Using Command Prompt
You can also delete thumbnail cache using command line.
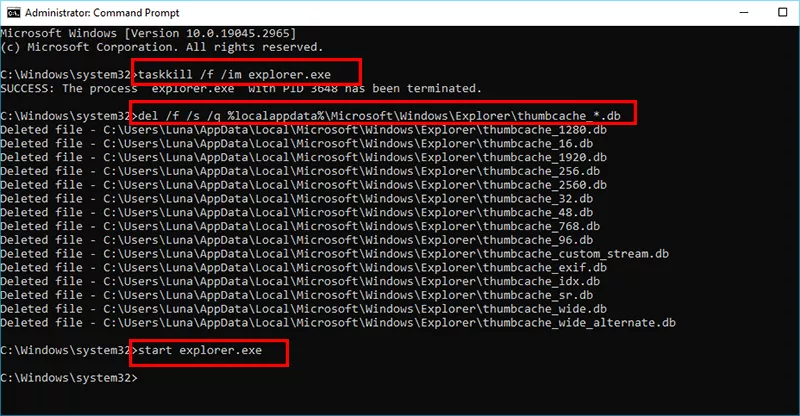
Step 2: Execute the command line to stop Windows Explorer: taskkill /f /im explorer.exe.
Step 3: Type the command line to delete thumbnail cache files:del /f /s /q %localappdata%\Microsoft\Windows\Explorer\thumbcache_*.db.
Step 4: After deleting the cache files, restart Explorer by typing: start explorer.exe .
Method 4: Use iSunshare System Genius to Clear Thumbnail Cache
For users who prefer automated cleanups, third-party tools like iSunshare System Genius can help. It offer easy options to clear thumbnail caches, browser histories, and more.
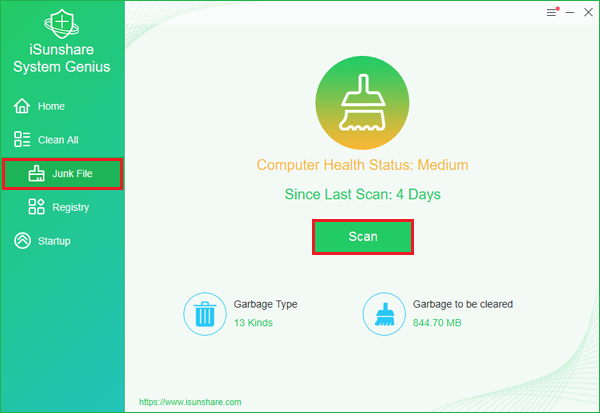
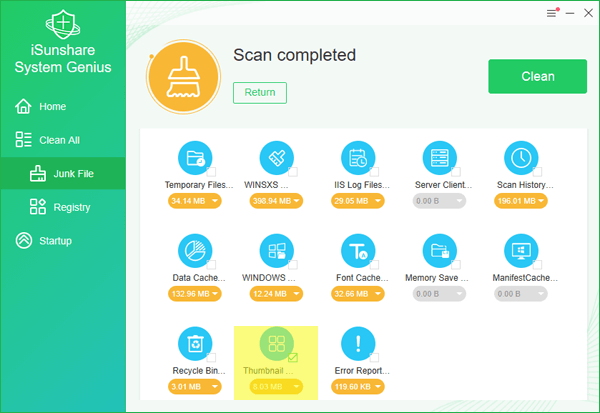
Step 1. Download iSunshare System Genius in your computer, open it and go to the function of Junk File. Then click the Scan button to scan junk files for your computer.
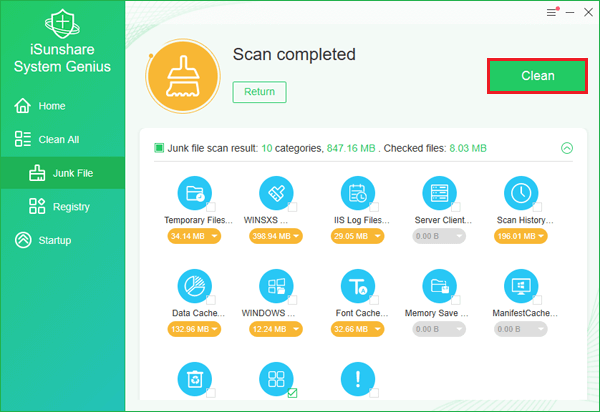
Step 2. When the scanning process is completed, you will get a junk files scan result. All the junk file scan results are selected by default. In order to clear Thumbnail cache only, you should uncheck the boxes beside all the results except the option of Thumbnail cache.
Step 3. Click the Clean button at the top right to clean the Thumbnail cache in your computer.
After the cleanup is finished, you can click OK to confirm.
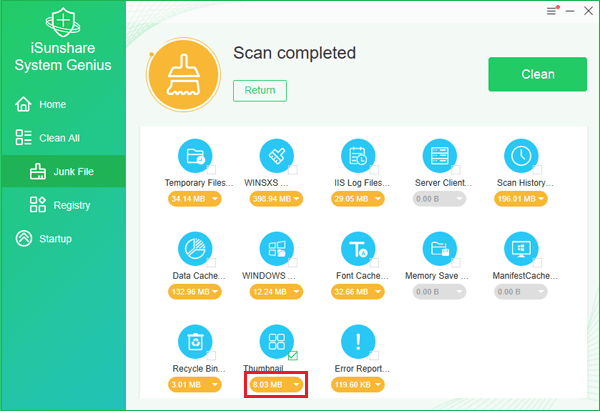
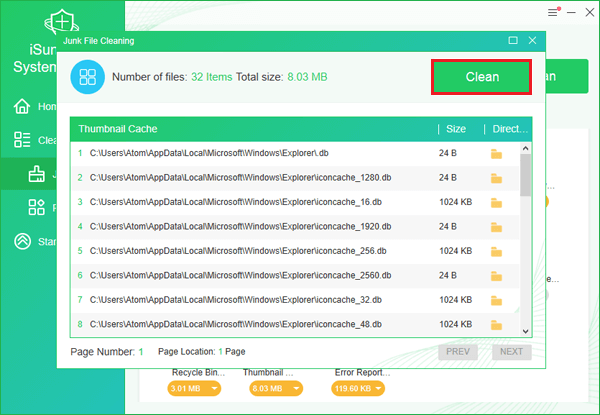
Notice: Alternatively, in the scan result page, you can click the yellow button under the icon of Thumbnail cache, which is known as the More button, to expand the item details page.
In the item details page, you can get the specific details about the scan result of Thumbnail cache. To delete the thumbnail cache, you can click the Clean button to do that. Then you can close the item details page and close the software.
FAQs about Clearing Thumbnail Cache in Windows 10
Q1: Is it safe to delete thumbnail cache in Windows 10?
Yes, it is safe. Clearing the thumbnail cache only removes the stored thumbnail images, which will not affect the Windows 10 running.
Q2: How to clear thumbnail cache in Windows 10 without Disk Cleanup.
You can use the command line or third-party tool, such as iSunshare System Genius to remove the thumbnail cache files in Windows 10.
Q3: Where is the Windows thumbnail cache location?
The thumbnail cache files are generally saved in the following location: C:\Users\YourUsername\AppData\Local\Microsoft\Windows\Explorer. You need to replace YourUsername with your actual Windows user profile name.
Conclusion
Clearing the thumbnail cache in Windows 10 is an easy and effective way to fix issues like slow performance and incorrect thumbnails. No matter which method you choose, regular maintenance can keep your system running smoothly.