VMware and VirtualBox are 2 popular virtualization software, which enables us to operate several systems in one physical computer. When you create a virtual machine on them, a virtual disk is needed to be made firstly and you can allocate the maximum space for it. What’s more, the maximum space is changeable, which means that you can increase the disk space when it’s not enough for usage. So, how can you expand a virtual disk in VMware or VirtualBox? Here, you can get 3 helpful answers.

- Part One: How to Increase Hard Disk Space in VMware Virtual Machine
- Part Two: How to Expand a Virtual Disk in VirtualBox
Preparations before applying the following ways:
- Back up files on the virtual disk which will be expanded.
- Remove all the snapshots from the virtual machine.
- Power off the virtual machine.
Part One: How to Increase Hard Disk Space in VMware Virtual Machine
Solution 1: Increase the Disk Space in VMware with its Extend Function
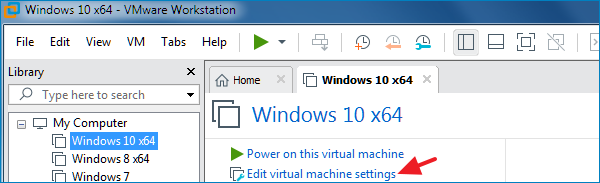
Step 1. Open VMware, choose the virtual machine and click Edit virtual machine settings.
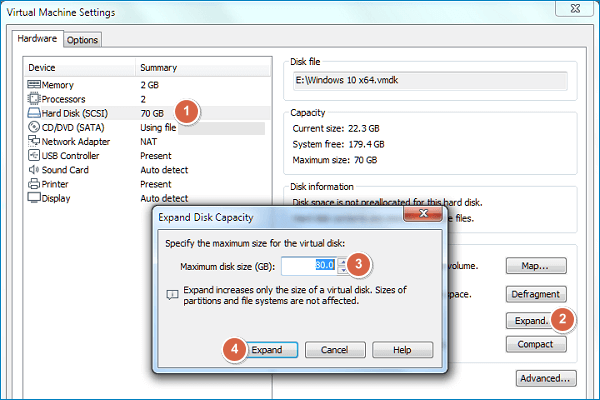
Step 2. Select the virtual disk and click Expand in the right panel. In the pop-out window, set a maximum space you want, then choose Expand to execute the operation.
Step 3. Start the virtual machine > go to Computer Management > select Disk Management. And you will see that the disk space is enlarged to the storage you set.
Solution 2: Add Disk Space to VMware via Command Prompt
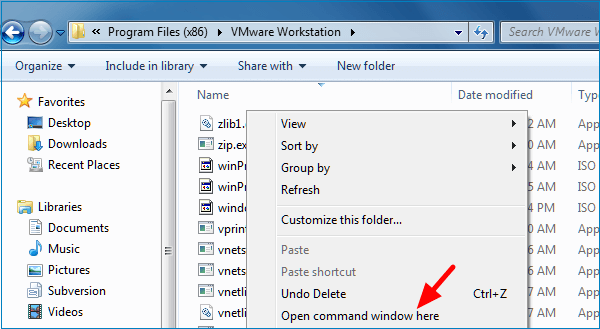
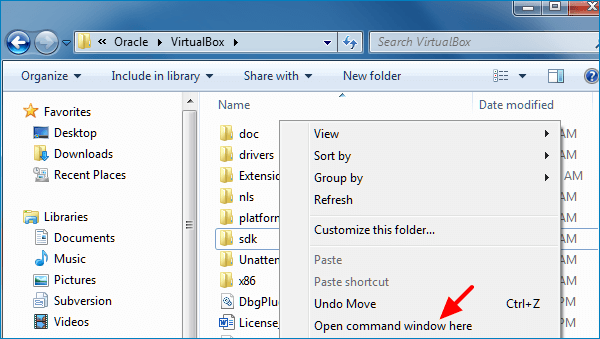
Step 1. Open the VMware installation folder. Then, press Shift and right-click the interface of the folder. In the context menu, choose Open command window here to open the Command Prompt.
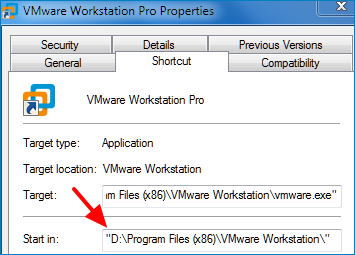
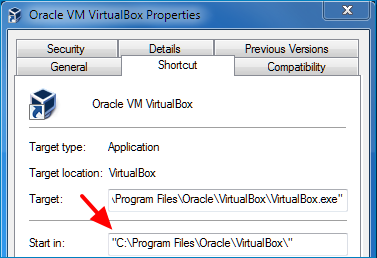
Tips: If you can’t find the VMware installation folder, you can right-click the VMware software, select Properties and click Shortcut to check it.
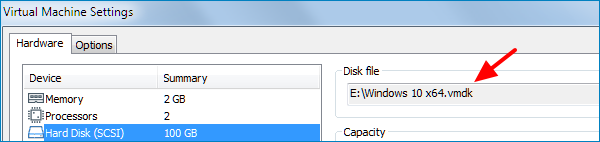
Step 2. After that, input vmware-vdiskmanager.exe -x Maximum size Gb “the location of the virtual disk file” like vmware-vdiskmanager.exe -x 100Gb “E:\Windows 10 x64.vmdk”. At last, you can check the expanded disk space in the Disk Management after powering on the virtual machine.

Tips: To check the location of the virtual disk file, you can realize it by choosing the virtual machine in VMware > double-click the virtual disk.
Part Two: How to Expand a Virtual Disk in VirtualBox
Step 1. Locate to the place where installs VirtualBox and enter it. In the VirtualBox installation folder, hold down Shift and right-click the interface. Then, select Open command window here.
Tips: The installation location of VirtualBox can be found by right-clicking the VirtualBox icon > click Properties > switch to Shortcut interface.
Step 2. To expand a virtual disk in VirtualBox, type the following command line in the CMD.
VBoxManage modifyhd “the virtual disk file’s location” ––resize expansion space(in Mb)
For example:
VBoxManage modifyhd “C:\Users\pc\VirtualBox VMs\Windows 10\Windows 10.vdi” ––resize 96120
Note: There are double dashes before “resize”.

Tips: If you forget the location of the virtual disk file, you can get it through opening the Settings window in the VirtualBox > select Storage and choose the virtual disk.

Step 3. When the virtual disk is expanded successfully, there is unallocated space for the virtual disk in the Disk Management.
To use the unallocated space, you can add it to the adjacent partition by the Extend Volume option or create a new volume with it.
Related Articles:
Your article has proven useful to me. VMware is difficult to handle so that I always do not know what to do.