The error—You must enable system protection on this drive always appears when performing a system restore in Windows 11/10/8/7. What can you do to solve this error and restore your system to a previous state? In this article, you can learn two working methods to fix the issue and one alternative way to backup and restore the Windows system.
- Part 1: About System Protection
- Part 2: How to Solve You Must Enable System Protection on The Drive Error
- Part 3: Better Way to Backup and Restore Your Windows System
Part 1: About System Protection
System protection is the Windows built-in feature that enables you to create system restore points, which can revert your system to a previous state in case of issues. When you perform a system restore, the System Protection should be enabled. Otherwise, you cannot get into safe mode and restore Windows.
When will you want to perform the system restore process? If the computer runs slowly or does not work normally, you can restore the system files and settings to an earlier point. If you want to recover the files or folders that were deleted by mistake, you can restore the system.
If you encounter the error You must enable system protection on this drive on the system restore process, how can you enable system protection to solve the issue? You can get the answer below.
Part 2: How to Solve You Must Enable System Protection on The Drive Error
Here are possible methods to fix the error You must enable system protection on the drive:
- Method 1: Enable System Protection via CMD
- Method 2: Enable System Protection via System Properties
- Method 3: Turn on System Protection via Control Panel
- Method 4: Fix the Error by Renaming Registry Files
Method 1: Enable System Protection via CMD
Step 1: Run the command prompt as administrator.
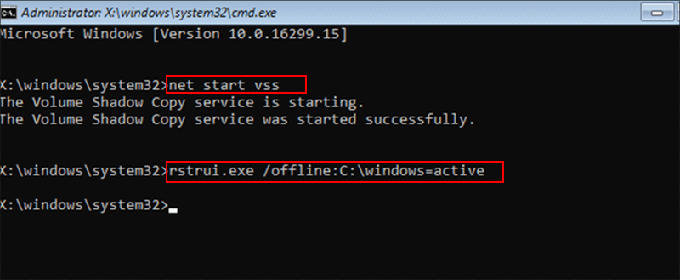
Step 2: Execute the command: net start vss to start the Volume Shadow Copy service.
Step 3: Execute the command: rstui.exe /offline : C: \windows=active.
Step 4: Restart your computer to check whether it goes to the previous state.
Tips: If you cannot boot into Windows, enter Windows Recovery Environment to access Troubleshoot > Advanced options > Command Prompt to run the commands.
Method 2: Enable System Protection via System Properties
Step 1: Right-click on This PC or Computer icon on your desktop and then choose the Properties option.
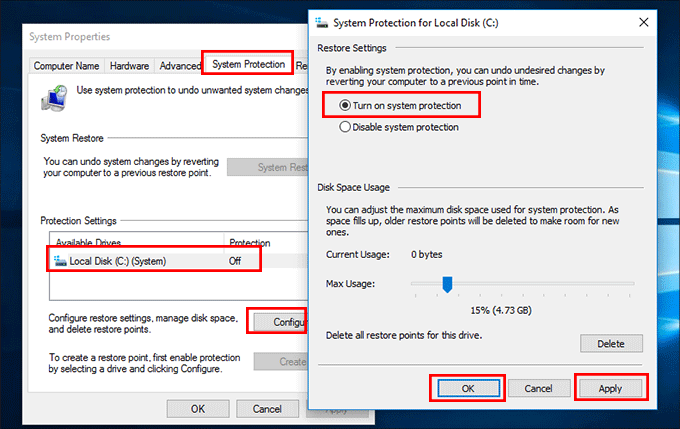
Step 2: Hit the System Protection tab on the System Properties window. After that, select the system drive you are going to enable system protection. Then hit the Configure button.
Step 3: Tick the Turn on system protection option and adjust the maximum disk space used for system protection. Finally, apply the changes and hit the OK button to save the changes.
Method 3: Turn on System Protection via Control Panel
Step 1: Access the control panel and then click System and Security > System > System protection.
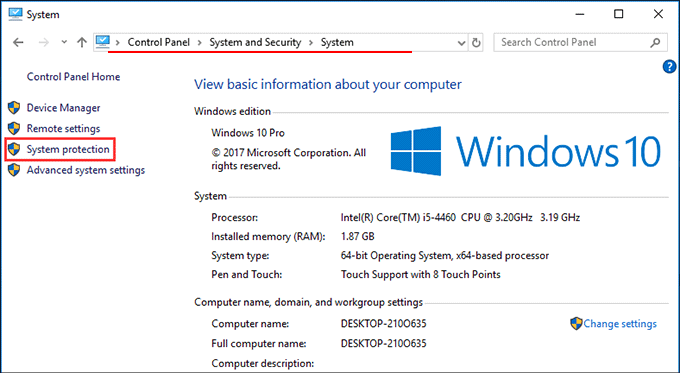
Step 2: Select your system drive and hit the Configure button.
Step 3: Select the option: Turn on system protection and click the Apple > OK button to confirm the changes.
Method 4: Fix the Error by Renaming Registry Files
If the above methods do not solve the error, there might be some errors in the registry files related to the system restore utility. You can rename them to get the system restore process to normal.
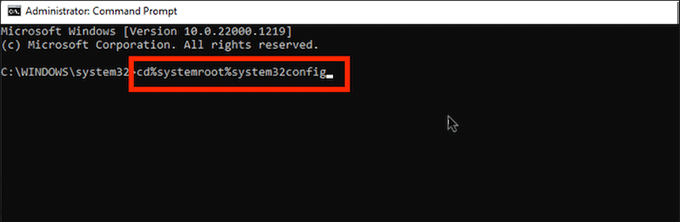
Step 1: Run the Command Prompt as Administrator.
Step 2: Execute the following command to access the registry files directory: cd %systemroot%system32config.
Step 3: Execute the command: ren SYSTEM system.001.
Step 4: Execute the command: ren SOFTWARE software.001.
Step 5: At last, restart your computer and check whether the error is solved or not.
Part 3: Better Way to Backup and Restore Your Windows System
If your Windows cannot boot and you encounter such an error message, how can you solve the issue without losing the data? You can back up and restore the Windows system with iSunshare CloneGo, without entering the Windows. This software can help to back up Windows OS, data partitions, or entire hard disks in simple clicks. Of course, the system restore is super easy with this software.
Check details: How to Backup and Restore Windows OS with iSunshare CloneGo
Besides, iSunshare CloneGo enables you to clone the system disk or the entire disk to SSD/HDD without reinstalling Windows. You can directly boot the SSD/HDD and enter the same working environment as before.

Conclusions:
When this error—You must enable system protection on this drive occurs when performing a system restore, you can try the mentioned methods to solve the error. If you want an easier and safer way to back up and restore a Windows system, you can try the reliable backup and restore software—iSunshare CloneGo. This software can even help to back up and restore your system without booting into Windows.
Related Articles: