We use cookies for personalizing content and ads and providing social media features. Your usage information on our website will be used for social media, advertising, and traffic analytics, or shared with our partners. Clicking "Accept" means you agree to use our cookies .
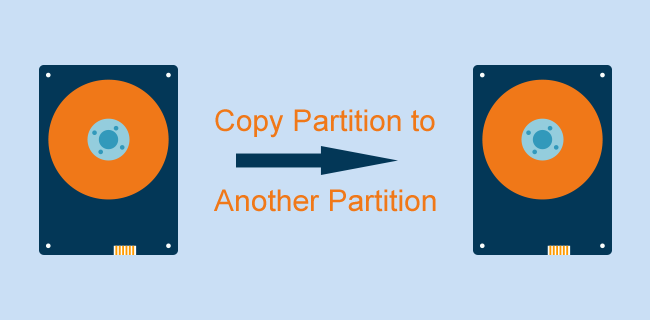
When we want to make a backup of a file or a document, we will directly copy and paste it to the destination partition/volume. However, when it comes to the data transfer of a whole partition/volume, is it possible to copy and paste the files and programs one by one with no data loss? No, you will find the convenient and reliable way to achieve it! Here, you will get the tutorial to copy partition to another partition in Windows and Mac
Part 1: Copy partition data with partition copy software on Windows
To make the data clone process simple and easy for you, we highly recommend you to apply the professional partition copy software– CloneGo, which will simply copy the whole partition data to another partition with a few simple clicks.
iSunshare Reliable Disk/Partition Clone Software
Safely clone partition to another partition
Migrate Windows system to SSD without reinstalling OS
Before you begin the data transfer, you need to do some preparations:
1. Download the software for free and install it on your Windows computer. It is better to download and install it on the partition except the C disk and the source disk for copy.
2. No matter the destination partition is on the same drive or on another drive, you should make a backup of the destination partition data in advance.
3. Check the source partition data and delete the useless and unnecessary images, videos, texts and etc. to speed up the clone process.
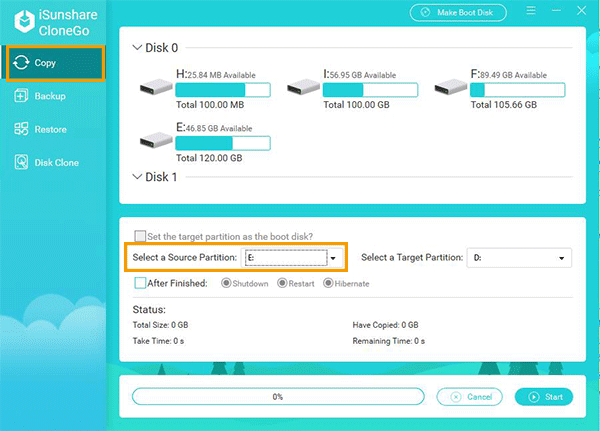
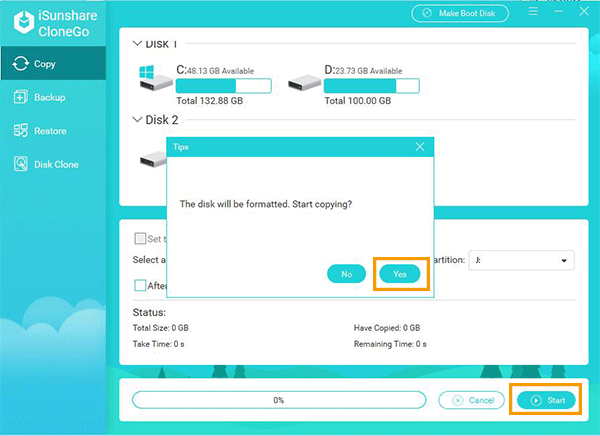
Step-1: Start CloneGo and choose "Copy" in the left menu. . You can also view all partitions from different disks listed on the first part of the interface.
Step-2: Add the data partition which you want to make a backup as the source partition.
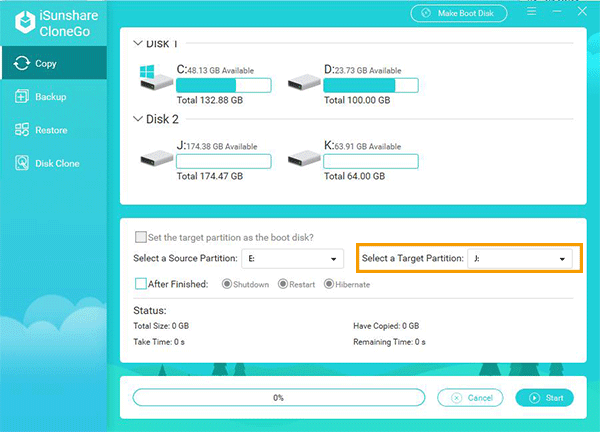
Step-3: Add another partition as the target partition.
Step-4: Click "Start" and you will get a pop-up windows which tells you this operation will format the partition. If you are sure the target partition data have been backed up, you can click "Yes" to start cloning your data partition.
After this, the whole data partition will be copied to another partition safely. You can close the software and go to the target partition to have a check.
Part 2: Copy one partition to another using Disk Utility on Mac
The restore feature in Mac can help you to copy one volume to another. You can make full use of it to build an exact copy of the primary partition/volume. However, there are two versions of Disk Utility with different operations in Mac computers. We will deep into it one by one.
Notice: All the data on the destination volume will be erased. Therefore, you need to create a backup for them in the cloud or other partitions. Besides, you need to make the destination volume large enough to store the data from the source volume.
Copy one volume to another in Mac OSX EI Captain and later
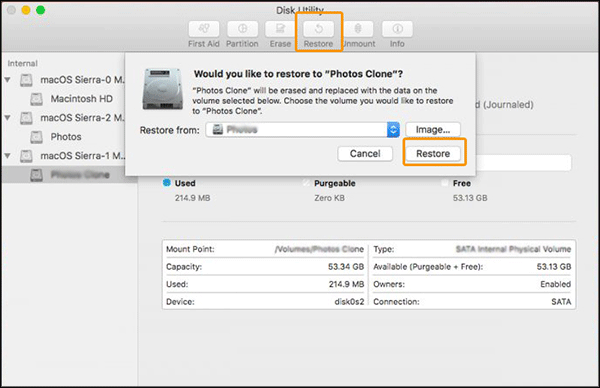
The restore feature in Mac OSX EI Captain and later becomes simplified. I will use macOS Sierra as an example.
Step-1: Access Disk Utility and select the destination volume you want to have the data copied to.
Step-2: Click "Restore" on the top menu. Or you can right-click to choose Restore option.
Step-3: You can choose the source target by using the drop-down menu. There is another option: Select a disk image file as the source volume.
Step-4: Click the Restore button which is under the Image button. And copy process starts at once.
After that, you get the volume/partition copied successfully and just go to click "Done" as an ending. It is worth mentioning that the destination volume with the copied data will share the same name with the primary one. If they are in one drive, you have better to modify the name of one of the volumes.
Copy one volume to another in Mac OSX Yosemite and earlier
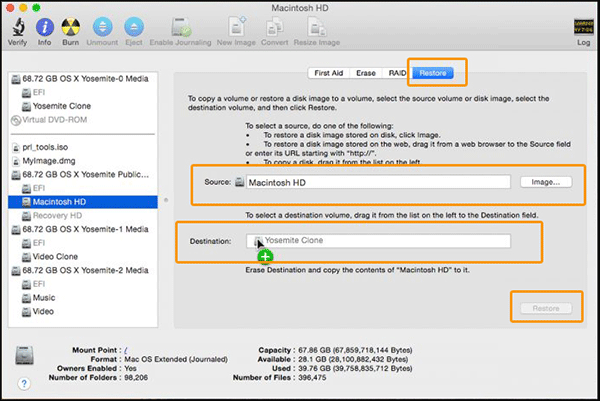
Step-1: Go to Disk Utility and click the volume you want to copy.
Step-2: Click "Restore" on the top menu. Here, you will see the chosen volume listed in the Source field. You are freely to change the source volume if you want. Or you can click "Image" behind the Source field to select a disk image file.
Step-3: Drag the destination volume from the list on the left to the Destination field. You should know that the destination volume will be fully erased in next step.
Step-4: Click "Restore" at the right-corner of the interface. And you will get a warning about the data erase on the destination volume. Next, click the Erase button to continue the copy process.
In no time, the erase and restore process will begin. When the process ends, you will get two volumes with the identical name.
Alternatively, there are many partition copy software for Mac, you can find one and use it to finish the data copy process.