We use cookies for personalizing content and ads and providing social media features. Your usage information on our website will be used for social media, advertising, and traffic analytics, or shared with our partners. Clicking "Accept" means you agree to use our cookies .
Q: "I configured my computer with a new M.2 SSD, but it doesn't show up in Windows 11's file explorer or in disk management, which is weird. How can I fix it?"
Solid-state drive is an efficient, silent, low-power storage device that allows users to enjoy better computer startup and operation speeds. However, sometimes in Windows OS, you may encounter the problem of SSD not showing up, thus not being able to access files on the SSD. In this article, we will discuss the reasons and fixes for SSD not showing up in Windows 11 or 10.
Based on understanding the possible reasons why SSD is not showing up in Windows, you can take the right steps to solve the problem. Here are some of the main reasons.
1. Incorrect BIOS settings.
2. New SSD not initialized.
3. Outdated or missing SSD driver.
4. SSD is not assigned a drive letter.
5. Hardware failures such as damaged SSD, bad sectors, or connection problems with the computer.
How to Fix SSD Not Showing Up in Windows 11/10
Now that you've learned the common reasons why your SSD drive doesn't show up in Windows 11 or 10, it's time to fix the problem, and here are some possible solutions.
If your SSD is damaged or it has connection problems with your computer, then it cannot be detected by your computer and show up in File Explorer, you may need to replace the faulty part or seek professional hardware repair services.
Step 1: Turn off your computer and disconnect the power, then uninstall the SSD and check its condition and interface for any damage or looseness.
Step 2: Check the integrity of the connecting cables for any breaks or damage.
Step 3: Reinstall the SSD and make sure it is firmly connected to your computer, then restart your computer to check if the issue is fixed.
Step 4: When the hard disk or SSD on your computer is corrupted, the error "The request failed due to fatal hardware error" will pop up on your computer. After fixing this error, if the SSD is still not recognized and shows up, then it should have nothing to do with the hardware and you can continue to try the next option.
Way 2: Initialize New SSD
When replacing your computer's hard drive, initializing the new SSD is a necessary step that ensures the operating system recognizes and uses the new storage device correctly. If your SSD is brand new and fails to show up in Windows 11, you may have forgotten to initialize it.
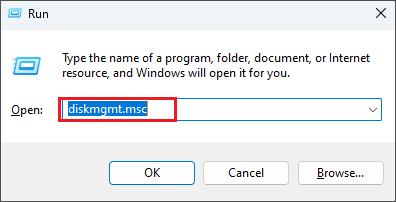
Step 1: Press the Win+R key combination, type "diskmgmt.msc" in the Run command box and run it to open the Disk Management tool.
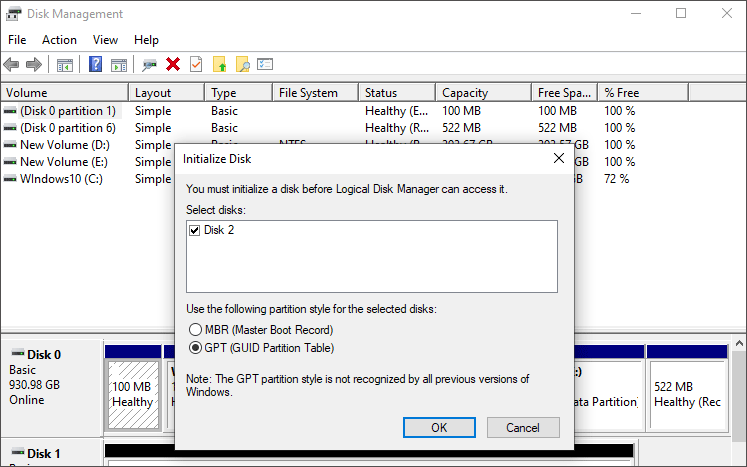
Step 2: If your SSD is not initialized, you will see a pop-up window asking you to initialize the disk, select the partition style and click "OK" to initialize the SSD, and then your SSD will be recognized by Windows 11, but it is not partitioned and formatted yet, you need to proceed to the next step.
Way 3: Assign Drive Letter to SSD
Since the PC system identifies and accesses individual drives by drive letter, if you do not assign a usable disk drive letter to the new SSD after initializing it, the SSD may not show up correctly in Windows Explorer.
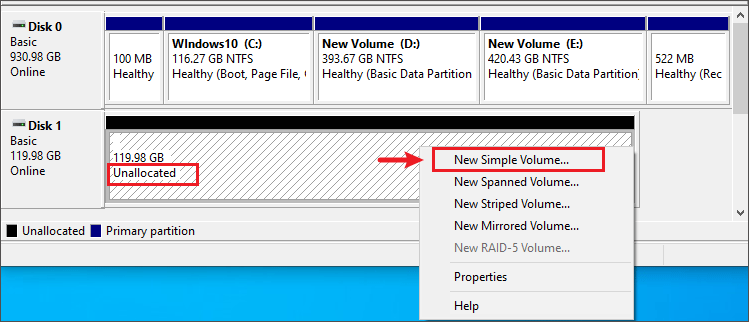
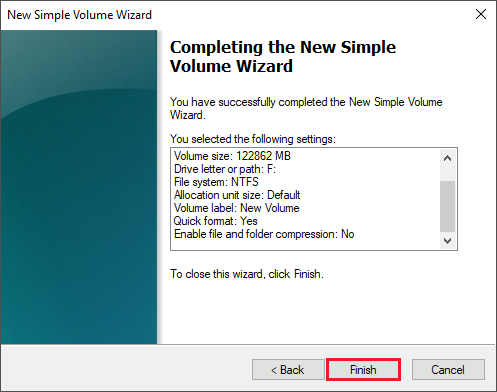
Step 1: In "Disk Management", if your new SSD shows up an "Unallocated" status, right-click it and select "New Simple Volume".
Step 2: In the New Simple Volume wizard, follow the prompts to set the partition size, drive letter, file system, and other information of the SSD, and then click "Finish".
Tip: If you don't know which partition format to choose, check out here on gpt vs. mbr.
Wait for the SSD to be formatted and assigned a drive letter. Once it's done, you'll be able to see and access the SSD in Windows 11 Explorer.
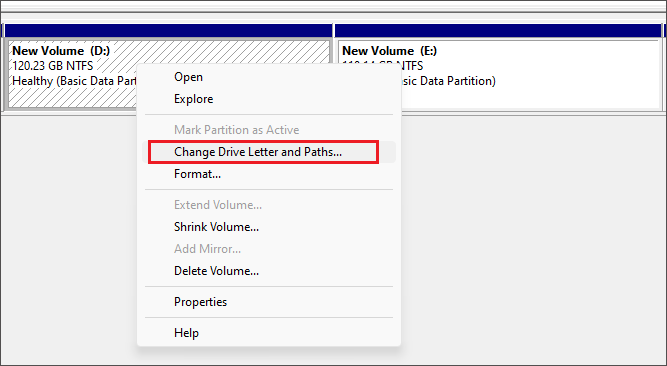
Alternatively, if you have assigned a disk letter to the SSD, and it is still not displayed in Windows 11/10, then it may be due to a conflict, and you can change the disk letter to the new SSD to try to solve the problem.
Way 4: Update SSD drivers
If the driver on your computer is too old or incompatible with the SSD, then you need to update or install the latest driver for the SSD to show up in Windows 11/10.
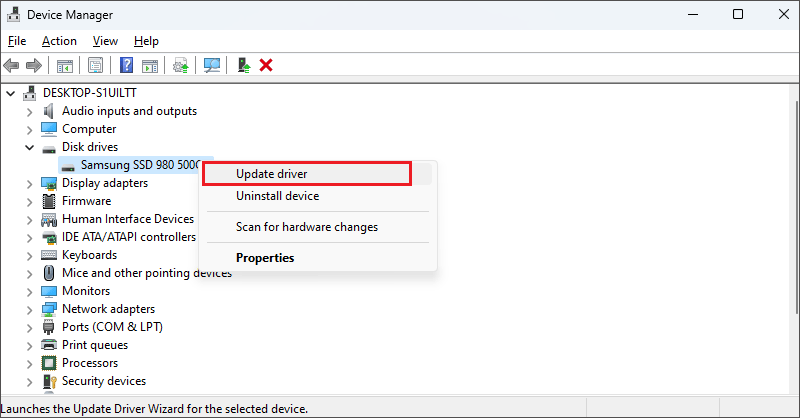
Step 1: Press "WIN + X" and select "Device Manager".
Step 2: Select your SSD from the "Disk Drivers" list, then right-click on it and select the "Update Driver" option.
Step 3: Select "Search automatically for updated driver software" and Windows 11 will automatically find and install the latest driver for your SSD. Once done, restart your computer and then check if the SSD not showing up in Windows 11/10 issue has been fixed.
Way 5: Configure BIOS settings
The BIOS is the firmware that loads when your computer boots up, and its settings affect how your computer system recognizes your SSD. If your SSD doesn't show up in Disk Management, you can check the configuration by going into your computer's BIOS or UEFI menu. You should also check if there is an option to disable or enable the SSD.
Step 1: Reboot your computer and press F2 or F10 or Del (depending on the computer model) to enter the BIOS setup.
Step 2: In general, enabling AHCI mode is usually the recommended setting, so you can set the SATA controller mode to AHCI in "Storage Configuration" and then save the setting.
Meanwhile, check if the BIOS enables or displays the SSD, if not, you need to adjust it to enable or display, and then exit the BIOS. Other than that, you can also try to restore the default settings of the BIOS or update the BIOS version to see if it solves the problem.
Tip: How to Move OS to New SSD in Windows 11/10
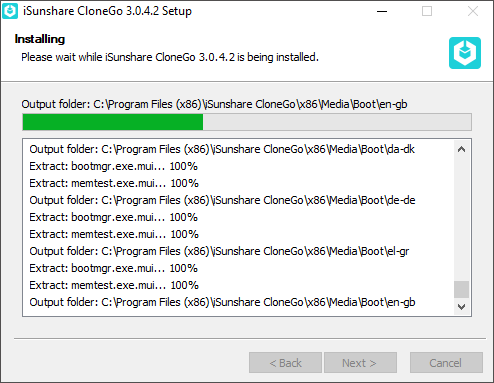
Migrating the OS from the old hard disk to the new SSD and then setting the SSD as the boot disk of your computer can better improve the system's performance and responsiveness. With the help of iSunshare CloneGo, you can move your Windows OS to the new SSD in just a few clicks without losing any data.
Step 1: Visit iSunshare official website to download and install CloneGo software.
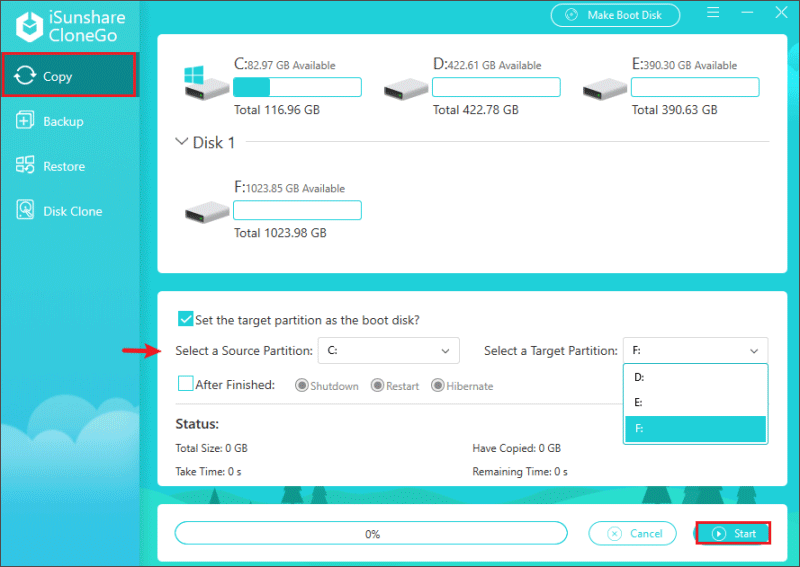
Step 2: Run the software and select the "Copy" option, then select the Windows OS (usually C drive) as the source partition, and then select the new SSD as the target partition.
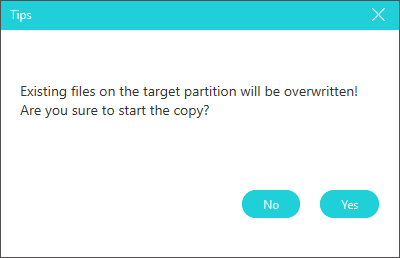
Step 3: Click "Start" and then click "Yes" to confirm moving Windows OS to the new disk, keep the computer on during the copying process until the copying is successful.
Conclusion
This article showed you how to fix SSD not showing up in Windows 11/10 and how to migrate OS to a new SSD. With these methods listed in this article, most users can easily fix the issue of not showing SSD on their computer, and I hope they can help you as well. If you found the article helpful, please share it with others.