We use cookies for personalizing content and ads and providing social media features. Your usage information on our website will be used for social media, advertising, and traffic analytics, or shared with our partners. Clicking "Accept" means you agree to use our cookies .
As we all know, compared with regular hard disk drives, SSD has more advantages in many aspects, such as faster read-write speed, lower consumption, better durability and etc. You may want to upgrade your old hard disk to a larger SSD in order to speed up your computer and improve the PC performance. But you may find it is very troublesome to reinstall the Windows operating system, programs, personal files, as well as other data to the new SSD. If only there was a feasible way to clone an entire hard disk! Well, it really did. In this article, you will learn how to clone hard drive to SSD in Windows 10/8/7 computer with a professional Windows disk cloning software. Now, let's get started!
iSunshare CloneGo – A Reliable Partition/Disk Cloning Software
There are various disk cloning software on the market. When it comes to what the best Windows disk cloning software is, it is hard to say. However, compared with most of software, iSunshare CloneGo is a relatively mature Windows disk cloning software which is mainly used to copy, back up and restore Windows system/partition, as well as clone the whole hard disk to another disk.
It provides an intuitive interface for each function, making it easier for users to operate. It is compatible with almost all versions of Windows, like Windows 10, Windows 8.1, Windows 8, Windows 7, Windows Vista and Windows XP. With this software, you can easily clone hard disk to SSD in your computer without data loss and reinstallation.
iSunshare Reliable Hard Drive Clone Software
Quickly clone hard drive to SSD in Windows computer
Steps to Clone Hard Drive to SSD in Windows 10/8/7 with CloneGo
Before you start to clone hard drive to your new SSD in your Windows computer, you'd better do the following basic three preparations in advance in case of anything wrong during the process.
Choose a SSD with enough space and that is suitable for your Computer.
Back up data in the SSD in advance if needed as the operation will overwrite it.
Download and install the software of iSunshare CloneGo in your PC first of all.
After you have done the above three preparations, you can start to copy hard drive to the new SSD in your Windows 10/8/7 computer with iSunshare CloneGo. Steps to do it are very easy and here are the detailed instructions:
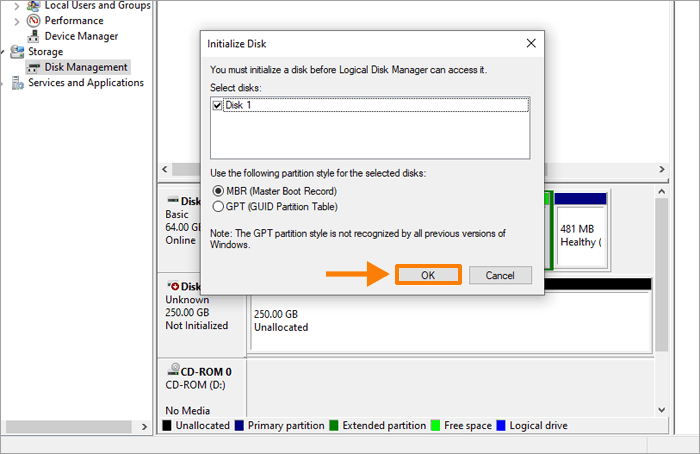
Step 1: Connect the SSD to your PC, initialize and allocate the disk.
First of all, you should connect the larger SSD to your computer well. After it, open your computer and go to the Disk Management, then you will be required to initialize the disk. Choose a partition style for the selected disk from the given choices and click the button of OK to make sure.
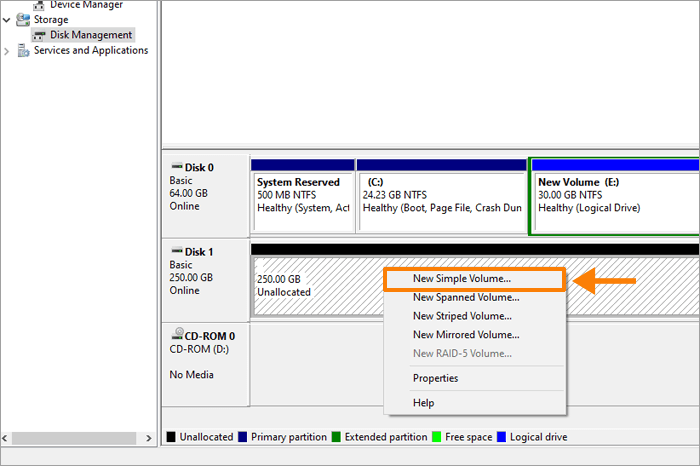
After you have initialized the SSD, right-click anywhere from the unallocated space, select the option of New Simple Volume from the drop-down menu, and then follow the on-screen New Simple Volume Wizard instructions to create a simple volume on the disk.
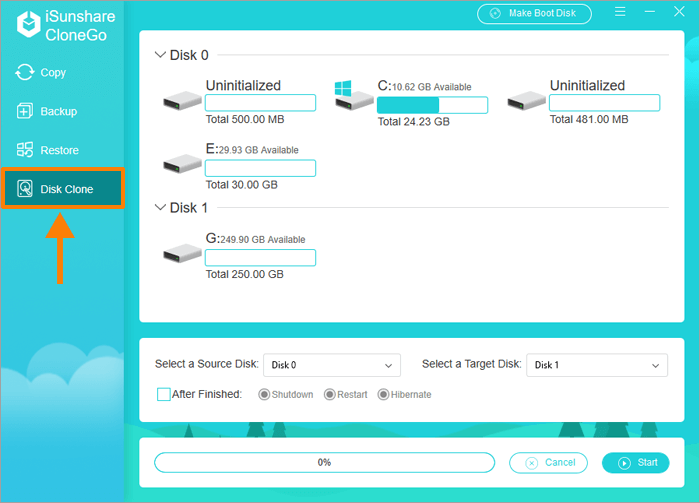
Step 2: Open iSunshare CloneGo and select the function of "Disk Clone".
Then you can open the software of iSunshare CloneGo that you have downloaded and installed on your computer before. After you open it, you will see a few functions from the left side menu. To clone hard drive to SSD, choose the function of Disk Clone to proceed.
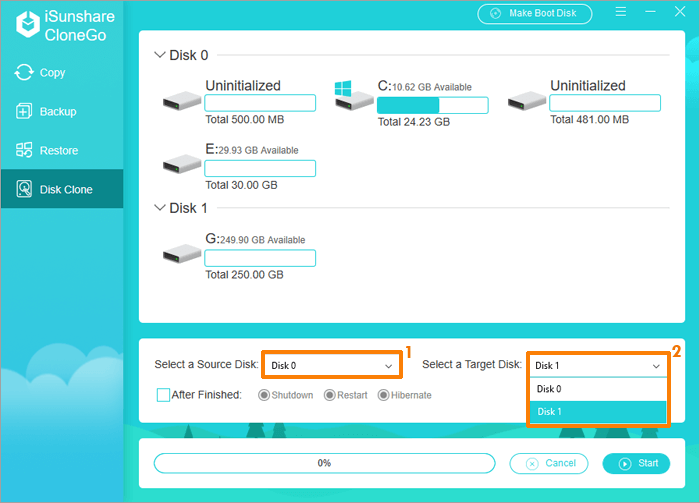
Step 3: Define the source disk and the target disk.
You can see all the hard disks on the Disk Clone interface. Now you can go to the option of Select a Source Disk to choose the original hard drive as the source disk and go to the option of Select a Target Disk to choose the new SSD as the target disk.
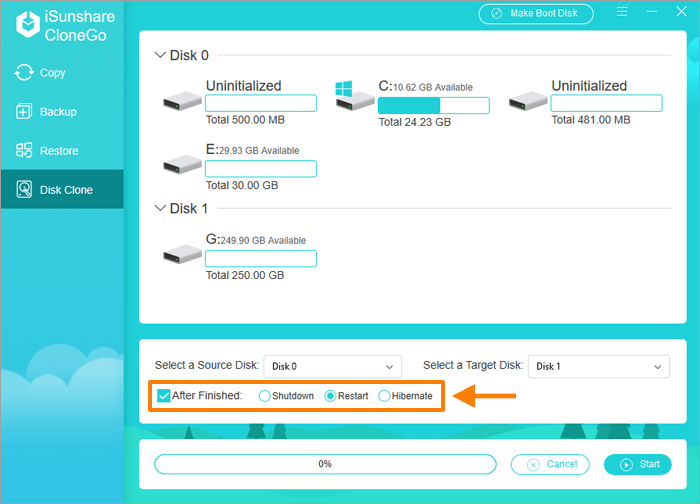
If you like, you can tick the box next to the option of After Finished and you will be given three choices: Shutdown, Restart, and Hibernate. You can choose one from them to decide the status of your computer after the disk cloning process finishes if needed. But you can also choose to do nothing. It doesn't matter.
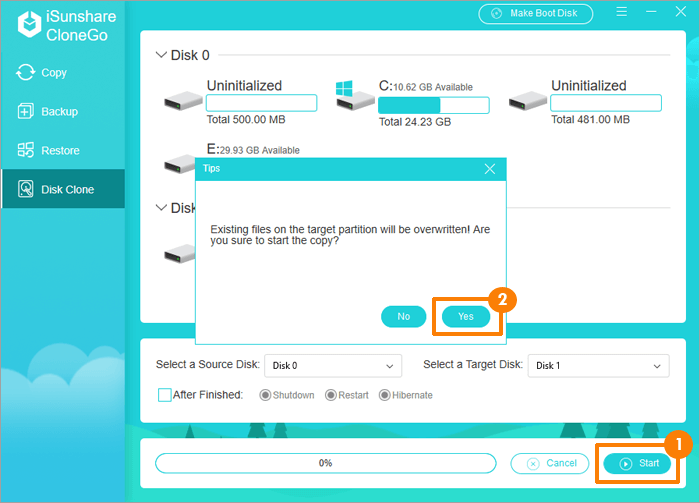
Step 4: Start the disk cloning process.
Now it will come to the most crucial step. Click the button of Start in the lower right corner of the interface in order to start the disk cloning process and you will get a small tips window saying "Existing files on the target partition will be overwritten! Are you sure to start the copy", click Yes to confirm your action.
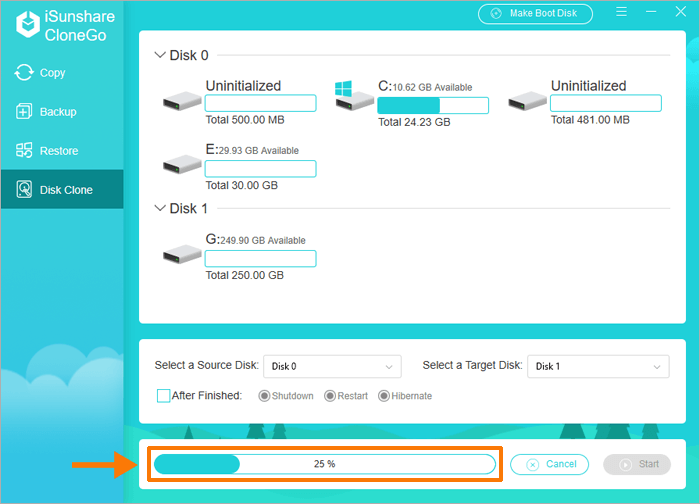
Step 5: Wait for the hard disk cloned to the SSD successfully.
The disk cloning process will start after Step 4 and it will take some time. So you just need to wait for the process to complete patiently. After the process ends, you will get the corresponding notice and then you can close the software. At that time, you will get all the data cloned from the original hard drive to the SSD successfully.
Conclusion:
This article studies how to clone hard drive to SSD in Windows 10/8/7 using an easy-to-use disk cloning software - iSunshare CloneGo. Following the above 5 steps, you will succeed in replacing your hard drive with SSD easily and effectively. After that, you are able to boot your computer from the SSD to get a better computer performance.