We use cookies for personalizing content and ads and providing social media features. Your usage information on our website will be used for social media, advertising, and traffic analytics, or shared with our partners. Clicking "Accept" means you agree to use our cookies .
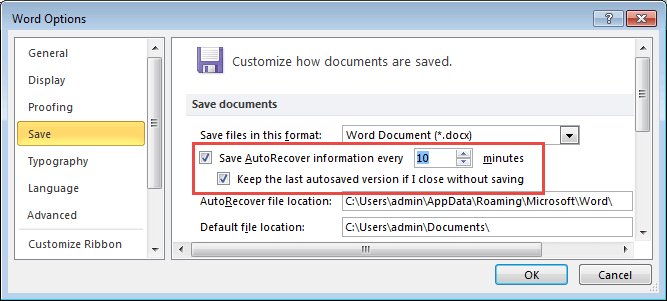
1. Documents to be saved automatically must be at least once saved (that is, the file exists in the hard disk). If you create a blank document in Microsoft Word, you need to save the file in the hard disk before AutoRecover feature can be used.
2. If you modify the document after the previous save (including manual save or save automatically), system begin to start the timer and automatically save the actions at a specified time interval. In the contrary, if you don't have any new change in the document after the previous save, the timer will not be activated, and system will not be timed to save the file.
3. The timer will work only if the Office is activated. Suppose that I open the Excel and made a change, but I switched to the Google to browse the web, so the timer will stop working, and it will not automatically save the action even an hour later.
4. During the timer works, if there is a manual arching event in advance, the timer will be cleared to stop the work.
Temporary File
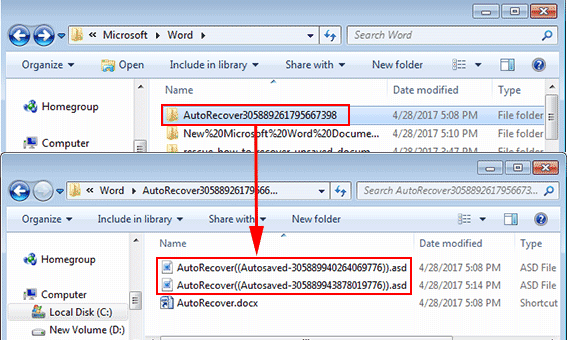
AutoRecover will generate some temporary files, so where to find these temporary files is critical for the recovery after an accident. Generally the files are stored in the following locations:
Win 7: C:\Users\<username>\admin\AppData\Roaming\Microsoft\<Application_Name>
Win XP: C:\Documents and Settings\<username>\Application Data\<App Name>
In this file path there will be a folder named by “<filename> + random number”, as shown on the screenshot below. Here takes MS Word as an example. Every time an auto-save event in this folder occurs, it will generate a file named “<file name> ((Autosaved- random number)).asd”, and the number of files generated depends on the times of auto save.
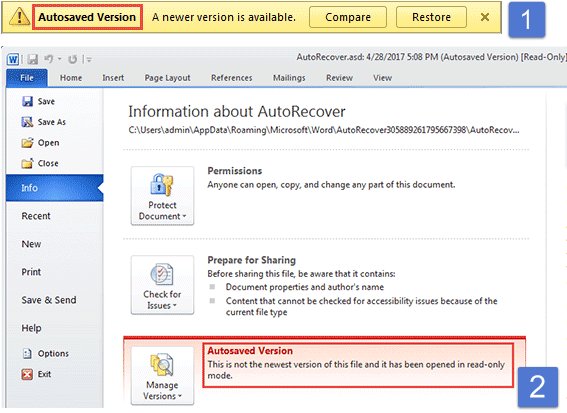
You can directly open these temporary files, which are read-only and “Autosaved Version” will be displayed in the information bar (the top of the edit bar). Also you can see the same information in the “Info” panel. Click the Restore button, and you can recover the content of the temporary file to the latest state of the document.
After learning the working principle of AutoRecover in Office, when you can't use Ctrl + Z to return the document to the ten minutes before, you can use this function to restore the historical version of a point in time. For many people, this is a good choice.