We use cookies for personalizing content and ads and providing social media features. Your usage information on our website will be used for social media, advertising, and traffic analytics, or shared with our partners. Clicking "Accept" means you agree to use our cookies .
For some reasons, we want to make non editable word document (.*docx and.*doc) so that readers can only digest the content but are unable to change it. Yes, it is easy to make a word document not editable. You can lock Word document from editing by adding the editing restrictions and modify password. Here, this article will show you how to lock word 2010/2013/2016 document with editing restrictions in detailed steps.
2 Ways to Make a Word Document Read Only with Password
To add the editing restriction for the Word document 2010/2013/2016, you can restrict others to change the content and format.
Way 1: Make a Word Document Read Only with Restrict Editing Settings
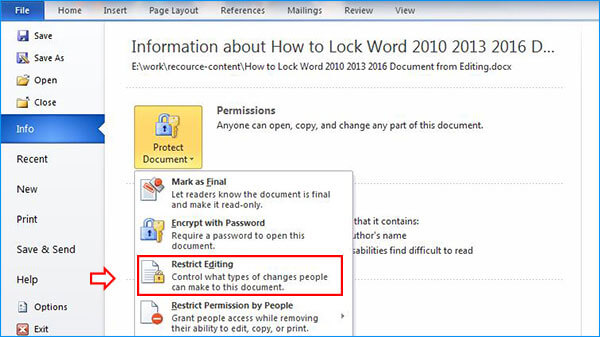
Step 1: In your Word document, go to click File > Info> Protect Document > Restrict Editing.
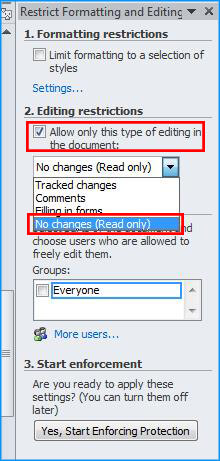
Step 2: Under the Editing restrictions in the Restrict Formatting and Editing panel, you need to select Allow only this type of editing in the document and change the type to No changes (Read only) from the drop-down list.
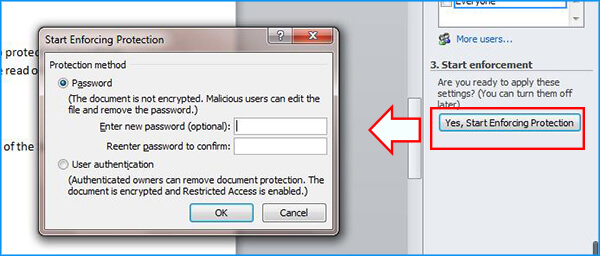
Step 3: Click the Yes, Start Enforcing Protection button and enter the editing password. After that, click the OK button.
Step 4: After that, your document is protected from unintentional editing. You can save the editing-restricted Word document.
When you open the Word document again, it displays as a read only Word document. But you cannot edit it before you remove the password protection.
Way 2: Make Word Document not Editable with Modify Password
When you save the Word document, you can add a modify password to protect it from editing. In this way, the person without the modify password can only enter the read only mode of the document.
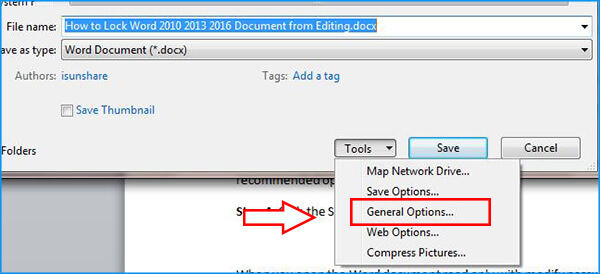
Step 1: Open your Word document and click File and choose Save as.
Step 2: Next, you should click the Tools button which is on the left side of the Save button. And choose General options from the drop-down list.
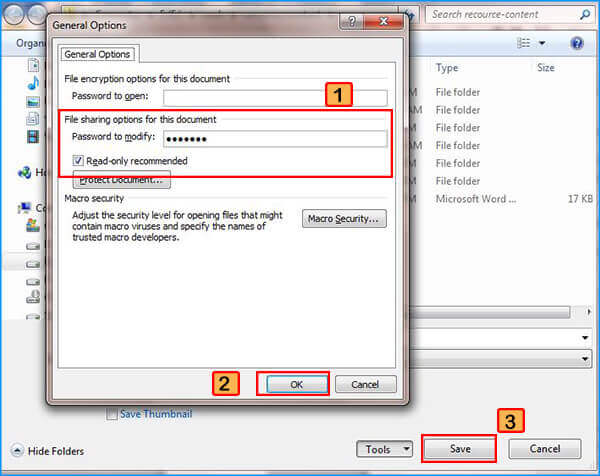
Step 3: In the General Option panel, you can set the modify password and select the Read-only recommended option. Then, click the OK button. Finally, click the Save button to save the settings.
When you open the Word document read only with modify password, you will get the password prompt which asks you to enter the password to modify or open read only version.
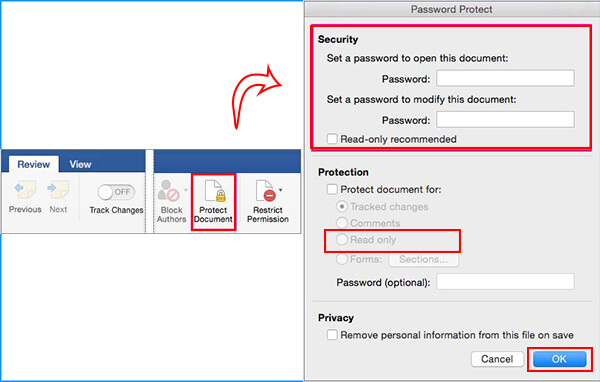
Part 2: How to Lock Word File Read Only with Password on Mac OS
On Mac OS computer, you need to open the Word document/file and click Review > Protect Document. Then you could find the Security settings in the Password Protect panel. You can set a password to modify this document and choose the Read-only recommended options. In the end, click the OK button.