We use cookies for personalizing content and ads and providing social media features. Your usage information on our website will be used for social media, advertising, and traffic analytics, or shared with our partners. Clicking "Accept" means you agree to use our cookies .
Windows 10 employs DPI scaling to ensure text, apps, and other elements remain sharp and readable on high-resolution displays. However, incorrect settings can result in blurry interfaces or inconsistent sizing across text and menus. Below are updated methods to adjust DPI scaling issues.
If only specific apps look blurry or improperly sized, use per-app DPI settings to fix the blurry issue.
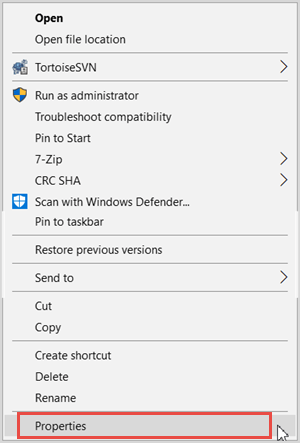
Step 1: Go to desktop, right-click on the blurry application icon then select Properties.
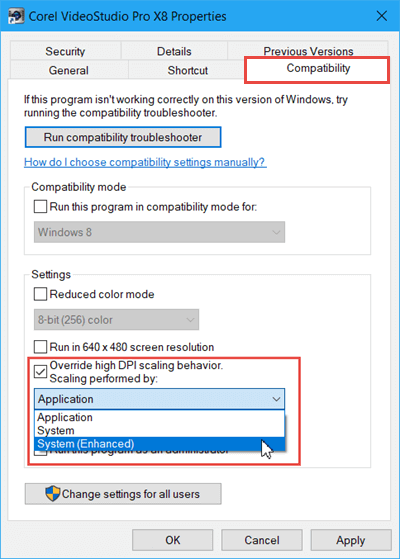
Step 2: Click on Compatibility tab, tick the Override high DPI scaling behavior checkbox. Click the down arrow next to Application and select System (Enhanced) from the drop-down. Tap on Apply and OK to save changes.
Note:
Recommended when only one or two apps appear blurry.
Part 2. Set DPI Scale via Settings
To resize all on-screen items, including text, icons, and buttons, you can change the display scaling settings. This is ideal for uniformly scaling UI elements across your system.
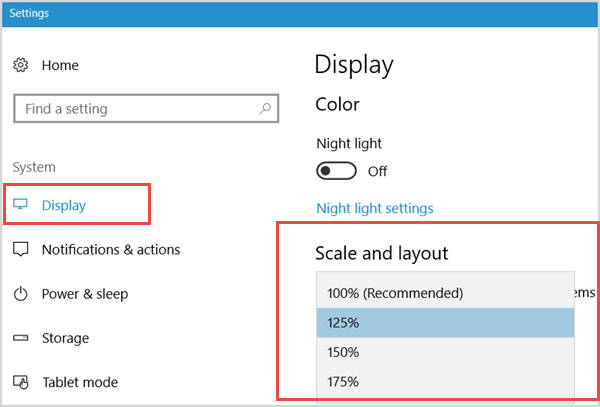
Step 1: Right-click on the desktop and choose Display settings.
Step 2: Under Display tab, locate Scale and layout section. You can change the size of text, apps, and other items. We recommend you choose 125% from the list.
Step 3: For finer control, click Advanced scaling settings. Here you can set the custom scale between 100% and 500%. Besides, you should toggle on the option—Let Windows try to fix apps so they're not blurry.
Step 4: Restart your computer to apply the changes.
Part 3. Use Registry for Advanced Control
For IT administrator or advanced users, they can adjust the DPI settings by editing registry keys.
Step 2: Navigate to: Computer\HKEY_CURRENT_USER\Control Panel\Desktop and find LogPixels DWORD to modify.
Step 3: Double-click LogPixels and change its Base to Decimal. Also, you can enter the value data for the DPI scaling level: the value data for 100% scaling level is 96; 120 for 125%, 144 for 150%, 192 for 200%, 240 for 250%, 288 for 300%, 384 for 400%, 480 for 500%. After that, click the OK button to save the change.
Step 4: Double-click the Win8DpiScaling DWORD and change its value data: 0 for default DPI scaling settings and 1 for other DPI settings. Hit the OK button to apply the change.
Step 5: Reboot your computer to make the change take effect.
FAQs on DPI Settings in Windows 10
1. What is DPI in Windows 10?
DPI (dots per inch) determines how content is scaled on your display. A higher DPI setting makes text, icons, and UI elements appear larger and easier to read, especially on high-resolution displays.
2. Why does my app look blurry after changing DPI?
Some older applications are not DPI-aware and may appear blurry. To fix this, use the DPI override feature in the Compatibility tab of the app's properties.
3. What DPI setting is best for 1080p or 4K displays?
For 1080p (Full HD): 100%–125%; For 4K (Ultra HD): 150%–200%. It is better to adjust based on your screen size and personal preference.
Conclusions
Proper DPI control ensures a crisp, readable display experience across apps and monitors. If only certain apps are problematic, you can use per-app DPI override to change DPI settings. For the consistent system-wide scaling, you can adjust DPI scaling via Settings. When it comes to advanced or mass configuration, try Registry editor. Hope this article can help you.