We use cookies for personalizing content and ads and providing social media features. Your usage information on our website will be used for social media, advertising, and traffic analytics, or shared with our partners. Clicking "Accept" means you agree to use our cookies .
If your Windows 10 PC is stuck in Diagnostic Startup mode—or you enabled it for troubleshooting and now want to switch back—you're in the right place. While Diagnostic Startup is useful for isolating issues, it can limit functionality and prevent key services from running.
In this guide, we'll explain what Diagnostic Startup is, and how to safely disable it and return to Normal Startup mode.
Diagnostic startup is a troubleshooting mode which enables users to run Windows with basic devices and services only. When the diagnostic startup mode is enabled, it can disable network drives, block third-party service and prevent certain programs from launching. Thus, most uses want to go back to normal startup once troubleshooting is complete.
Part 2: Reasons for automatically diagnostic startup in Windows 10
Three reasons may cause diagnostic startup:
1. Illegal shutdown. For example, power-off directly. Under such case, the computer has not finished read-write yet. By default, the data is saved in the memory temporarily. As computer suddenly shut down, data saved inside lost. The next time you launch your computer it will detect the error of drive and repair it. You'd better not skip this procedure. Otherwise, it will cause the new read-write error and harm your hard drive.
2. Your hard drive format is FAT 32. FAT 32 requires the computer diagnostic startup when occurring the suddenly power-off.
3. Bad track. A computer will ask for a diagnostic startup when exits bad track.
How to Disable Diagnostic Startup in Windows 10
Way 1: Revert to Normal Startup via System Configuration
Step 1:Open Run box. Then input msconfig and hit Enter.
Step 2: In the General tab, choose Normal startup.
Step 3: Click Apply, then OK. Then restart your computer to apply the changes.
Note:
If you're unable to access msconfig due to login issues, proceed to the next section.
Way 2: Using Command Prompt in Recovery Mode
If Diagnostic Startup has disabled essential services preventing normal login, you can access recovery mode to exit diagnostic startup mode.
Step 1: On the login scree, keep pressing the Shift key and then hit the power icon, choose Restart to enter recovery mode.
Step 2: In the Windows recovery screen, click Troubleshoot> Advanced options. Then choose Command Prompt to run.
Step 3: In Command Prompt, type: bcdedit /deletevalue {current} safeboot and press Enter.
Step 4: Close Command Prompt and select Continue to boot into Windows. After that, you can repeat the steps in Way 1 to turn off diagnostic startup mode.
Way 3: Optimize the Drive to fix Diagnostic Startup Error
If your system repeatedly enters Diagnostic Startup, it might be due to disk errors:
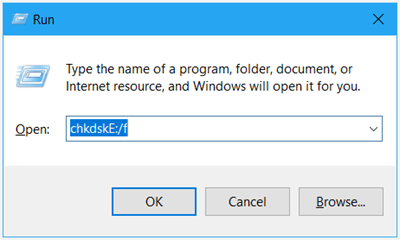
Step 1: Press Window + R key to invoke Run dialog. Input "chkdskX:/f" without quotes and click OK. Replace the hard disk letter to X.
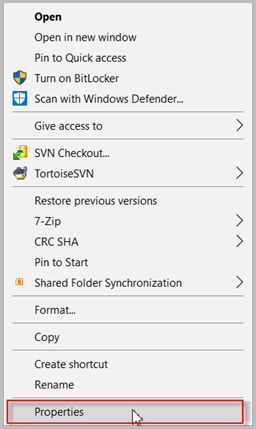
Step 2: If it shows you the error of hard drive, click on This PC and right-click on the corresponding drive and select Properties.
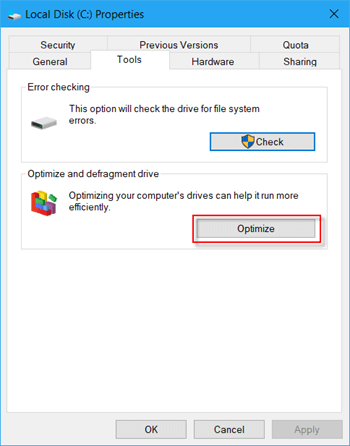
Step 3: In the Local Disk Properties window, click on Tool tab.
Step 4: Tap on Optimize button to optimize and defragmenter drive.
Note: If this does not help, the hard drive may exit bad cracks. Backup your files in Drive D then format it.
Note:
Persistent issues may indicate hardware problems. Consider backing up data and consulting a professional.
Way 4: Fix the error via Registry Editor
Your computer probably exits wrong bytes inside.
Step 1: Hit Window + R key, type "regedit" in the box then hit Enter.
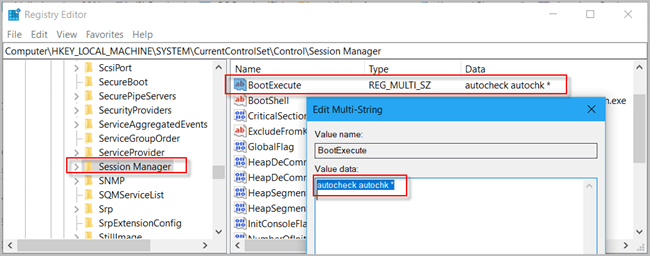
Step 2: Expand the following keys in the Register Editor. HKEY_LOCAL_MACHINE/SYSTEM/CurrentControlSet/Control/Session Manager
Step 3: In the right side, find out "BootExecute:REG_MULTI_SZ" key and double-click on it. Type "autocheck autochk " in the box under Value Data. Or you can delete the "BootExecute:REG_MULTI_SZ" key completely.
Part 4: FAQs on Diagnostic Startup Mode in Windows 10
Q1: Will I lose data by switching from Diagnostic Startup to Normal Startup?
No, switching back to Normal Startup does not delete files or affect your data.
Q2: Why can't I log in after enabling Diagnostic Startup?
This mode may disable services required for certain login methods, like PIN or biometric authentication.
Q3: How do I prevent accidental activation of Diagnostic Startup?
Always ensure you're selecting the correct startup mode in msconfig. Avoid changing settings unless necessary.
Q4: How to Enable Diagnostic Startup Mode in Windows 10?
You can open Run by Windows +R, type msconfig and tap OK to open System Configuration. Then in the General setting, choose Diagnostic startup and click OK.
Conclusions
By following these steps, you can effectively disable Diagnostic Startup in Windows 10 and restore normal functionality.