We use cookies for personalizing content and ads and providing social media features. Your usage information on our website will be used for social media, advertising, and traffic analytics, or shared with our partners. Clicking "Accept" means you agree to use our cookies .
Whether in Windows 10 upgrading, PIN code adding, Windows Store or even Xbox, you may receive an error message 0x80190001. It is disgusting and should be something went wrong. This frustrating message often points to update failures, PIN setup issues, or network interruptions. The good news? Below are proven fixes that solve the problem.
Network/Internet issues like time sync, proxies, or corrupt connections
Antivirus or third-party security software blocking requests
Corrupted system files or Windows profiles affecting update or PIN setup
Incorrect system date/time disrupting authentication
Part 1: Fix Windows 10 Upgrade Error Message 0x80190001
When you upgrade error, it is common to receive 0x80190001 error Message. Worry not, here are five fixes for you. Just try and address the issue in Windows 10.
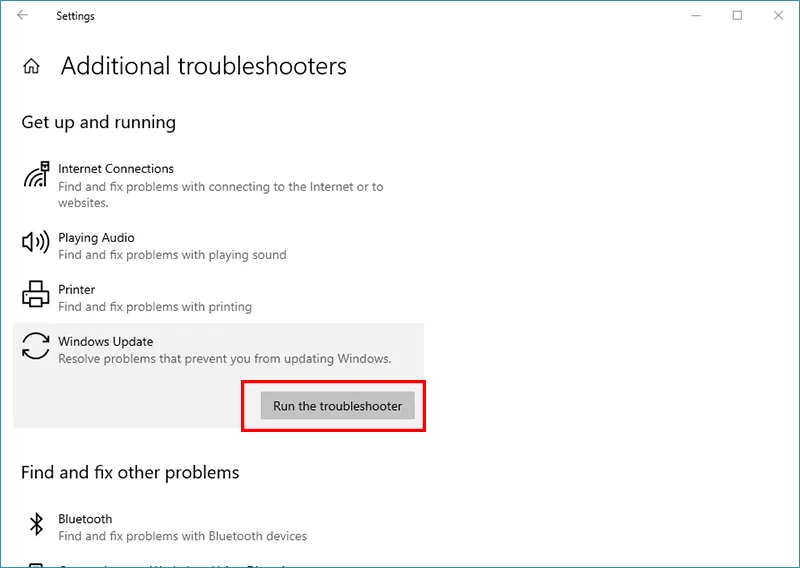
This Troubleshooter can help to detect problems in the process of Windows update.
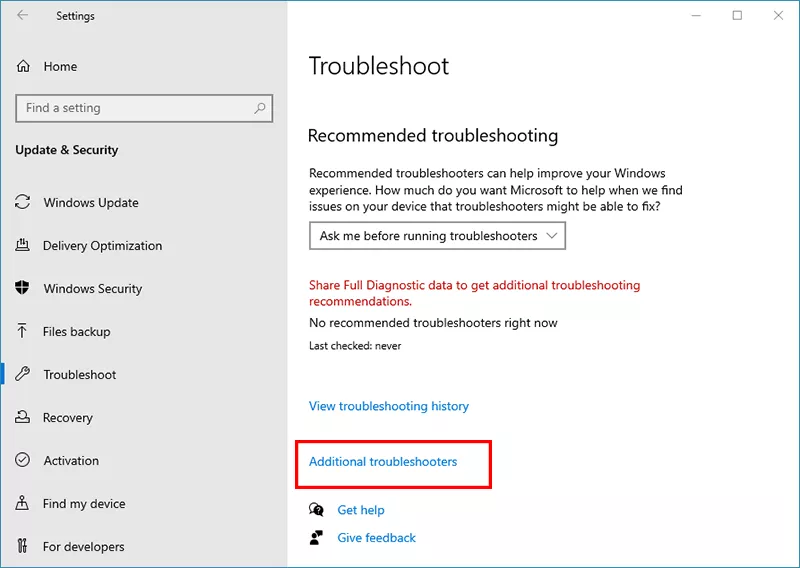
Step 1: At the lower-left corner, click Start icon then tap on Settings.
Step 2: Navigate to Update & Security > Troubleshoot . Then click Additional troubleshooters.
Step 3: Go to Windows Update option and then hit Run the troubleshooter button.
After the process ends, apply suggested fixes and restart.
Fix 2: Try to clean boot Windows 10
To check if the issue is caused by applications or not, it is necessary to try to clean boot Windows 10. Clean boot your computer, it means that launch Windows 10 system services and components only rather than run third-party applications and add-ins. If the message does not show you, there would be malfunctions between your applications and add-ins.
Step 1: Press Window + R key combi then input "msconfig" in the Run dialog box. Hit Enter to open System Configuration window.
Step 2: Under the General tab, select Selective startup option. Check Load system services and uncheck Load startup items.
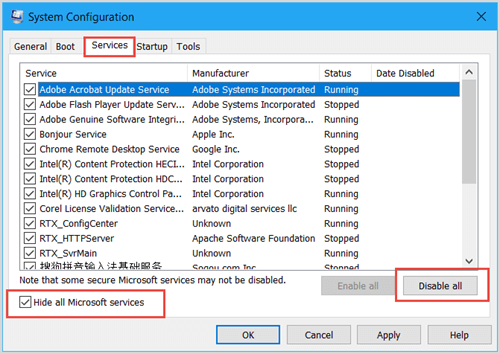
Step 3: Click on Services tab, check Hide all Microsoft services and tap on Disable all.
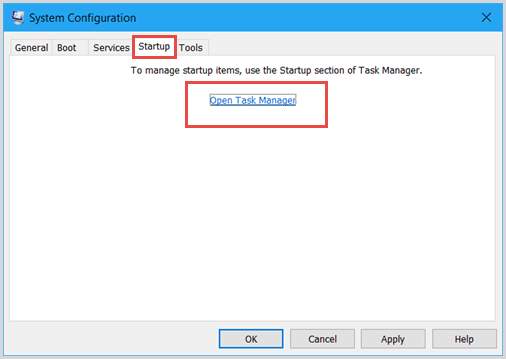
Step 4: Go to Startup tab, click Open Task Manager.
Step 5: In the Task Manager, click Startup tab. Click on options and tap on Disable.
Step 6: Tap on OK and restart your computer.
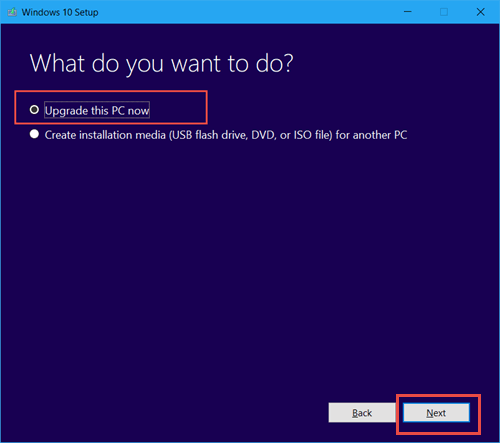
Fix 3: Upgrade Windows 10 via Media Creation Tool
When you meet error message 0x80190001, you can try to download Media Creation Tool to bypasses many update blockers.
Step 1: If you have downloaded theMedia Creation Tool, double-click to launch it.
Step 2: Check on "Upgrade this PC now" from the list as the image below. Tap on Next to continue. Then follow the instructions to update your Windows 10.
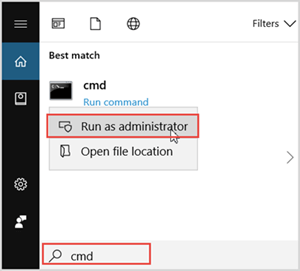
Fix 4: Repair error 0x80190001 by using Command Prompt
Step 1: In the Cortana search bar, type cmd then right-click on the result, select Run as administrator.
Step 2: Copy the following command to Command Prompt and hit Enter after each line.
DISM.exe / Online / Cleanup-image / Restorehealth
sfc / scannow
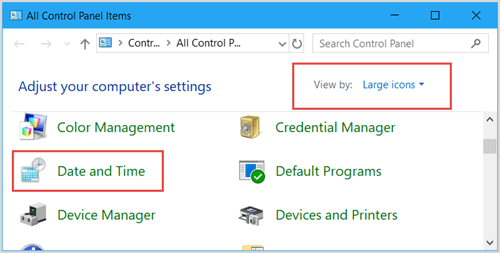
Fix 5: Check for date and time setting
Windows 10 may send you error message 0x80190001 if the computer time is not the same as Internet time.
Step 1: Open Control Panel, click the down arrow next to View by and select the Large icon.
Step 2: Scroll down and find Date and Time.
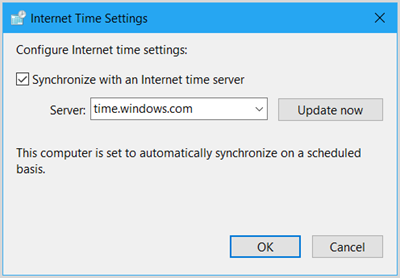
Step 3: Click on Internet Time tab and tap on Change settings.
Step 4: Tick the "Synchronize with an Internet time server" checkbox. Tap on Update now button.
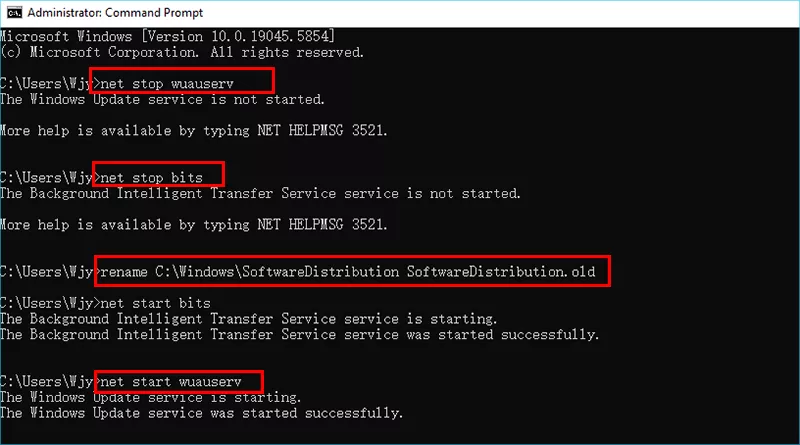
Fix 6: Clear Windows Update Cache
You can run Command Prompt to clear Windows Update Cache.
Step 1: Open Command Prompt as administrator.
Step 2: Execute the following command line one by one:
net stop wuauserv
net stop bits
rename C:\Windows\SoftwareDistribution SoftwareDistribution.old
net start bits
net start wuauserv
Step 3: Retry the update.
Part 2: Repair Windows 10 Add PIN Code Error 0x80190001
What to do if you add PIN code in Windows 10 and receive an error message 0x80190001? Walk through the tutorial below to troubleshoot.
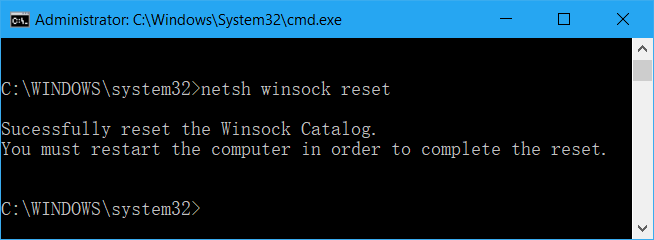
Step 1: Run Command Prompt as administrator.
Step 2: Input "netsh int ip reset" and press Enter to reset the network. Input "netsh winsock reset" then hit Enter to reset winsock catalog.
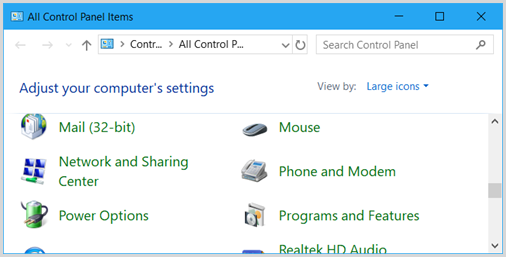
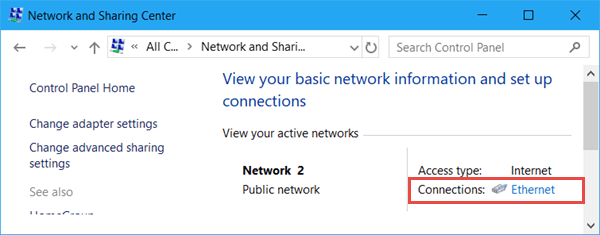
Step 3: Open Control Panel, click on Network and Sharing Center.
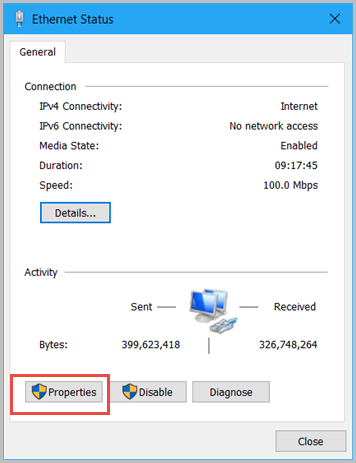
Step 4: Next to Connections, click on Ethernet.
Step 5: In the Ethernet Status window, click on Properties button.
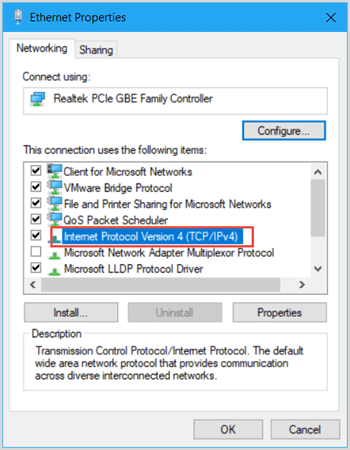
Step 6: Double-click on Internet Protocol Version(TCP/IPv4).
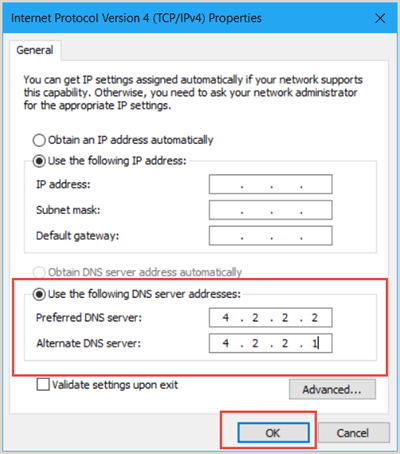
Step 7: Check Use the following DNS server addresses. Input 4.2.2.2 behind Preferred DNS server then type 4.2.2.1 next to Alternate DNS server.
Step 8: Restart your PC and set your PIN code again.
Conclusions
With these step-by-step troubleshooting methods—from update cache clearing to network resets —you'll likely resolve the annoying 0x80190001 error. Once fixed, your Windows setup processes and PIN access should work smoothly again.