Do you often get the "Last line no longer available" error on your iPhone when you try to make a call from your default phone number? Take it easy, as you are not the only one facing this problem. In this article, I will provide a full guide to help you fix last line no longer available on iPhone. Let's see what fixes are available to solve this problem.
Part 1: Why does my iPhone get the "Last line no longer available" error?
When you have two SIM cards on your iPhone, iOS allows you to set the default line (phone number) used for iMessage and FaceTime. In addition, iPhone allows you to use the default line when calling or messaging someone who is not in your Contacts app. Depending on your needs, you can select a default line for calls and messages and use a different line for cellular data only.
This error prevents users from calling contacts via their preferred SIM card. As a result, they are forced to use the remaining lines for this purpose. Well, knowing the cause of this error, here's how to fix the "Last line no longer available" error on iPhone.
Part 2: How to Fix Last Line No Longer Available on iPhone?
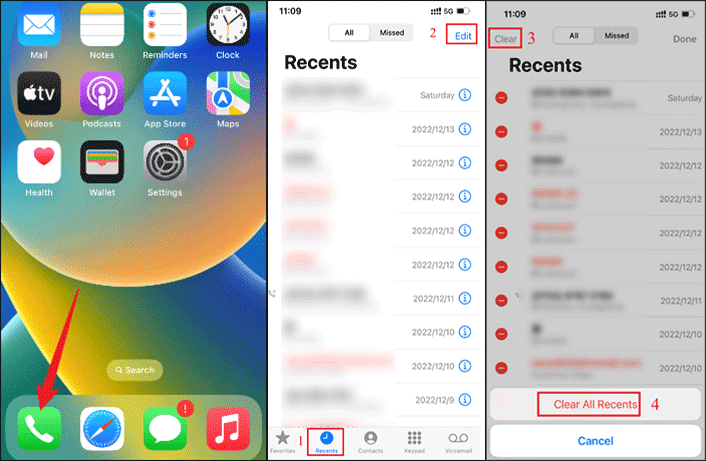
Some iPhone users who encountered the "last line no longer available" error reported that clearing their recent call history worked for them.
Step 1: Launch the Phone app on your iPhone, go to the Recent tab at the bottom, and click Edit in the upper right corner of the screen. Then click on Clear in the upper left corner of the screen. Then select the option Clear All Recents to confirm the deletion. Now restart your iPhone.
Step 2: After restarting your iPhone, try dialing from the default line. If no pop-up window appears, the problem has been resolved.
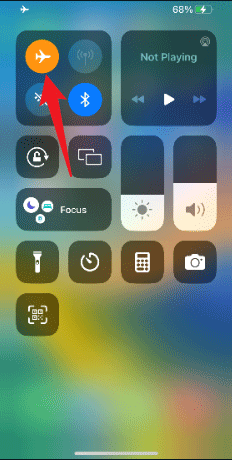
Fix 2: Enable Airplane Mode and then disable it
Step 1: Swipe down from the top right corner of the screen (on an iPhone without Home button) to access Control Center, and tap Flight Mode to turn it on.
Step 2: After a few seconds, tap the Airplane Mode icon to turn it off, then turn the network connection back on. Now try calling any contacts from the preferred SIM card on your iPhone to see if the "last line is no longer available" issue is resolved.
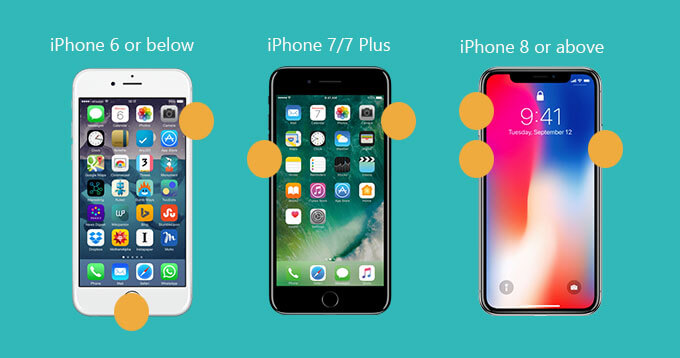
Fix 3: Force a reboot of your iPhone
A forced reboot (also known as a hard reset) clears the cache and removes useless temporary files, which often helps resolve many iOS issues on iPhone.
iPhone 8 or later: Press the Volume Up button. Then quickly press the Volume Down button. Then press and hold the Power button until the Apple logo appears on the screen.
iPhone 7/7 Plus: Press and hold the Power button and the Volume Down button at the same time until the Apple logo appears on the screen.
iPhone 6s/6 Plus or earlier versions: Press and hold the Power button and Home button at the same time until the screen goes black and the Apple logo appears.
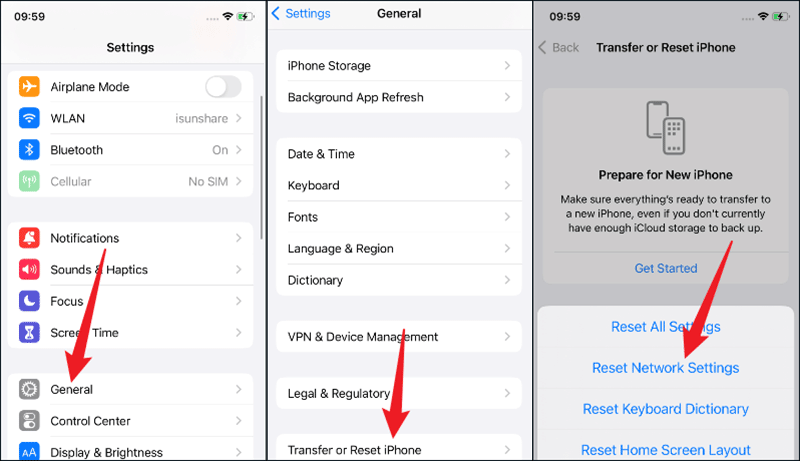
Fix 4: Reset network settings
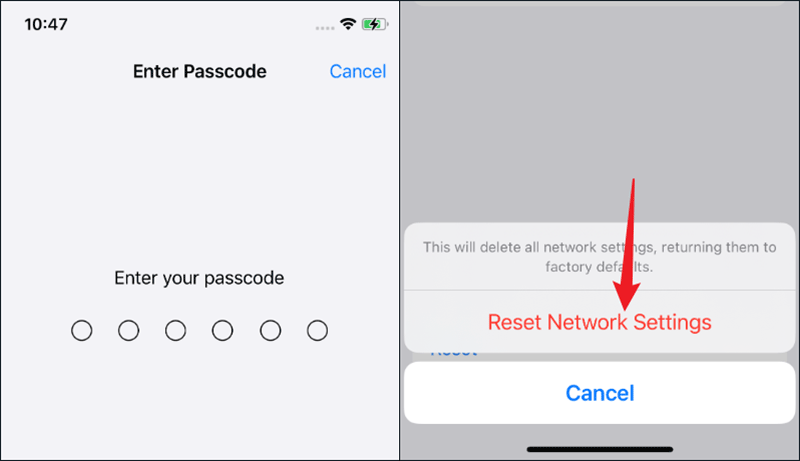
Step 1: Move to Settings > General > Transfer or Reset iPhone > Reset > Reset Network Settings.
Step 2: Enter your iPhone's password and select the option Reset network settings to confirm your choice in the pop-up window.
Fix 5: Take out and re-insert the SIM card
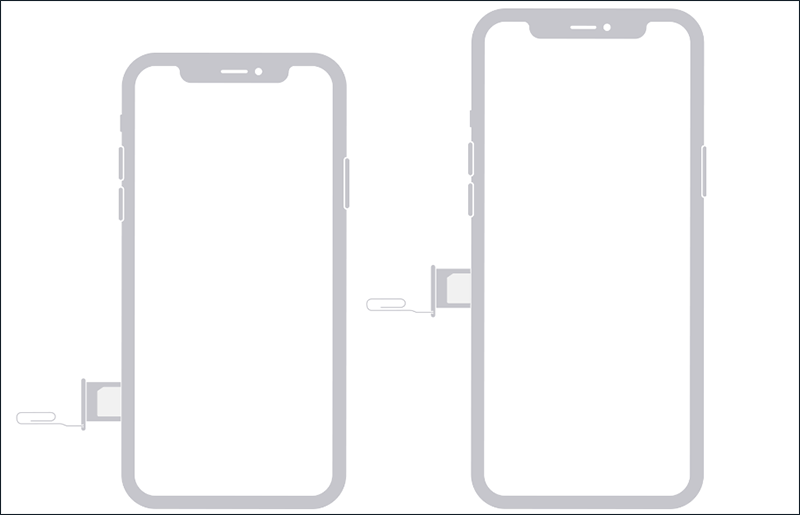
Step 1: Turn off your iPhone, then use the SIM card eject tool to slide out the SIM card tray. Wait a few seconds, then reinsert the physical SIM card.
Step 2: Then press and hold the power button to turn on iPhone. Now make a call using the default line on your iPhone and see if the "Last line is no longer available" error message appears.
Fix 6: Update your iPhone to the latest version
Most times, simply updating your iPhone to the latest iOS version will fix most issues on your device." The last line no longer available" is one such issue that can be fixed by installing any pending updates if none of the fixes listed so far resolve the issue.
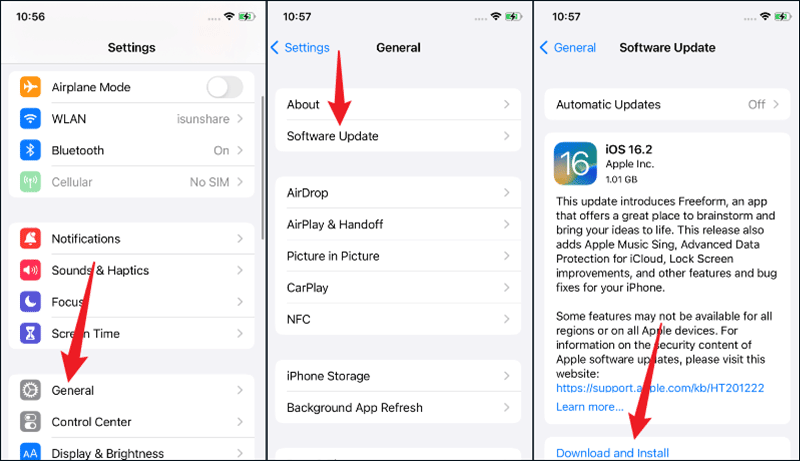
Head to the Settings app on your iPhone > General > Software Update and download and install the latest version of iOS.
Fix 7: Use professional system recovery tool -- iOS Repair Genius
iSunshare iOS Repair Genius is the easy-to-use iOS repair software which can easily repair more than 50 common system problems like stuck in spinning circle, black screen of death, last line no longer available, etc. It can fix any problem occurs on your iOS device, except the hardware problem.
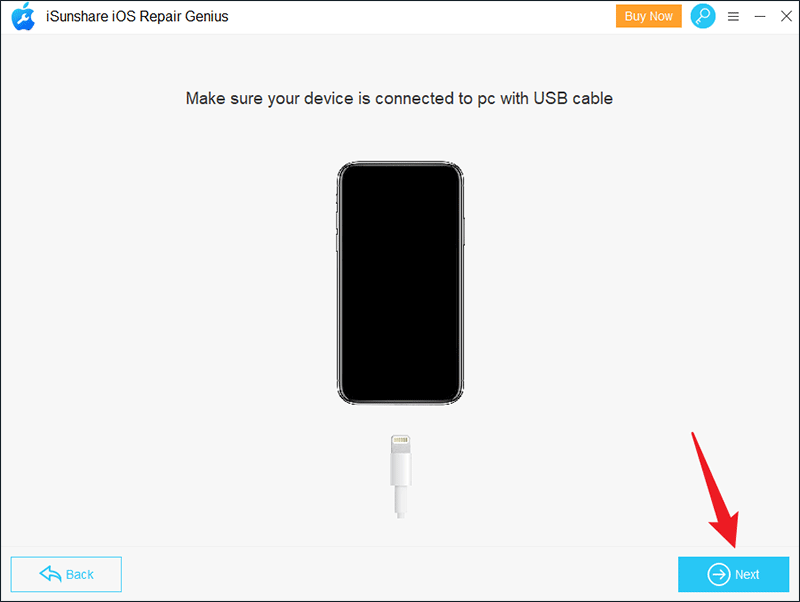
Tip: Make sure your iPhone is connected to pc with USB cable all the time and iTunes should be installed on the computer.
Step 1: Download and install iOS Repair Genius on your PC or laptop.
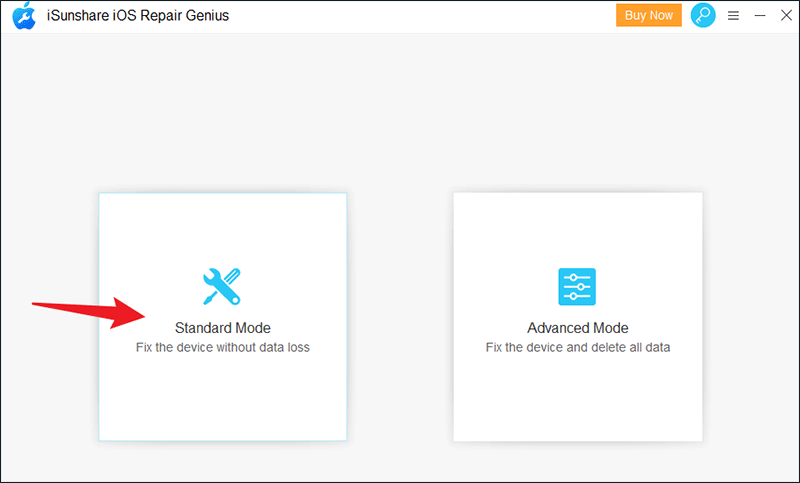
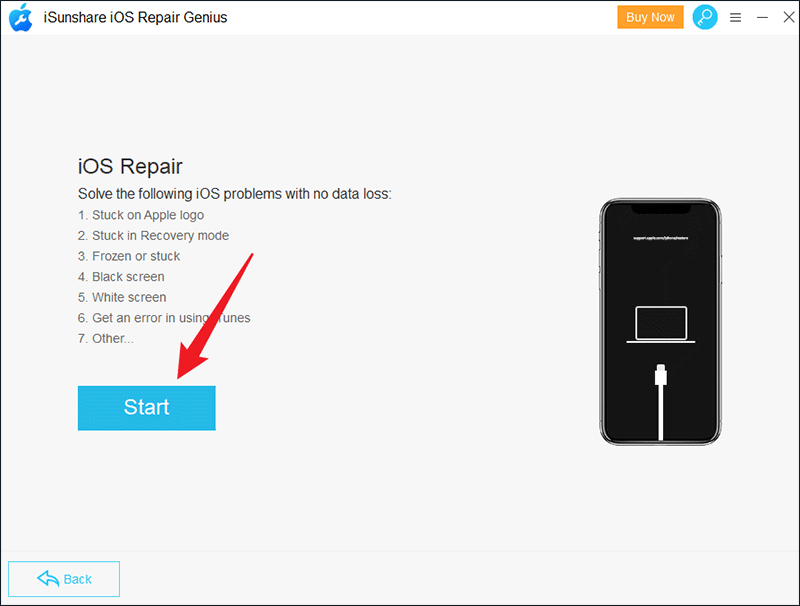
Step 2: In the main screen, there are two modes to choose from, Standard and Advanced. Standard Mode can fix your iPhone without data loss, and Advanced Mode can fix your iPhone and delete all data. If you have never backed up your iPhone via iCloud or iTunes, I suggest you choose Standard Mode.
Step 3: Click Start button to continue.
Step 4: Make sure your iPhone is connected to pc and click Next button at the bottom right of the interface. If your iPhone cannot be detected, you need to put your iPhone in DFU or Recovery Mode. On the screen you can see a very clear guide and follow it.
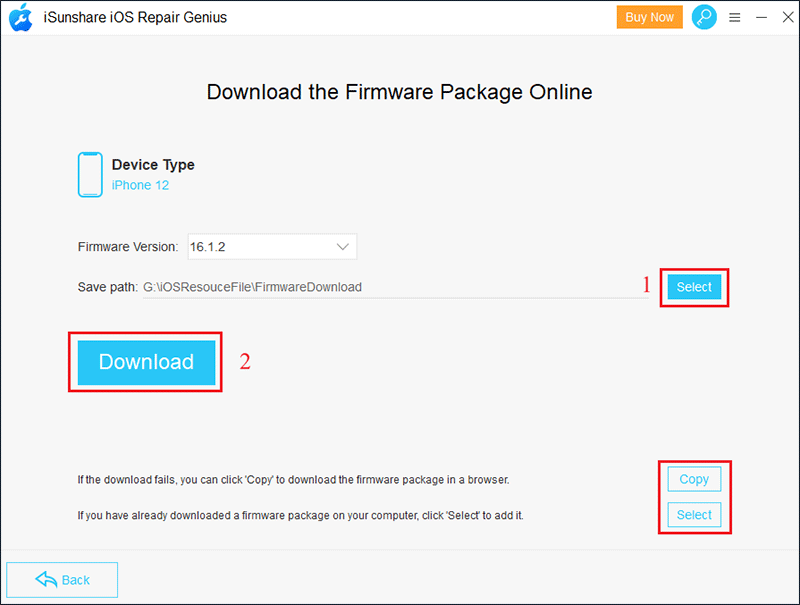
Step 5: The program will automatically identify your iPhone model and show you the latest available version of firmware. Click Select button to choose the location to save the package and then click Download button to download a firmware package. If it fails to download, you can click Copy button to download it on the browser. Then click Select button on the bottom to import it. If you have already downloaded a firmware package on your PC, simply click Select to add it.
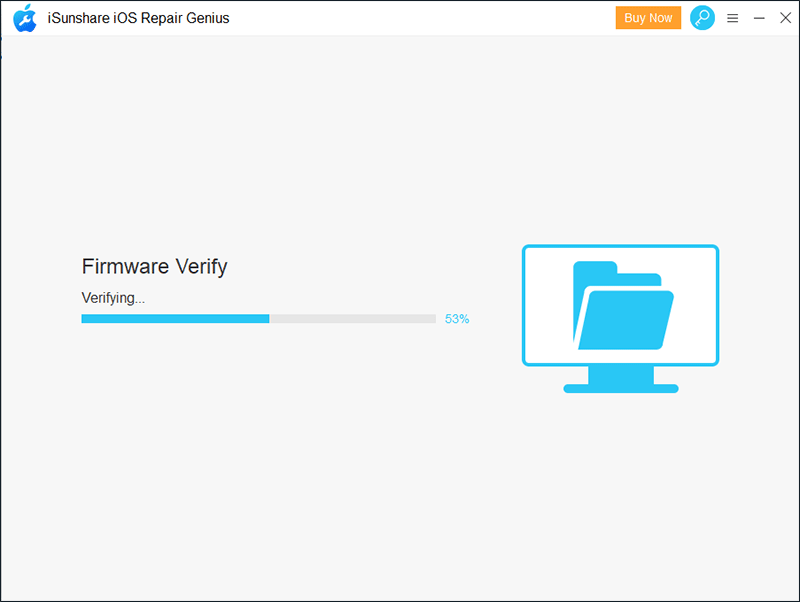
Step 6: Wait for firmware verify.
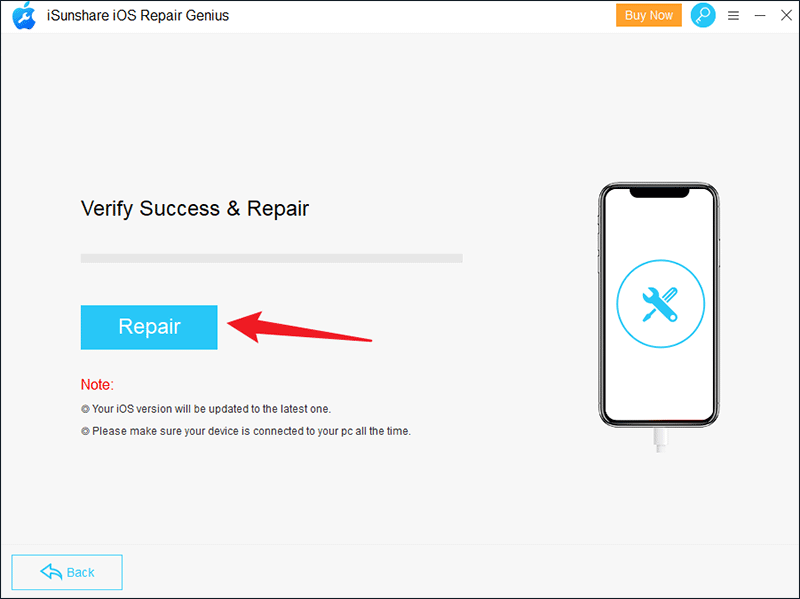
Step 7: All preparations have been completed. Click Repair button to start repairing.
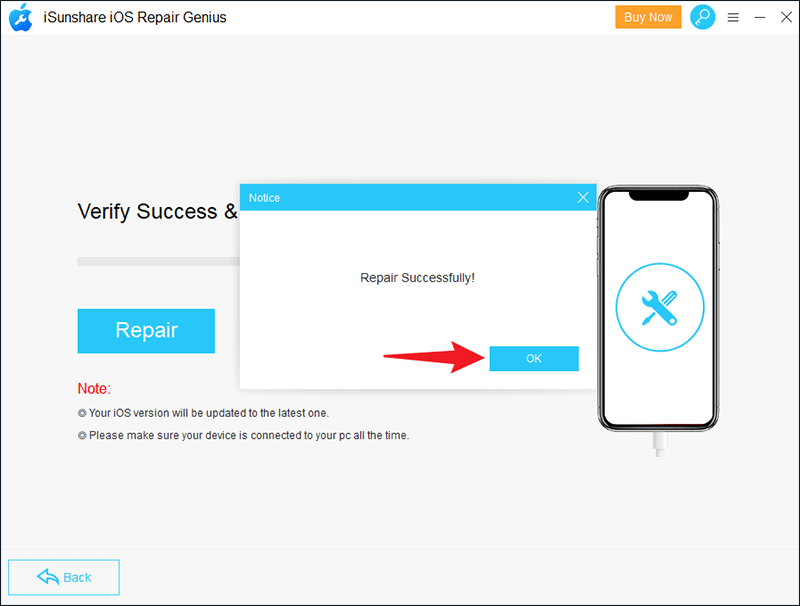
Step 8: Wait for a while until a window pops up prompting that the device has been repaired successfully. Click OK to close the window. Finally, your iPhone will work properly and boot up automatically, and the last line no longer available issue on your iPhone should also be addressed.