We use cookies for personalizing content and ads and providing social media features. Your usage information on our website will be used for social media, advertising, and traffic analytics, or shared with our partners. Clicking "Accept" means you agree to use our cookies .
Quick access is a feature that could help you access to frequently used folders and recently used files quickly when you open a File Explorer window in Windows 10 computer.
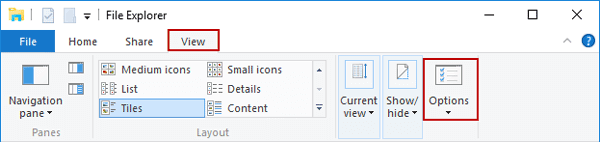
Quick Access is surely a good feature in Windows 10. But it doesn't mean that that it is good for everyone. For example, when you don't want to see frequently closed files or folders and you want to view customized folders or files as you open file explorer, it would be a trouble. So in this article, we will go through two methods to disable or remove quick access from Windows 10 file explorer.
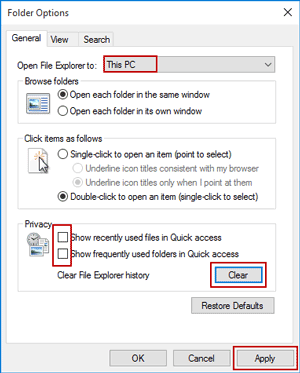
2. In Folder Options window, you can see the default option for file explorer is selected as "Quick access". Now just click the list and select "This PC".
Step 2: Uncheck the "Show recently used files/folders in Quick Access".
In order to disable quick access feature, it is necessary to uncheck the "Show recently used files in Quick Access" and "Show frequently used folders in Quick Access" in Folder Options dialog. Then click Apply and OK to save changes.
Tips: Some of the folders might still be visible in the quick access menu in This PC. To clear out these, click on the "Clear" button displayed right next to the "Clear File Explorer history" in the Folder Options settings. This will remove all the existing links.
Method 2: Remove Quick Access Using Registry Editor
Before removing quick access in file explorer permanently, please make sure you have been logged into Windows through an account with administrative privileges.
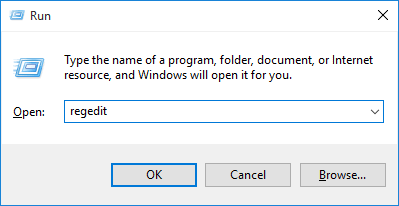
Open Run box with combination keys "Windows + R" and type "regedit" in it. Press Enter and Registry Editor is opened.
Step 2: Navigate to the following path: HKEY_LOCAL_MACHINE\SOFTWARE\Microsoft\Windows\CurrentVersion\Explorer
Step 3: Find the key named HubMode (if not available, create a new DWORD (32-bit) Value and name it HubMode).
Step 4: Set the value of HubMode to 1
Step 5: Restart your computer or sign out and sign in again. This will remove Quick Access from the navigation pane in File Explorer.
Conclusions
Whether you find Quick Access cluttered or simply prefer a minimalist File Explorer, disabling or removing it in Windows 10 is straightforward. Use the method that suits your comfort level—Folder Options for simplicity or the Registry Editor for complete removal.