“Anyone can help me? I run the Windows Photo app and it finds my photos on the iPhone. When it begins to export, this prompt comes –something went wrong, your files may not have been imported. I did not want to reinstall the Windows OS as the customer support said. Can anyone help to fix the cannot import photos from iPhone to Windows PC issue?”
When you encounter such prompts, including there are no photos to import, iPhone DICM folder is empty, no new photos were found, something went wrong, try again; you can’t import photos from iPhone to Windows 11/10/8/7 PC, what can you do to solve this issue? You can find effective methods from the below content.
- Method 1—Build the Connection Again with the Original USB Cable
- Method 2—Reset Location & Privacy Settings on the iPhone
- Method 3—Upgrade iOS Version on Your iPhone
- Method 4— Check Apple Mobile Device Related Service
- Method 5—Import a Small Number of Photos at a Time
- Method 6 —Import Photos from iPhone to PC via iDevice Genius
Method 1—Build the Connection Again with the Original USB Cable
Sometimes, when photos won’t import from iPhone to PC, it is due to the connection issue. Yes, some USB cables can make your iPhone recognized by the PC, but it is incapable of data transferring. Thus, disconnect the connection and get the original USB cable to connect iPhone to your PC. Besides, you should make sure your computer is in good health.
Method 2—Reset Location & Privacy Settings on the iPhone
It may help your iPhone to transfer photos if you reset the location & privacy settings. The following steps are based on iOS 15 version and above.
Step 1: Disconnect the iPhone with the computer.
Step 2: Tap Settings > General >Transfer or Reset iPhone>Reset.
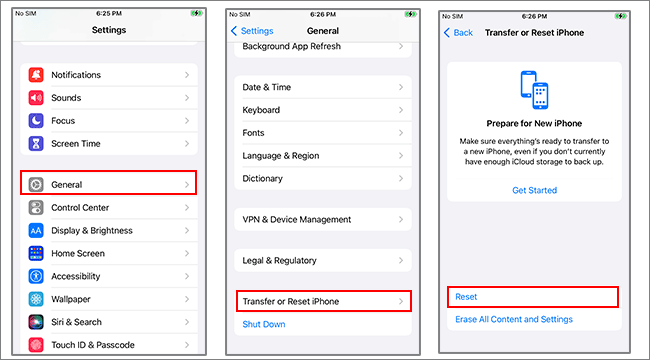
Step 3: Tap Reset Location & Privacy and then choose Reset Setting. This will reset your location and privacy settings to factory settings.
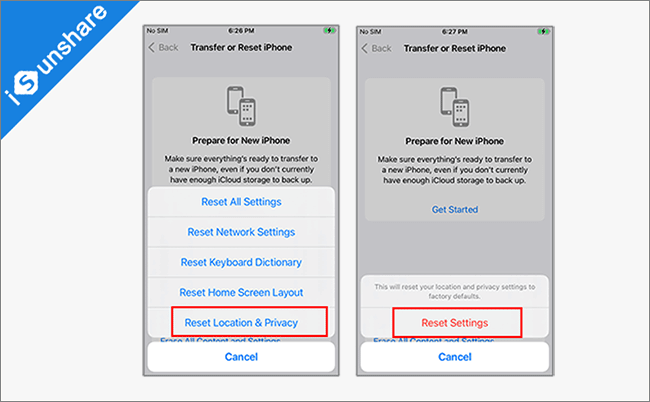
After resetting, you can connect the iPhone to your PC and then Trust the computer. Now try to import pictures from iPhone to PC now.
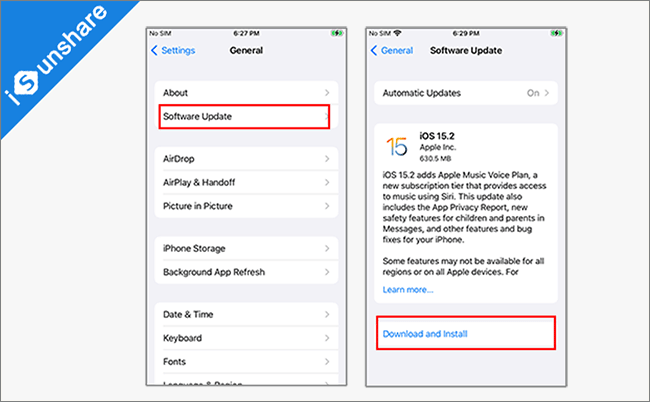
Method 3—Upgrade iOS Version on Your iPhone
The outdated iOS version on your iPhone would also lead to the failure of importing photos. You can go to check for the update of your iOS software and then download and update the software.
Step 1: Head to Settings > General, and then choose Software Update.
Step 2: If there are new software updates, you can click the Download and Install button to finish the upgrade.
Method 4— Check Apple Mobile Device Related Service
There are two Apple mobile device related services on your computer: Apple Mobile Device Support and Apple Mobile Device Service. Both of them can ensure smooth communication between the iPhone and the computer. If they get into trouble, you can’t import photos from iPhone to the computer.
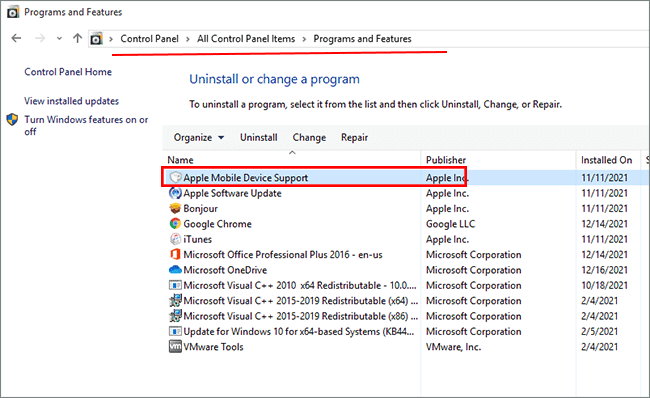
First, you should check whether the Apple Mobile Device Support is installed on your computer or not. Just go to Control Panel and select Program and Features to check Apple Mobile Device Support. If there is no Apple Mobile Device Support on the list, you need to uninstall and install iTunes again to get Apple Mobile Device Support.
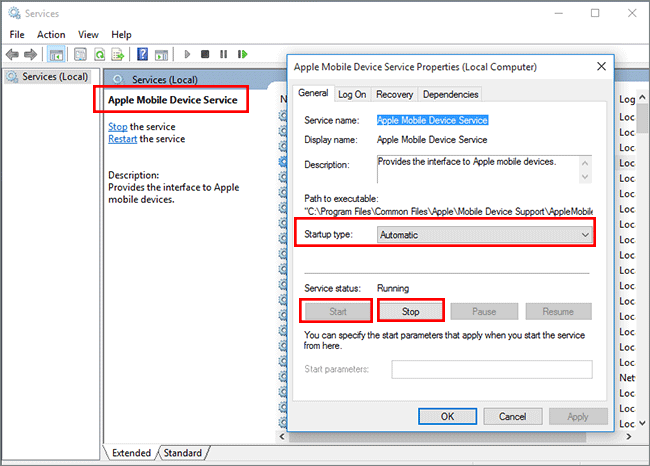
After that, you can press the Windows key and R key on the keyboard to open the Run window on your computer. Then, input services.msc and click on the OK button. On the Service window, go to find Apple Mobile Device Service and right-click it. Choose Properties from the drop-down list. Finally, you can change its startup type to Automatic and click the Stop button to pause the Apple Mobile Device Service. After a while, click the Start button to restart the service.
Method 5—Import a Small Number of Photos at a Time
If you are importing a large number of photos from iPhone to computer, it is bound to slow down the transfer speed and make the process very slow. Sometimes, it would even cause iPhone in stuck status– photos taking forever to import from iPhone to PC. So, just select a small number of photos to import at a time.
Method 6 —Import Photos from iPhone to PC via iDevice Genius
Which tool you are using to transfer iPhone data to PC? It is significant to select a powerful iPhone data transferring tool to import the iPhone pictures. Of course, you can utilize iCloud and iTunes to finish the task. But iDevice Genius is the top choice for you to quickly import photos from iPhone to a Windows computer. Not only mass photos can be imported into the PC, but also they can be deleted from the iPhone within simple clicks to free up space on iPhone. It can be an alternative way for you to deal with photos when you cannot import photos from iPhone to PC.
Step 1: Download iDevice Genius and then complete the installation on your computer.
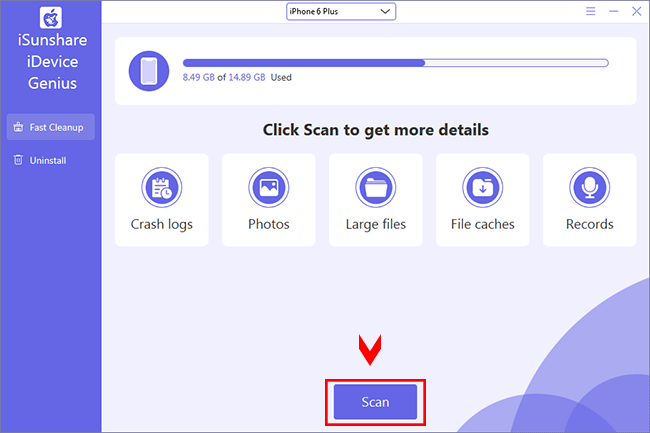
Step 2: Connect the iPhone to your PC and then open iDevice Genius. You should tap the Trust option when there is a trust prompt on your iPhone. Next, wait for the software to detect your iPhone and click the Scan button on the center of the panel.
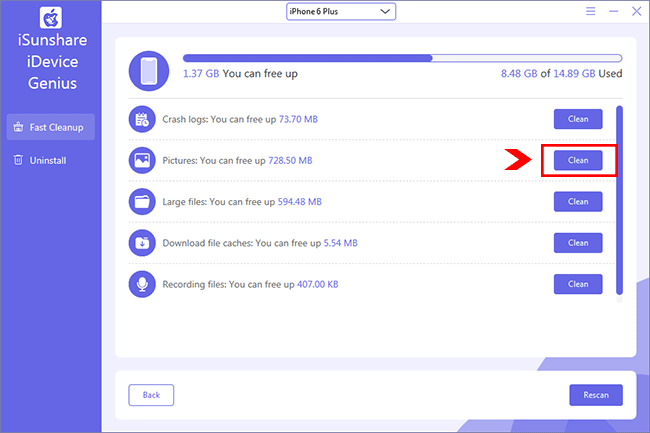
Step 3: After the scanning process ends, you can click on the Clean button behind the Pictures field.
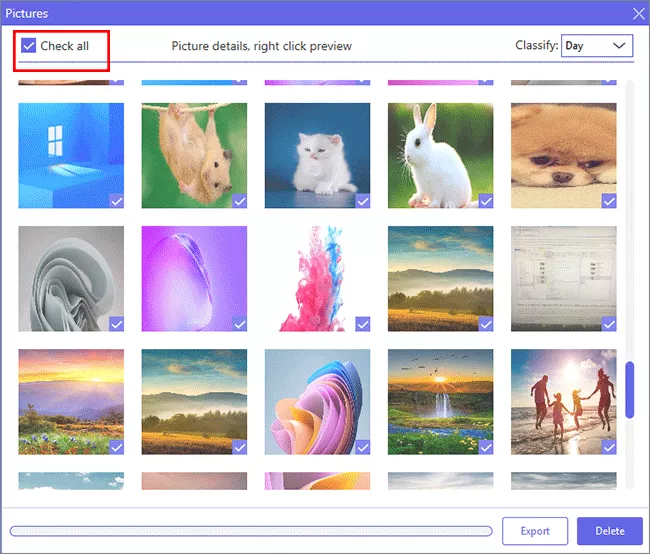
Step 4: In minutes, all the photos on the iPhone can be viewed here. To import all photos, you can tick the checkbox of Check all on the top left corner. Or you can choose the pictures by yourself.
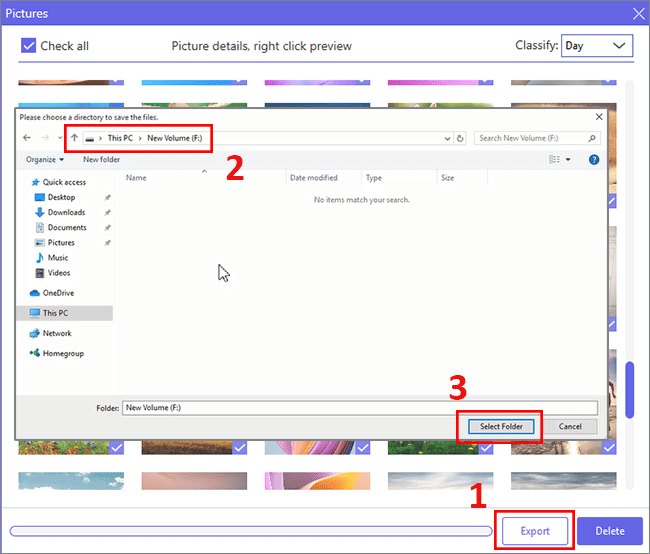
Step 5: Click on the Export button and then set the location on your computer to save the photos.
Step 6: You will get the successful prompt soon.

Related Articles: