When you get 100 disk usage error on Windows, Superfetch service will be one of the factors that cause the high disk usage. SuperFetch, also called Prefetch in some Windows versions, can help you to make the applications launch faster and improve the system respond speed via pre-loading your frequently-used app into RAM. When it affects your computer performance, you should disable this service. Here we will share 4 ways to disable/ turn off SuperFetch on Windows 10/8/7.
- Way 1: Disable SuperFetch from Windows Services App
- Way 2: Disable Windows SuperFetch via Registry Editor
- Way 3: Disable SuperFetch using Command Prompt
- Way 4: Disable SuperFetch with iSunshare System Genius

Way 1: Disable SuperFetch from Windows Services App
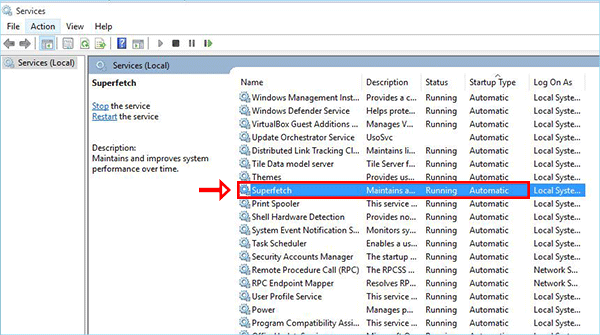
Step 1: Type Services into Windows search box and then click Services app from the result.
Step 2: In Services interface, you can need to find Superfetch service and double click to enter its properties settings.
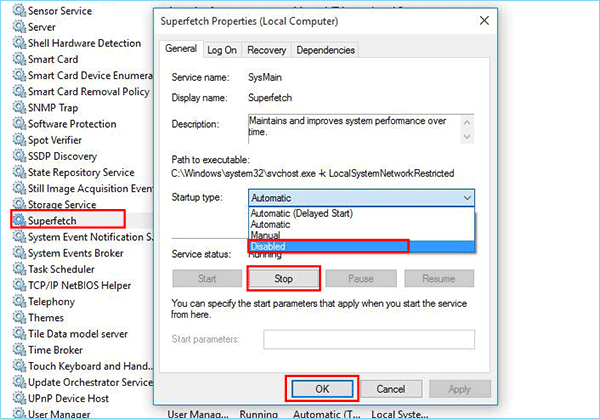
Step 3: In Startup section, you can choose Disabled from the drop-down menu. After that, click the Stop button under Service status field. Minutes later, the service stop process ends, you can click the Apply button and then OK button to save the change. Now, you turn off Windows SuperFetch service.
Way 2: Disable Windows SuperFetch via Registry Editor
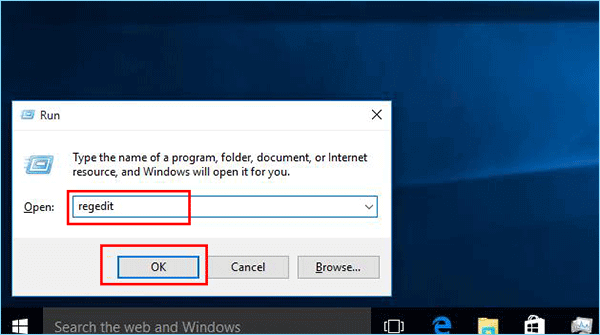
Step 1: Press Windows +R on your keyboard to open Run prompt. Then enter regedit and click the OK button.
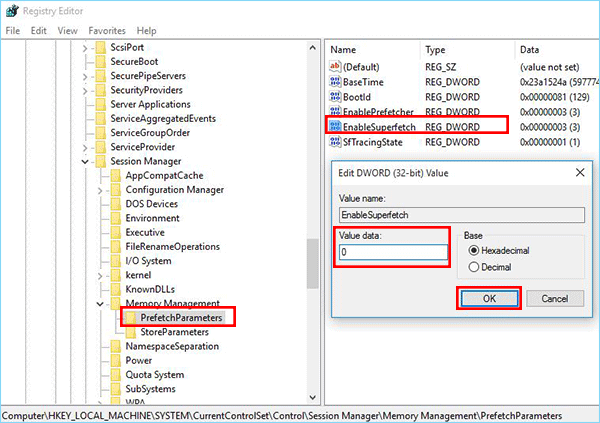
Step 2: When you open the Registry Editor, you can go to the following location:
- HKEY_LOCAL_MACHINE > SYSTEM > CurrentControlSet > Control > Session Manager > Memory Management > PrefetchParameter
Step 3: On the right side, choose EnableSuperfetch and double click it. Then, you can view the Value data is 3, which means the Superfetch is on. You can change the Value data to 0 to disable it. In the end, click the OK button. After that, when you reboot the computer, SuperFetch will be turn off.
Way 3: Disable SuperFetch using Command Prompt
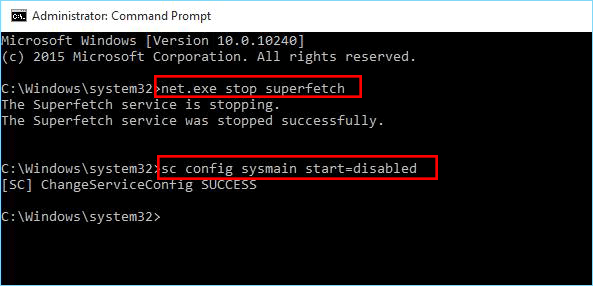
Step 1: Run command prompt as administrator.
Step 2: Enter “net.exe stop superfetch” command lines and press Enter.
Step 3: Enter “sc config sysmain start=disabled” command line and press Enter. And then you disable Superfetch services successfully.
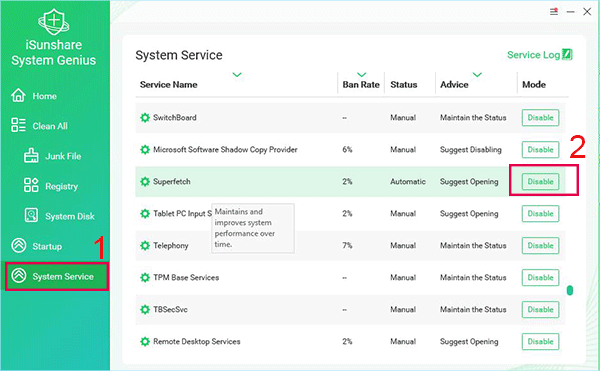
Way 4: Disable SuperFetch with iSunshare System Genius
iSunshare System Genius – the powerful Windows system optimizer tool offers you the fastest and simplest way to disable the Windows services. With a free download on your computer, you can install and launch it instantly. Afterward, you can click System Services on the left side and then find SuperFetch service from the list. Finally, click its Disable button to turn Superfecth service off.
Video Tutorial: How to Disable Superfetch Services in Windows Computer
Related Articles:
- Fixed: Services.msc Not Opening in Windows 10
- 6 Quick Ways to Clear RAM on Your Windows 10 PC
- How to Turn On/Off Windows Search Service in Windows 10
- 4 Methods to Disable Windows Error Reporting in Windows 10