We use cookies for personalizing content and ads and providing social media features. Your usage information on our website will be used for social media, advertising, and traffic analytics, or shared with our partners. Clicking "Accept" means you agree to use our cookies .
We would have to replace CD drive or DVD burner when we found that the old one couldn't full fill our satisfaction, and in order to replace CD drive and DVD burner in a proper way, we should read some instruction or guidelines, and the under steps could meet your requirements.
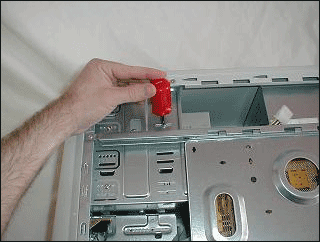
Step 1: Unplug the power cord and remove the "up" side from a mid-tower.
When it comes to installing a DVD drive which is not mounted on rails, you need to remove both sides of the case. The DVD or CD drive is mounted with two screws on each side. We remove all of the plug-in connectors from the back of the DVD drive and remove the four fine thread screws.
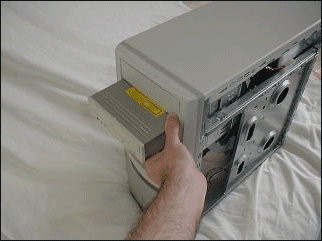
Step 2: Remove the drives through the front of the case, since the CD tray has to be accessible from the front.
CD drives and burners are identical in form to DVD drives and burners, in fact, you can't tell them apart except for the face-plate labeling. If more than one bay is available, it doesn't matter which bay you mount the drive in. If you've forgotten to disconnect the power, IDE or audio patch cables from the back of the DVD drive, you'll find out at this point when it doesn't pull out easily.
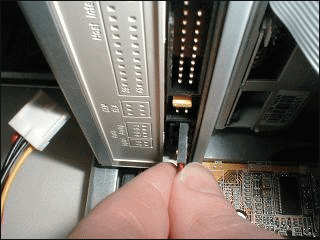
Step 3: Check the new CD drive to make sure it has same jumper pair with old one.
Both CD and DVD drives, and their recorder (burner) equivalents are almost universally parallel IDE drives. There are more expensive SCSI drives available for very specific applications, normally arrays. Parallel IDE drives are equipped with Master/Slave jumpers which allow the IDE controller to address two separate drives on a single channel. The drives feature three jumper sets, Master, Slave, and Cable Select (the cable wiring makes the selection).
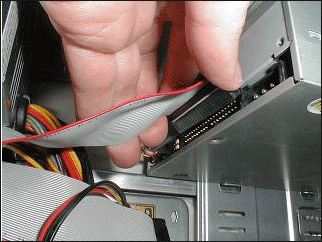
Step 4: Secure the CD drive or DVD burner with four screws.
If you do this with the case standing up, make sure that the CD drive is actually supported on the bottom as you slide it in, because some super-cheap cases just have an open cage, and the drive can drop out of your hand and damage the motherboard. Since the faceplate of the CD recorder will open to the front of the case, it's important (for aesthetics) to make sure it's flush with the front facade before tightening the four fine thread screws.
Step 5: Connect audio lead for playing music CDs to a connector on the CD burner.
Keeping in mind there are identical to the connections for a CD ROM, DVD ROM or DVD recorder. The first connection to make when you install a CD drive (because it's at the bottom and hardest to get at) is the audio lead for playing music CDs, which attaches to the sound card. If you skip this step, everything will work properly, including sound for games, but you won't be able to play music CDs.
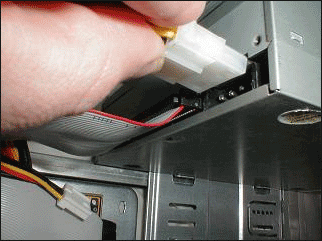
Step 6: Connect 40 wire IDE ribbon cable to a connector on the CD burner.
The red wire on one side of the flat ribbon goes to the "Pin 1" end of the connector on the CD drive, and if the drive isn't labeled, the red wire should go next to the power connector. If the CD drive isn't recognized when it's installed, check that the other end of the cable is properly installed on the motherboard.
Step 7: Connect the power to CD drive or DVD burner.
The power connector (below) is seated firmly over the four large pins in the connector, usually goes in about a half an inch. The power connector is keyed so you can't get it wrong.
Tip: You can buy a CD drive or DVD burner online, such as Ebay, Alibaba, Newegg, etc.