We use cookies for personalizing content and ads and providing social media features. Your usage information on our website will be used for social media, advertising, and traffic analytics, or shared with our partners. Clicking "Accept" means you agree to use our cookies .
When it comes to the Windows 10 slow running problem, you always get the recommendation to install and run Windows 10 operating system on an SSD. It is a fact that the SSD is better than HDD in fast speed, especially for fast startup. But for those whose computer has already run Windows 10 on SSD, what can they do when they get the SSD slow boot issue? Now, this article will discuss how to fix Windows 10 slow boot on SSD problem in details.
An SSD should ideally boot Windows in under 20 seconds. But several factors may slow it down:
Too many startup apps or services
Antivirus scans or heavy background processes
Disabled or misconfigured Fast Startup
Registry entries like ULPS (for AMD GPUs)
Misconfigured virtual memory
BIOS settings, outdated drivers, or failing hardware
Way 1: Prevent Antivirus Software and Other Programs Auto Running at Startup
If you do not pay attention to the startup settings, most software, especially the antivirus software, will be set to run while Windows 10 is loading. It is the common cause for Windows 10 longer boot time on SSD. Many users said the boot time is largely improved after they disable the auto startup programs. You can also have a test now with the specific tutorial on this page: 3 Ways to Stop Windows 10 Apps from Automatically Launching at Startup.
Way 2: Clean up Your SSD
It is not recommended to store a large amount of data or install many programs on SSD due to the massive data will greatly affect the read & write speed of SSD. Thus, to get a fast startup, try to clean up the junk files and registry on the SSD. Here iSunshare System Genius can help you to finish the cleaning in no time.
iSunshare Reliable Windows System Optimizer
Clean up junk files on Windows booting system drive
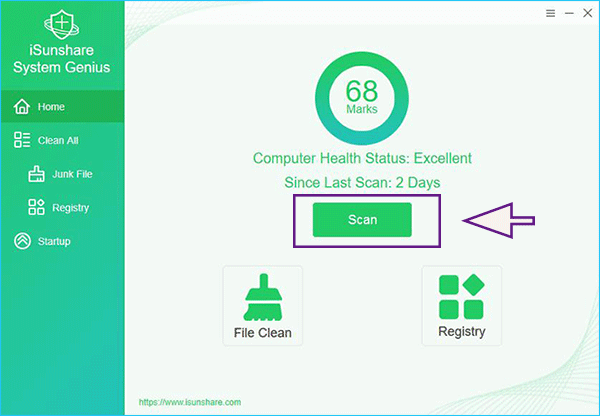
Step 1: Run iSunshare System Genius and then click on the Scan button.
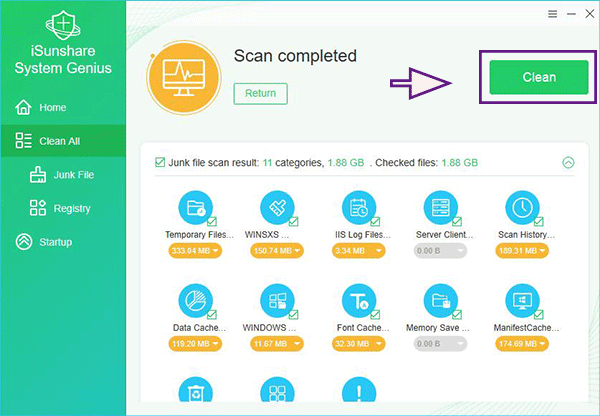
Step 2: Soon the software will present you the scan result about the junk files and registry. You can click to view those files in each category. And all the detected files are selected by default. In order to make the SSD with fewer burdens, you can click on the Clean button without hesitation to clean all files. Minutes later, the cleaning is completed and you can reboot the computer again to check whether it helps or not.
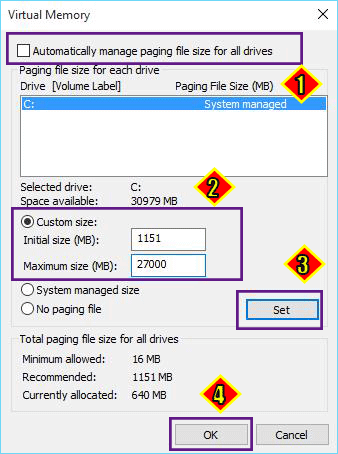
Way 3: Change the Virtual Memory Settings
The low memory issue can result in the slow boot in Windows 10 on SSD. If so, you need to increase the virtual memory by following the steps below.
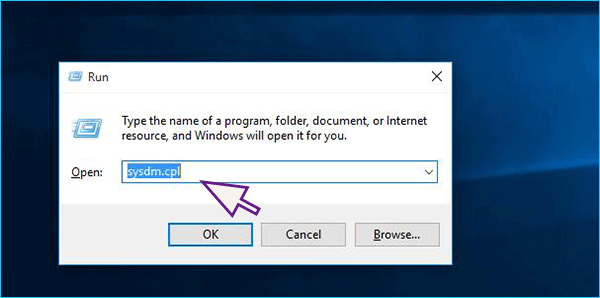
Step 1: Press Windows + R and enter sysdm.cpl in the Run box. After that, press Enter on the key board to navigate to Windows system settings.
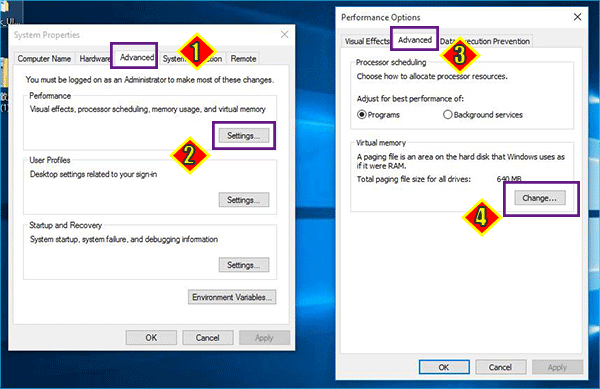
Step 2: Click Advanced tab and then hit the Settings on Performance section. Afterwards, in the pop-up Performance Options window, click the Advanced tab and go to click the Change button on Virtual memory section.
Step 3: Uncheck the box for Automatically manage paging file size for all drives which is displayed on the top. Then, check Custom size option and customize your Initial size and Maximum size. Finally, click the Set button and OK button.
Step 4: Click the Apply button on both Performance Options window and System Properties window. After that, the virtual memory setting is changed successfully.
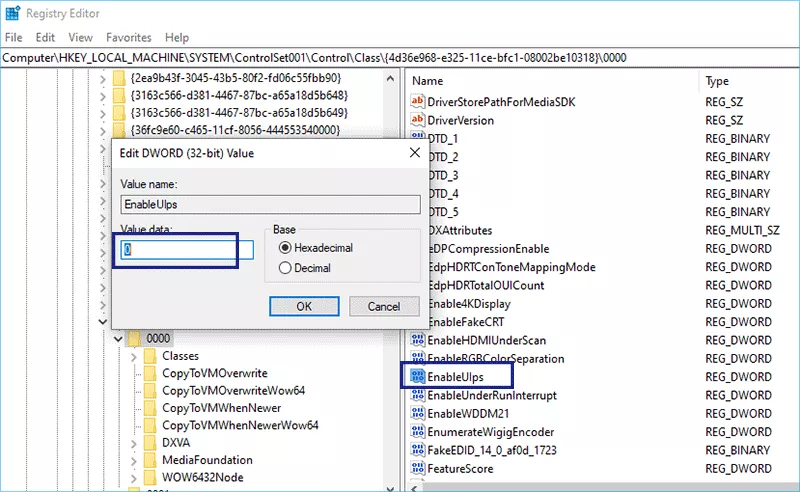
Way 4: Disable ULPS for AMS GPUs
If your Windows 10 takes a long time to boot, you can turn off ULPS to cut the boot time. Just open Registry Editor and head to Computer\HKEY_LOCAL_MACHINE\SYSTEM\ControlSet001\Control\Class\{4d36e968-e325-11ce-bfc1-08002be10318}\0000. After that, find EnableULPS setting, double-click and set its value to 0. Finally, restart the computer to see how much time it takes to boot.
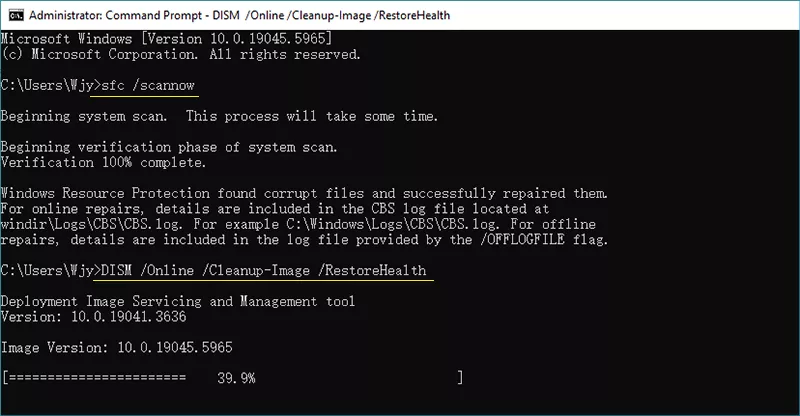
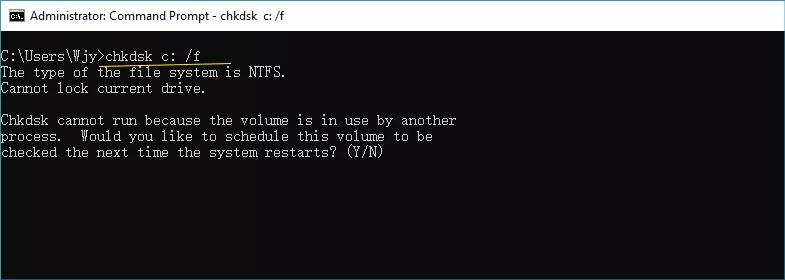
Way 5: Run System & Disk Health Checks
You can run SFC and DISM to repair system files. Also, you can run command line to check SSD file errors on C drive.
Instead of clean Windows installation on your current SSD, it would be better for you to get a larger SSD and clone Windows 10 to the larger SSD. After that, you can set the computer to boot from the larger SSD. It is bound to shorten the boot time.