We use cookies for personalizing content and ads and providing social media features. Your usage information on our website will be used for social media, advertising, and traffic analytics, or shared with our partners. Clicking "Accept" means you agree to use our cookies .
For security, every driver you normally install on your computer must be digitally verified by Microsoft via a digital signature. But you can also disable driver signature enforcement to install a driver that plays an important role to you but is not digitally signed. Here you can learn 4 effective ways to disable driver signature enforcement on Windows 11.
Way 1—Disable driver signature enforcement on Windows 11 in Startup Settings
In this process, you need to restart the computer to change startup settings. This method can also be applied to disable driver signature enforcement in Windows 10.
Step 1: Click the Windows icon on your computer desktop and then choose Settings.
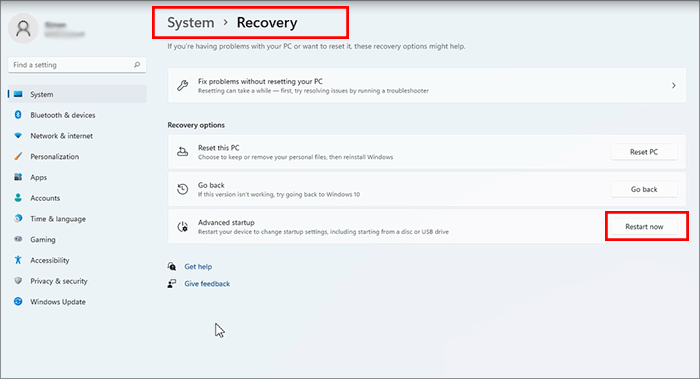
Step 2: Go to access System > Recovery and then click the Restart now button in Advanced startup section.
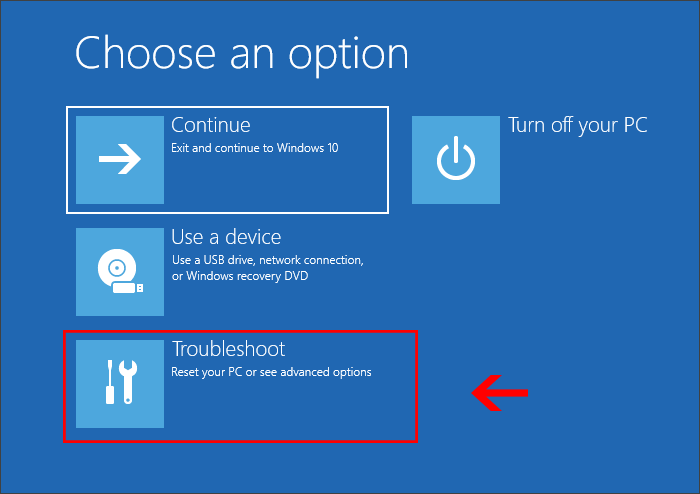
Step 3: When the computer is restarting, press the Enter key on your keyboard. Or you can choose Troubleshoot option.
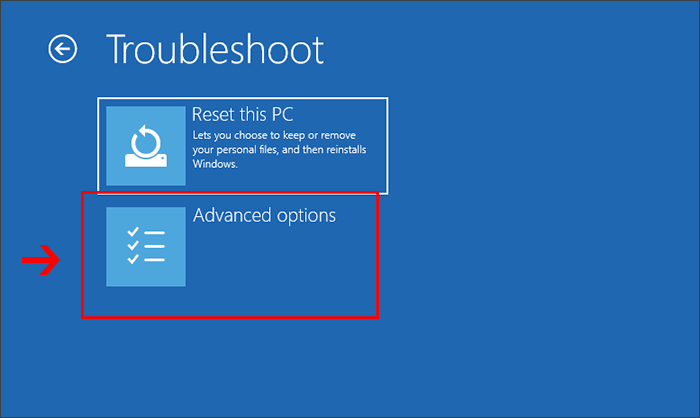
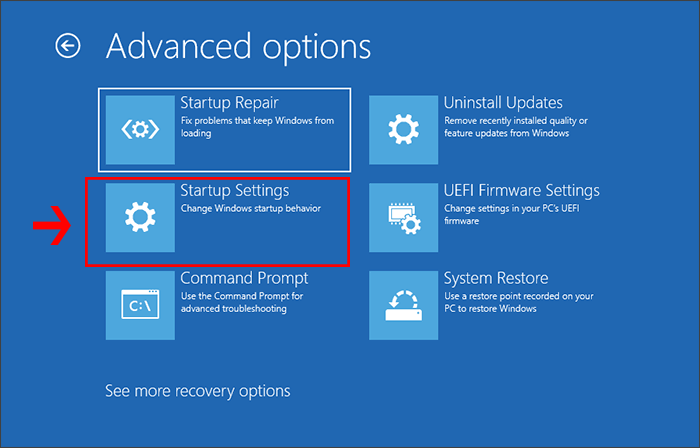
Step 4: Choose Advanced options to continue.
Step 5: In Advanced options, click Startup Settings.
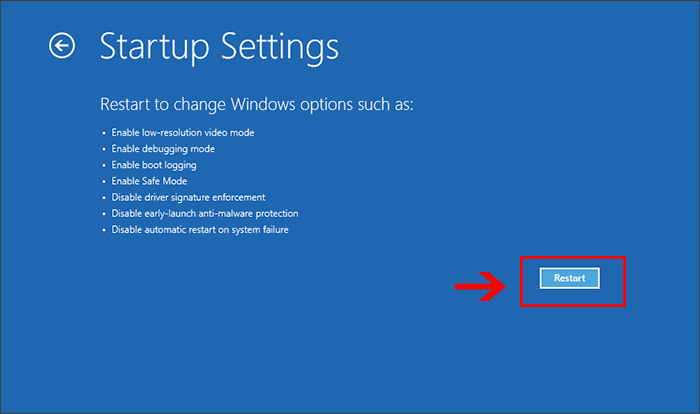
Step 6: Here you can see the changes you can make after restarting. Click the Restart button to go ahead.
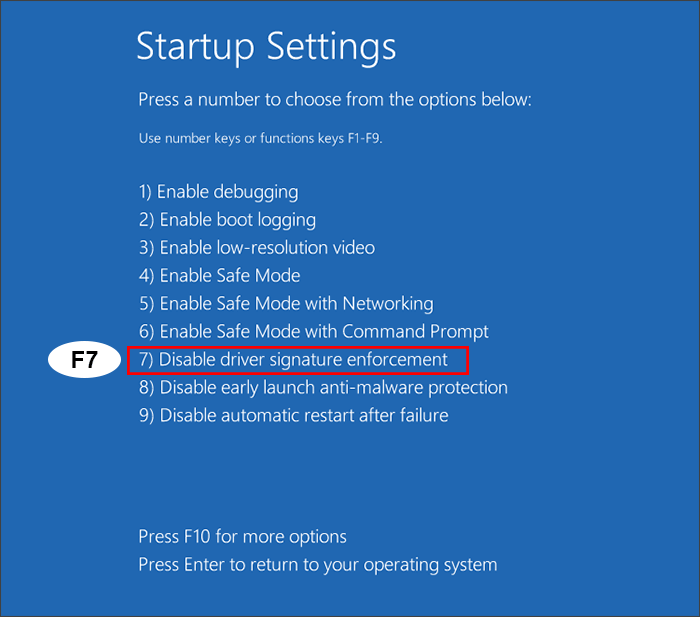
Step 7: The computer restarts again. And you need to press F7 on your keyboard to disable driver signature enforcement. After that, the computer reboots and the driver signature enforcement is turned off.
Way 2—Disable driver signature enforcement on Windows 11 via Advanced Boot Options
There is a fast way for you to disable driver signature enforcement with restart. You can change it in Advanced Boot Options.
Step 1: Restart your computer and then press F8 key on your keyboard repeatedly.
Step 2: When the Advanced Boot Options interface appears, choose Disable Driver Signature Enforcement with the up or down arrow on your keyboard. After that, press the Enter key to enter your Windows OS. Now, you can install unsigned drivers on the computer.
Tips: If you enter the BIOS settings after press F8, you can press Ctrl + Alt + Delete to restart the computer. And you can press F8 after the BIOS prompt goes by. If you still cannot enter the Advanced Boot Options interface, try again.
Way 3—Disable driver signature enforcement on Windows 11 using CMD
Is it possible to disable drive signature enforcement on Windows 11 without restart? Yes, you can do it easily using the Command Prompt. But this method only works when the secure boot function is disabled on UEFI.
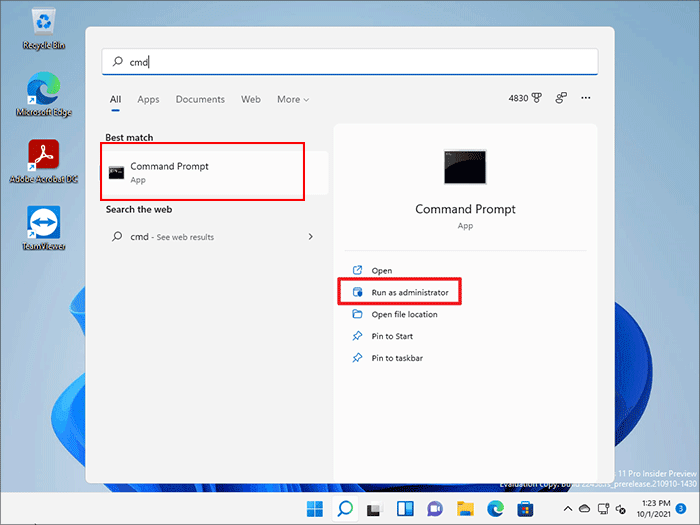
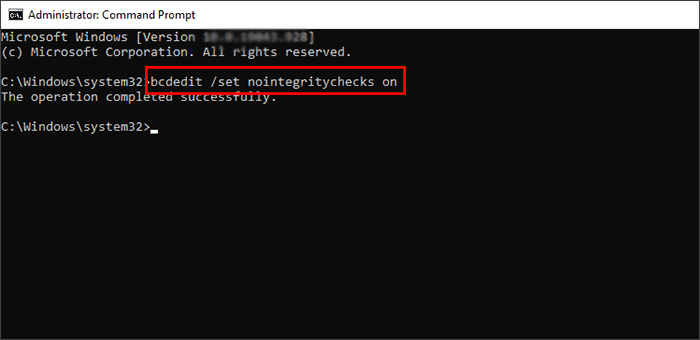
Step 1: Run Command Prompt as administrator.
Step 2: Enter the following command lines: bcdedit /set nointegritychecks on. After that, press the Enter key and it will tell you the operation is completed successfully in no time.
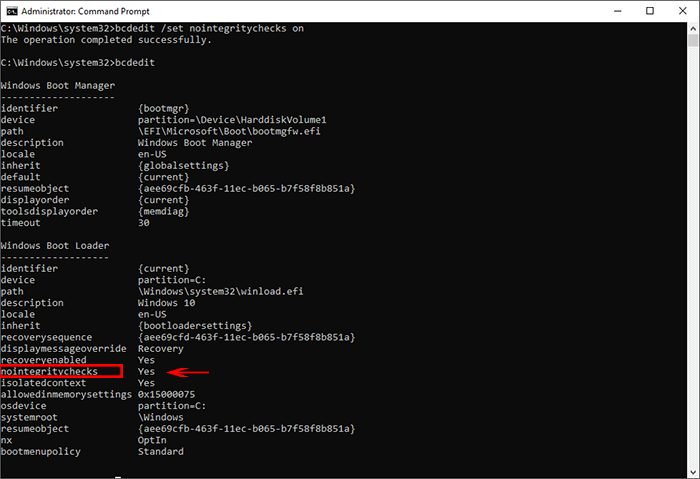
Step 3: Execute the command line: bcdedit and you can check nointegritychecks option under Windows Boot Loader is changed to Yes. It means that you are able to install unsigned drivers as you want.
Way 4 – Disable driver signature enforcement on Windows 11 in Local Group Policy Editor
You can also disable driver signing code in Local Group Policy Editor. It is easy to make it done with the following steps.
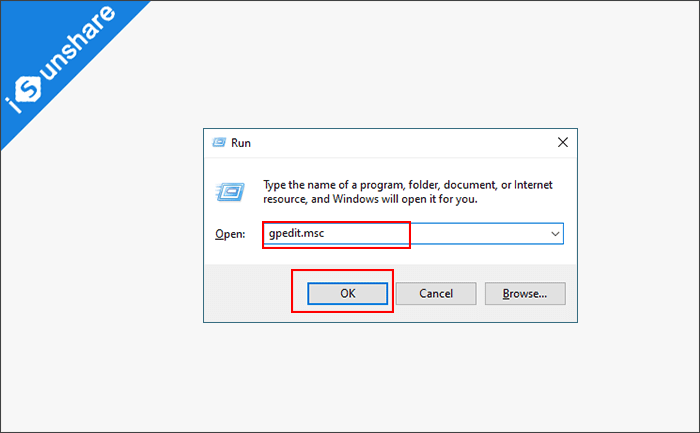
Step 1: Press Windows + R key to open Run. Then input gpedit.msc and click OK to open Local Group Policy Editor.
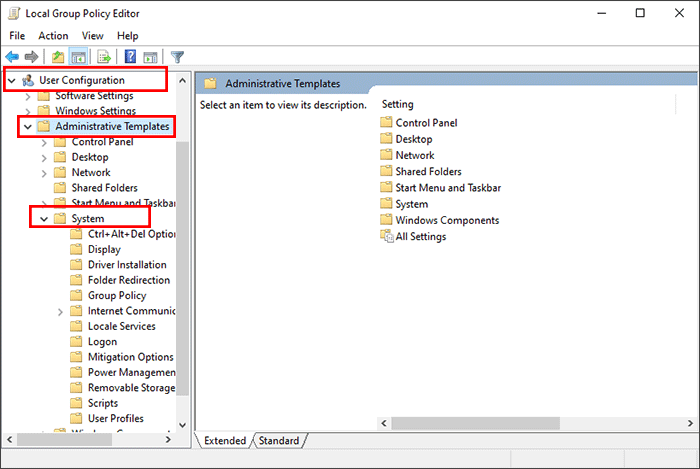
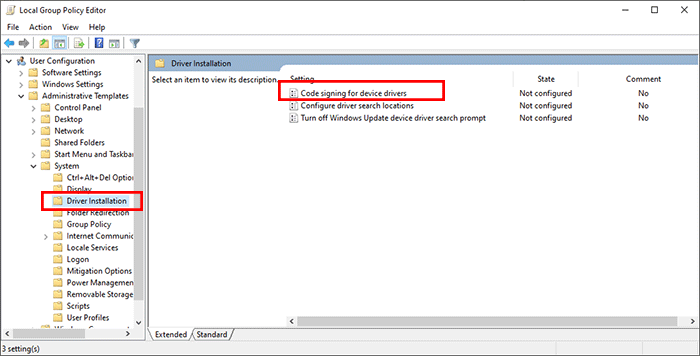
Step 2: In Local Group Policy Editor, click User Configuration > Administrative Templates> System.
Step 3: Under System option, you need to find and click Driver Installation option. Then on the right menu, double-click Code signing for device drivers option.
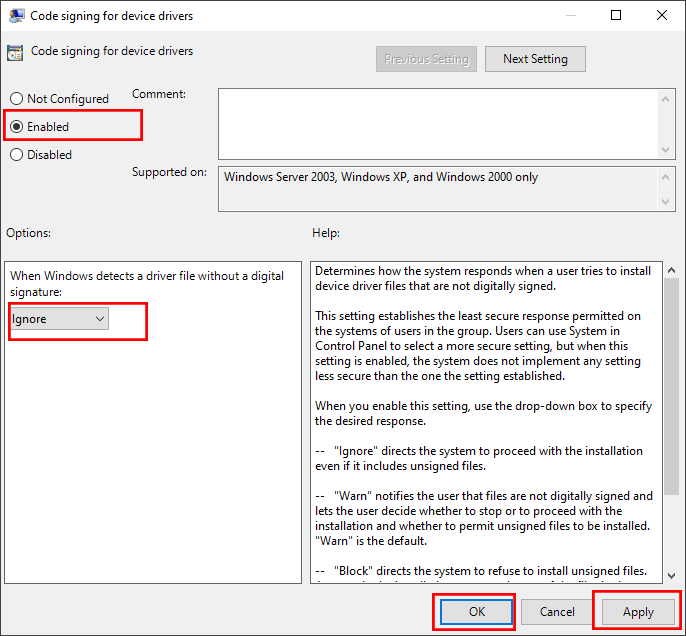
Step 4: In the Code signing for device drivers interface, select Enabled and then choose Ignore under the Options field. In the end, click the Apply and OK button on the bottom right. Then you can apply this change to your computer.
Tips: There is no Group Policy Editor pre-installed on Windows 11 Home edition. So you can not open it with gpredit.msc command. You can try other methods to disable driver signature enforcement or try the following steps to enable it.
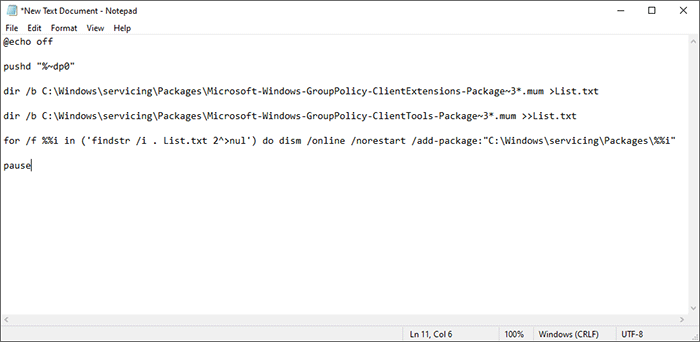
Step 1: Create a new text document on your computer and then copy and paste the following commands in the text document.
@echo off

pushd "%~dp0"

dir/b C:\Windows\servicing\Packages\Microsoft-Windows-GroupPolicy-ClientExtensions-Package~3*.mum >List.txt

dir /b C:\Windows\servicing\Packages\Microsoft-Windows-GroupPolicy-ClientTools-Package~3*.mum >>List.txt

for /f %%i in ('findstr /i . List.txt 2^>nul') do dism /online /norestart /add-package:"C:\Windows\servicing\Packages\%%i"

Pause
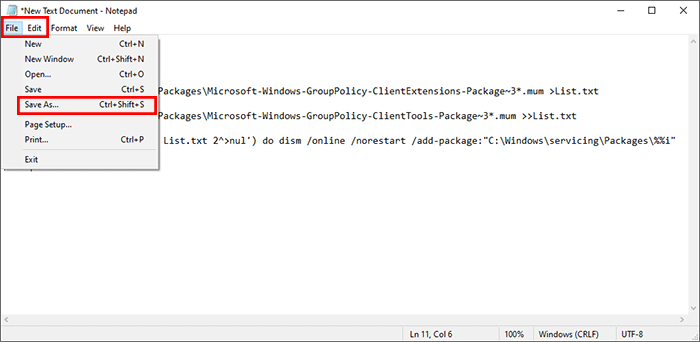
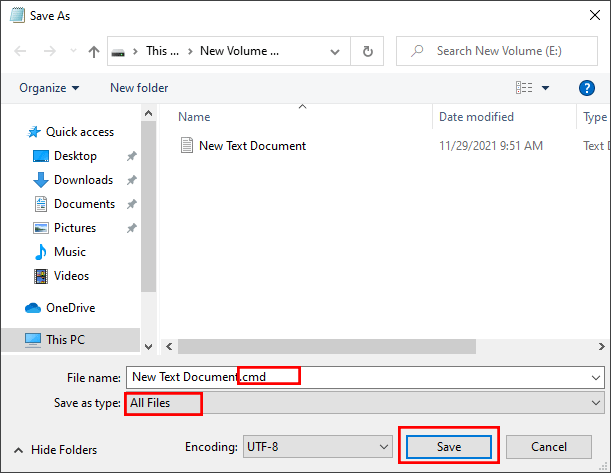
Step 2: Click the File option on the top and then choose Save As… option.
Step 3: Choose All Files in the Save as type checkbox and edit the file name ending with .cmd. After that, click the Save button to save this text document.
Step 4: Right click the saved file and choose to Run as administrator. Now, you just need to wait for the process to complete.
For Windows 8 users, they can refer the below article to disable driver signature enforcement.