We use cookies for personalizing content and ads and providing social media features. Your usage information on our website will be used for social media, advertising, and traffic analytics, or shared with our partners. Clicking "Accept" means you agree to use our cookies .
Scenario 1: "My HP computer prompted to upgrade Win 11 a week ago, which I then did. However, after that my device became very slow, for example it takes a minute to boot up. This is very annoying.Why is my computer so slow after windows 11 update?"
Scenario 2: "I haven't made any changes to my computer, but lately I can clearly feel it running slower, sometimes it takes more than 10 seconds to open a folder. How can I improve the speed of Windows 11?"
Many Windows 11 users online who claim Windows 11 is slow. There’s no doubt that slow speed effects overall user experience. If you want to know how to make Windows 11 run faster and improve performance, this post might help you out of this issue.
The most likely reason why your computer is running slower after the Windows 11 update should be related to the hardware configuration of your device. If your computer happens to be at the minimum configuration required by Windows 11, the update puts a strain on system resources, resulting in a drop in performance.
If you haven't made any changes to your device, such as upgrading, installing large memory software, changing system settings, etc., then the reasons why your computer is running very slowly include compatibility issues, disk fragmentation, software bloat, malware interference and excessive temporary file accumulation, in addition to hardware configuration.
You can follow the following fix tips to make your Windows 11 computer run faster.
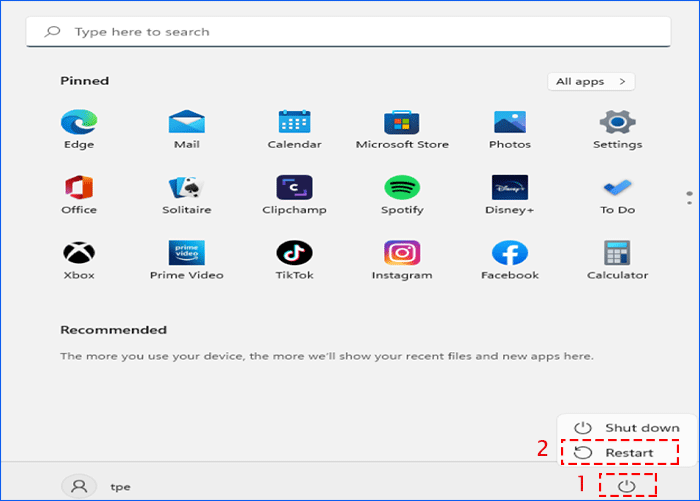
Tip 1: Restart Your Windows 11
Running too much software on your PC may lead to computer crashes, unresponsive programs, or blue screens of death. Restarting your computer is one of the best ways to optimize your Windows 11 problems. This means that you are re-running the wrong program or system.
It is simple to restart Windows 11, just click the "Start" menu and click the "Power icon", then click "Restart" on the pop-up shortcut menu. Please note that when the system restarts, the previously launch programs also will be recovered. You can only open the programs you need to enable your computer to run at a faster speed. Try to restart it to see if it works.
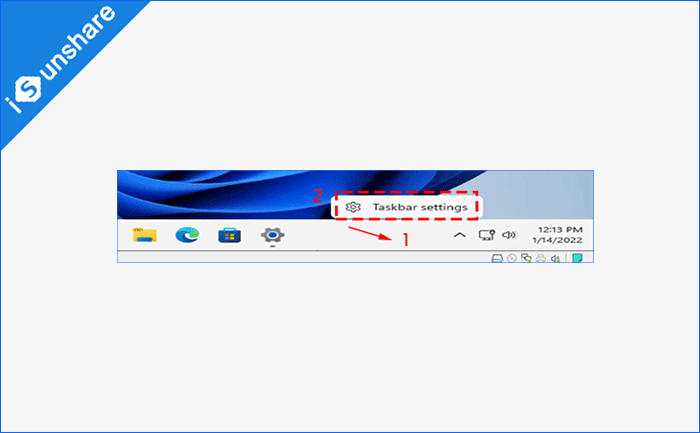
Tip 2: Close Unnecessary Program on the Taskbar
Turn off any taskbar items that unused or that you don't think you need.
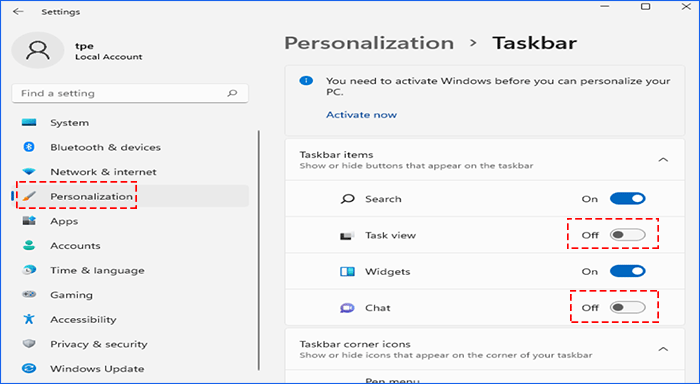
Step 1: Right-click the blank area of taskbar. Next, click the "Taskbar settings" option.
Step 2: The taskbar items are displayed. Close programs that you don't need pinned to taskbar.
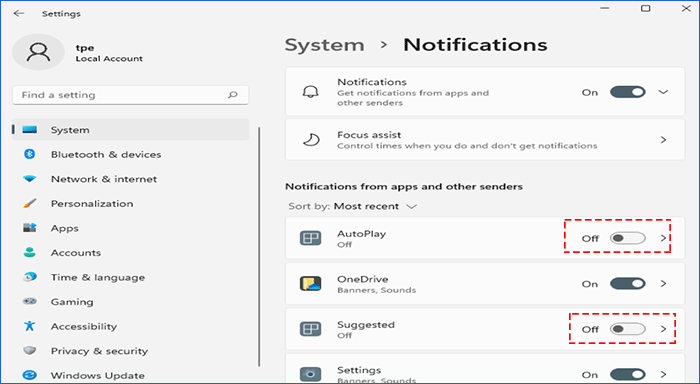
Tip 3: Disable Unnecessary Notifications
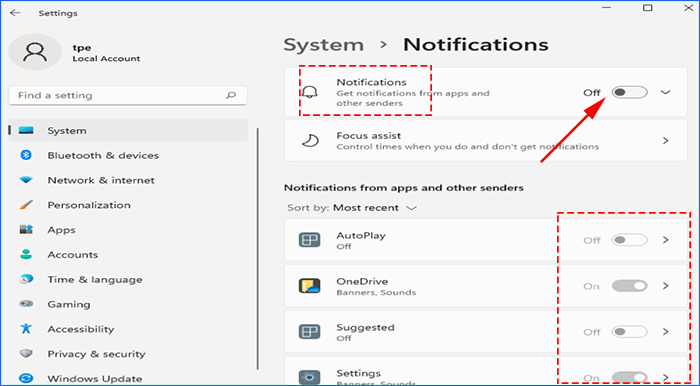
You can optionally turn off unnecessary notifications by clicking the Start menu on your desktop to go to "Settings". Next, click on the "System" on the left panel, scroll down to "Notifications", click on it. After that, please disable applications that don't need to be alerted in Settings on the right panel.
Or you can disable the "Notification" at the top. By doing so, all apps and other senders are closed and no longer receive notification of new messages.
If your Windows 11 is still running slowly, continue to try the next tip to speed up Windows 11.
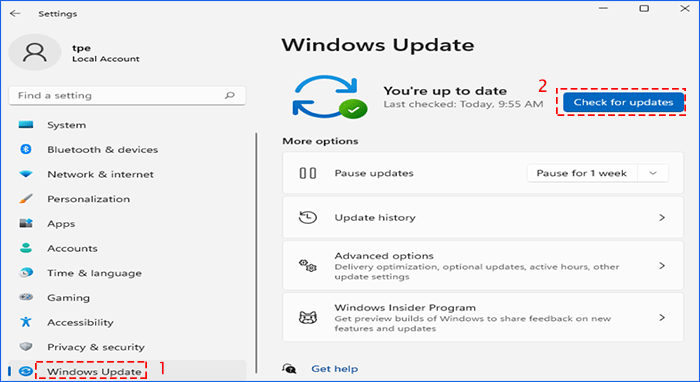
Tip 4: Check for Windows Update
Common errors and system errors that degrade system performance can be fixed by updating your PC. Go to Settings>>Windows Update>>Check for update. It will take some time to update your computer.
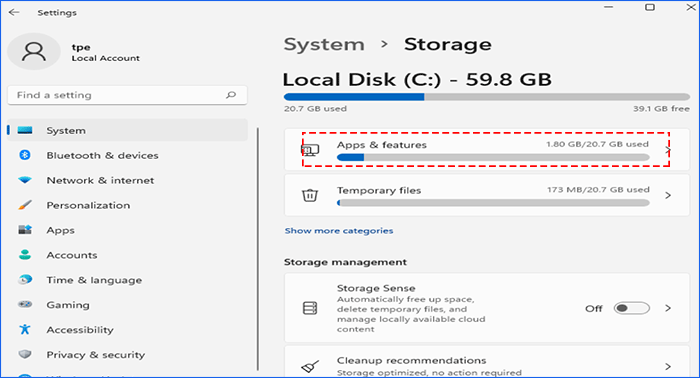
Tip 5: Uninstall Unused Apps
Step 1: Go to Settings>>System>>Storage.
Step 2: In this interface, you can see how much storage your all your apps take up. Click "Apps & features".
Step 3: Select apps which you want to delete and then click three-dot on the right of it. After that, a shortcut menu will pop-up, click "Uninstall" to delete the app.
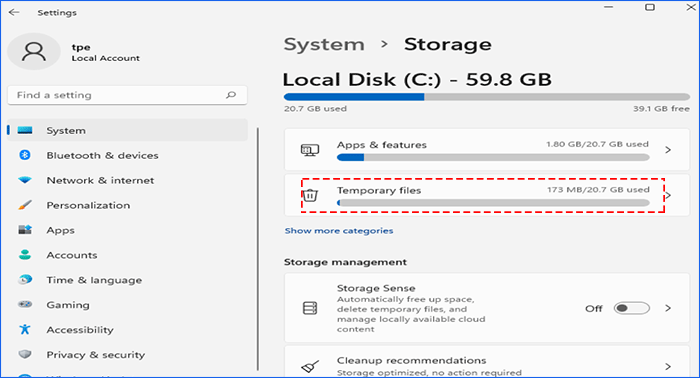
Tip 6: Delete Temporary Flies
Temporary files are usually generated when you download, install, and uninstall software, they occupied many memories on your computer, which decreases your performance of Windows on this computer. To speed up Windows 11, you'd better delete unused temporary files.
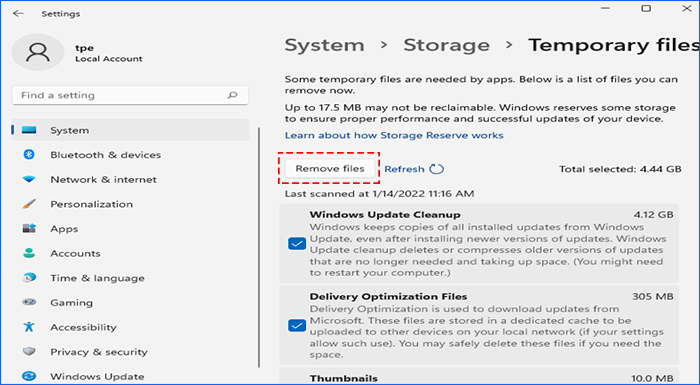
Step 1: Same as above, for deleting temporary files, go to Settings>>System>>Storage. Click "Temporary Files" under "Apps & features".
Step 2: Click "Remove files", this process can take a long time.
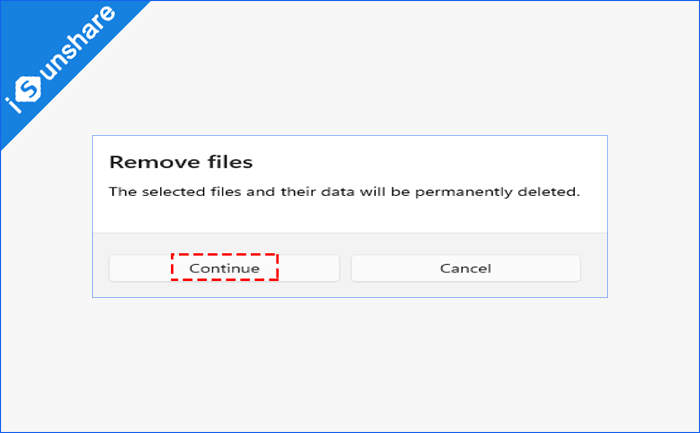
Step 3: When a dialogue pop-up that "Remove files", click "Continue" to complete. Then the selected files and their data will be permanently deleted.
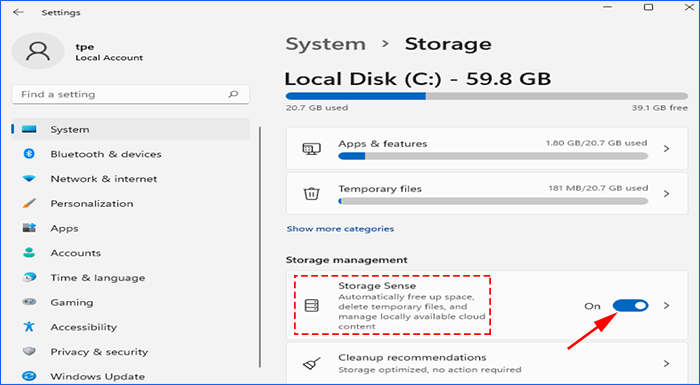
Tip 7: Enable Storage Sense
Enable "Storage Sense", which means automatically freeing up space, deleting temporary files, and managing locally available cloud content. The same as Tip 5 and Tip 6, go to Settings>> System>> Storage to open storage management. Just enable "Storage Sense", in this way, when this computer has not enough storage space, the Windows system will automatically clear up junk files and speed up computer startup, and shut down speed.
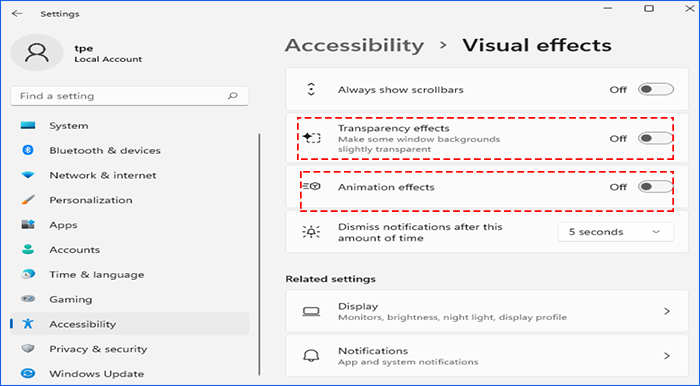
Tip 8: Disable Visual Effect
Windows 11 is visually gorgeous, but running it on a PC with weak hardware can significantly slow down your computer's performance, potentially causing apps to take some time to open or close. So, how to improve performance on Windows 11, please try the steps listed below.
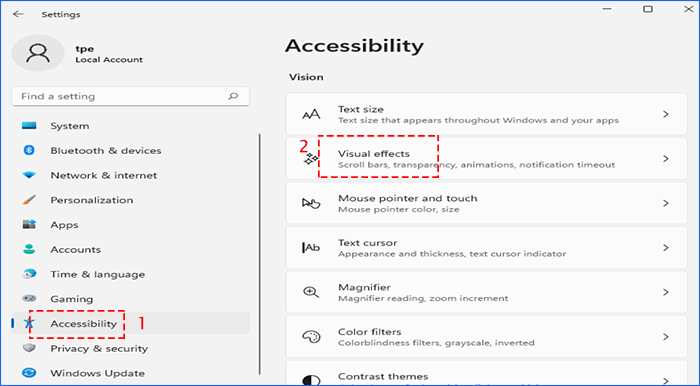
Step 1: Click "Accessibility" from Settings in the left pane, then click "Visual effects" in the right pane.
Step 2: Disable "Transparency effects" and "Animation effects". You can go back and undo your change any time.
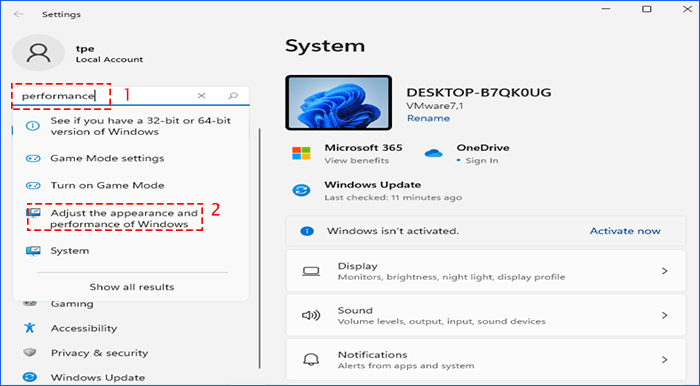
Tip 9: Adjust Best Performance of Windows
Step 1: Go to Settings, search "performance" in the search bar and then select "Adjust the appearance and performance of Windows".
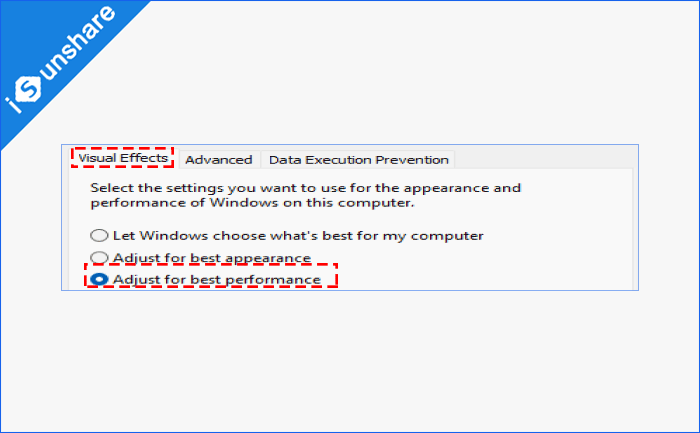
Step 2: In the "Visual Effects" section, select "Adjust for best performance". In this way, the appearance and performance you use for will be turn for best performance.
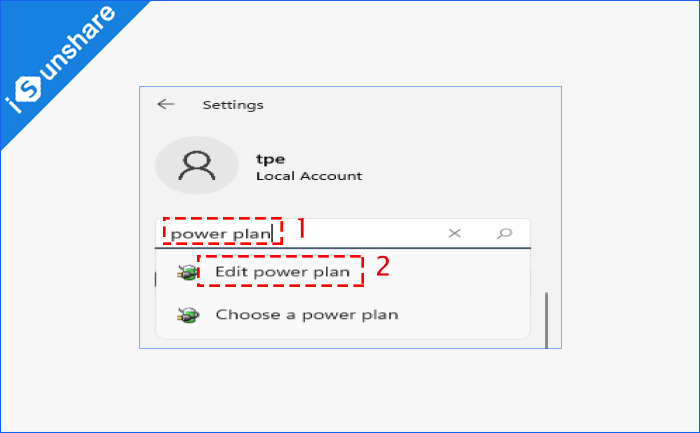
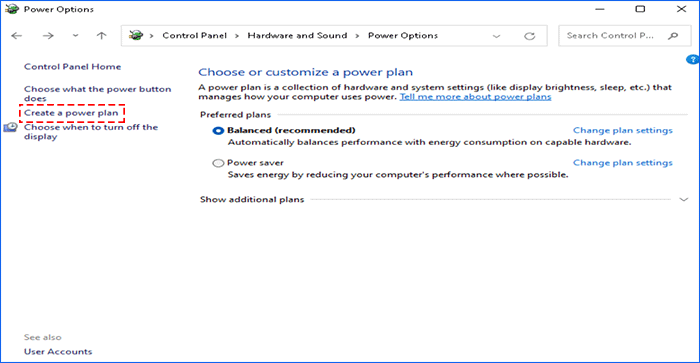
Tip 10: Create Power Plan for High Performance
Step 1: Go to "Settings" and enter "power plan" on the search bar, and then select "Edit power plan".
Step 2: Click "Create power plan" on the left sidebar.
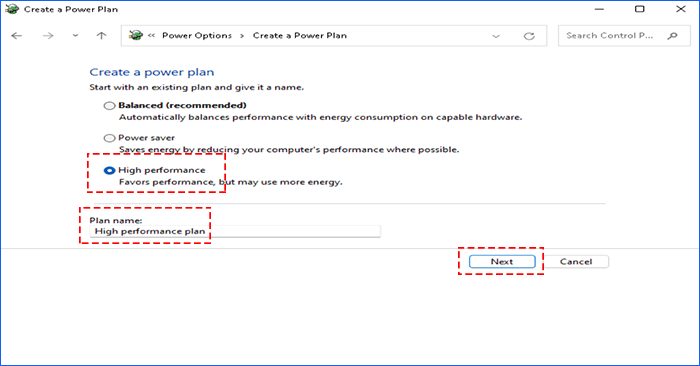
Step 3: Click "High performance" under the "Balanced (recommended)" and "Power saved". Besides, enter the plan name on the line at the bottom of "Plan name". After that, click the "Next" option to create it. Your PC will switch to a high performance soon.
Tip 11: Delete Duplicate Files on Windows 11
If you have a lot of duplicate files on Windows 11, such as pictures, videos, documents, etc., it will also affect the running speed of Windows 11. Thus, you need a powerful tool to clean up these duplicate files with one click. iSunshare DupFiles Genius can find, locate and delete duplicate files with high efficiency. It can also identify all types of duplicate files and classify them cleverly. Below are the specific steps:
Step 1: Download and install iSunshare DupFiles Genius on your Windows 11, then launch it.
iSunshare Powerful BitLocker Encryption Software
Quickly search and find dulplicate files on Windows PC
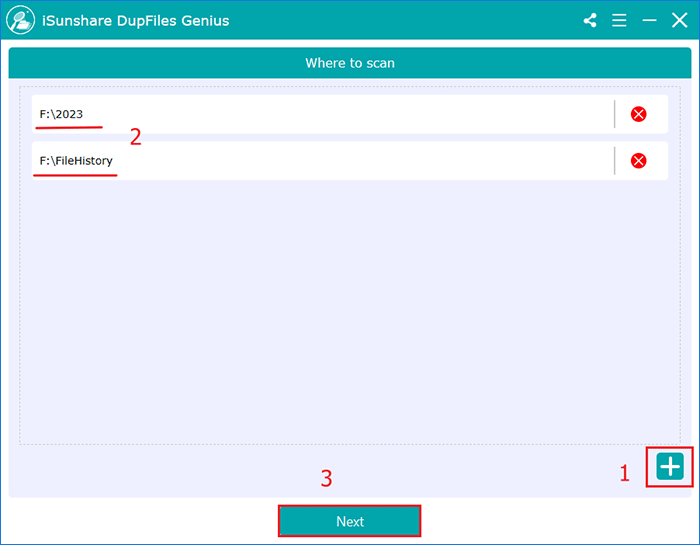
Step 2: Click the Add button in the lower right corner, select one or more disks or folders from your Windows 11 system to scan, and click Next to continue.
Step 3: You can select one or more folders to exclude from scanning and then customize the scanning options. You can set the types of files to be scanned, set the maximum and minimum size of scanned files, and set skip scanning system and hidden files. Once you have completed the scan settings, click the Start scanning button.
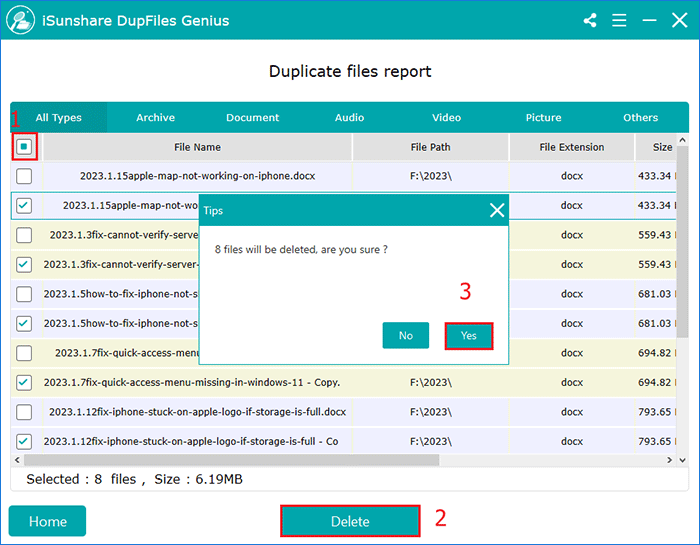
Step 4: When the scan is complete, DupFiles Genius will list a scan report based on your scan settings. You can right-click the document and choose the Open file location option to check the files. Then you just need to check the box in front of the File Name, click the Delete button, and select Yes in the pop-up dialog box to delete these duplicate files with one click.
Tip 12: Clean Up System via iSunshare System Genius
If the above methods do not play a big role on speeding up Windows 11, how to make your Windows 11 faster? Here, we show you how to do it with third-party software. You can try this out by using iSunshare System Genius. It is a strong cleanup tool that helps you clean Windows systems quickly and disables startup apps at ease.
iSunshare Reliable Windows System Optimizer
Clean up invalid registries on Windows computer
Clear junk files to make Windows 11 run faster
Turn off startup programs to fasten Windows 11 startup
Compatible with almost all Windows operating system
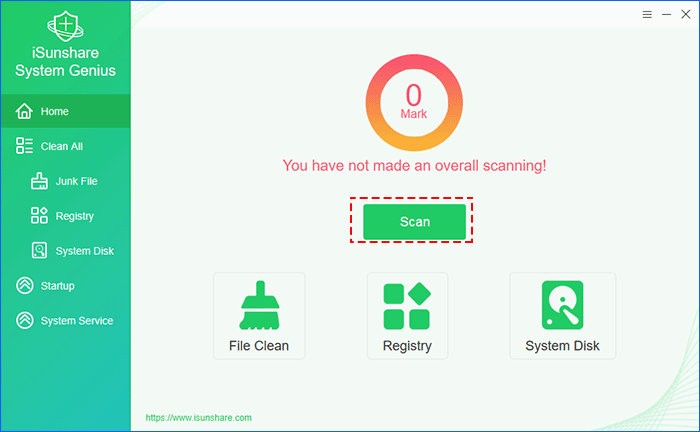
Step 1: Download and install iSunshare System Genius on your Windows 11, then launch it.
Step 2: Click on the "Scan" button on the right sidebar to start scanning your Windows system.
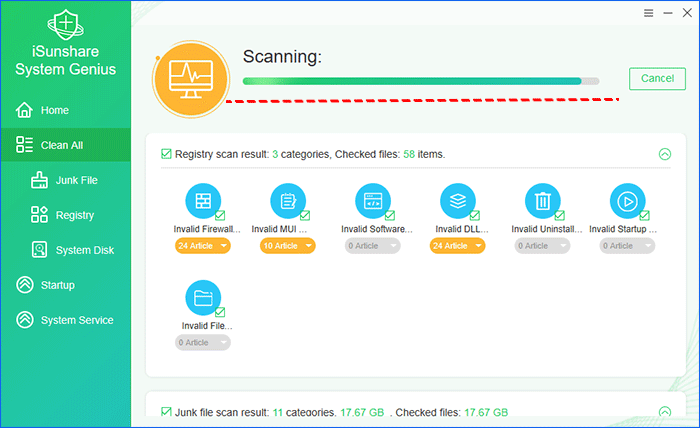
Step 3: You can see the progress of the scan at the top. And in the process, you can see more and more unused things on your computer being scanned.
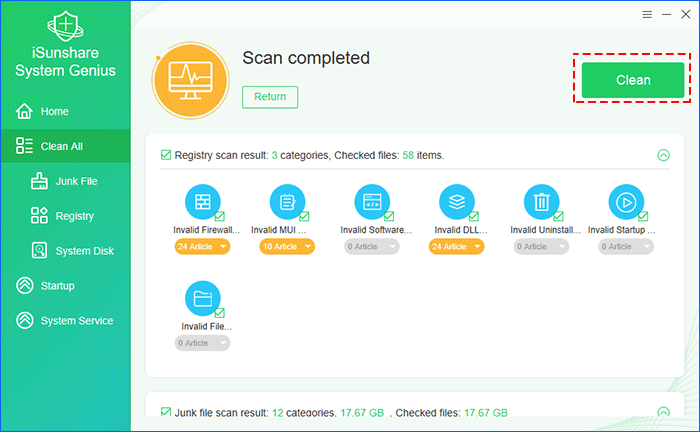
Step 4: After scanning completed, click the "Clean" button to clean all the scan results.
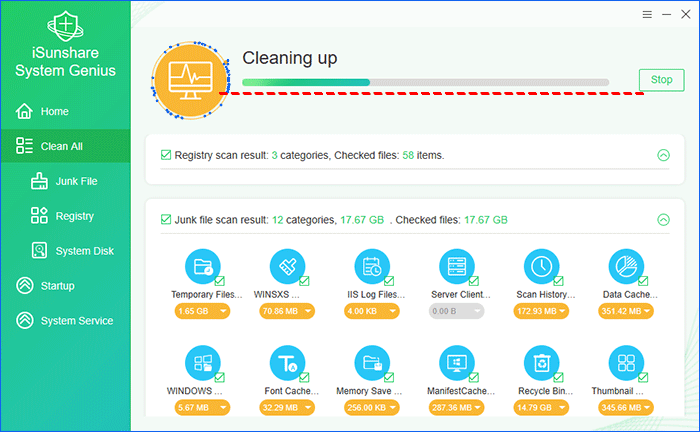
Step 5: Wait cleaning up patiently. To be honestly, this process would take you some time but no really long.
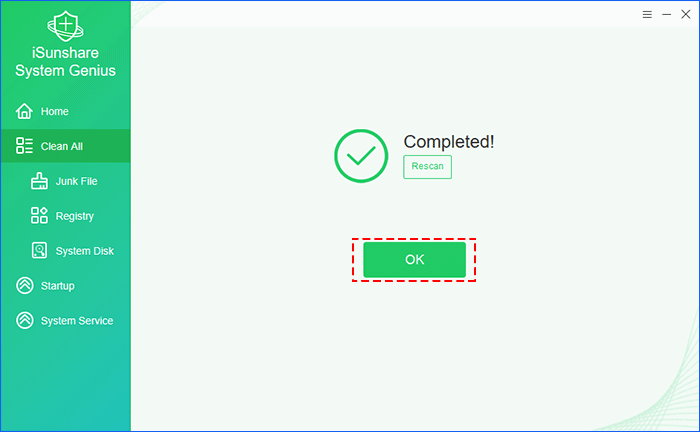
Step 6: At the end, click the "OK" button when cleaning is complete. That's all you need to do to speed your Windows 11 PC with iSunshare System Genius.
That's how to make Windows 11 run faster, if you're also encountered Windows 11 run slowly, try above tips to optimize your Windows 11 PC.