We use cookies for personalizing content and ads and providing social media features. Your usage information on our website will be used for social media, advertising, and traffic analytics, or shared with our partners. Clicking "Accept" means you agree to use our cookies .
Windows 10 allows users to adjust the System Cooling Policy, which controls how your computer manages heat. Whether you want better performance or quieter operation, you can follow the instruction below to activate or deactivate the policy in your Windows 10 PC.
What Is System Cooling Policy?
The system cooling policy determines how Windows manages the processor's temperature。
Active: It increases the fan speed before slowing the processor. Ideal for desktops and performance use.
Passive: It slows the processor before accelerating the fan speed. Best for conserving battery on laptops and reducing noise.
How to Change System Cooling Policy in Windows 10 via Power Options
Step 2: Click Change plan settings on the right of the selected power plan.
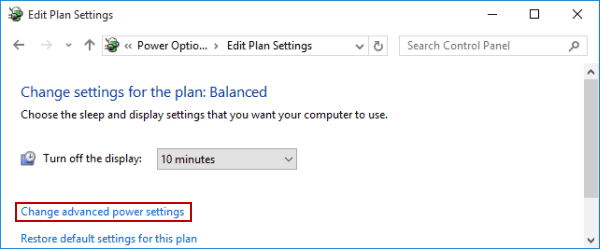
Step 3: Tap Change advanced power settings to continue.
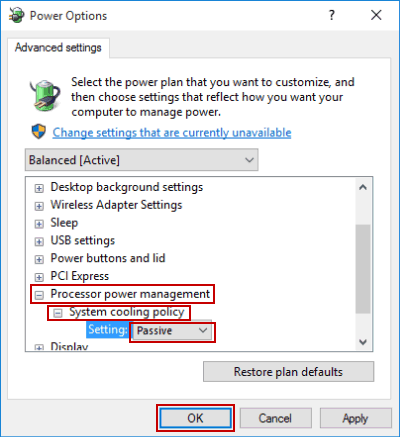
Step 4: Expand Processor power management, choose System cooling policy, select Active or Passive, and hit OK to finish the setting.
System Cooling Policy Option Missing? What to Do?
If you can't find "System Cooling Policy" in the settings, you can make it visible using PowerShell or the Registry Editor.
Option 1: Use PowerShell Command
Run Windows PowerShell and then execute the command line below:
REG ADD "HKLM\SYSTEM\CurrentControlSet\Control\Power\PowerSettings\54533251-82be-4824-96c1-47b60b740d00\94D3A615-A899-4AC5-AE2B-E4D8F634367F" /v Attributes /t REG_DWORD /d 2 /f
Step 2: Navigate to: HKEY_LOCAL_MACHINE\SYSTEM\CurrentControlSet\Control\Power\PowerSettings\
54533251-82be-4824-96c1-47b60b740d00\
94D3A615-A899-4AC5-AE2B-E4D8F634367F
Step 3: Find Attributes, and set its value to 2. Then restart the computer to restore the system cooling policy option.
FAQS about System Cooling Policy in Windows 10
Q1: Is changing the system cooling policy safe?
Yes, it's a built-in feature of Windows and won't harm your system or void your warranty.
Q2: Can I set different cooling modes for battery and plugged-in use?
Absolutely. Windows allows you to set separate cooling policies for battery and AC power.
Q3: The system cooling policy setting disappeared. What do I do?
Use the PowerShell or Registry method above to restore it.
Conclusions
By configuring the system cooling policy, you can control how your PC balances performance and temperature. Active mode is best for desktops and demanding tasks, while passive mode is useful for quieter and cooler laptop use.