We use cookies for personalizing content and ads and providing social media features. Your usage information on our website will be used for social media, advertising, and traffic analytics, or shared with our partners. Clicking "Accept" means you agree to use our cookies .
It is very convenient for Windows users to use a mouse to operate their computers. However, many users have reported that mouse pointer disappears on Windows 10 at times due to some reasons especially after a Windows update, which causes quite a few troubles to them. Have you once encountered the same problem? If yes, you may wonder how to get it back when mouse cursor disappears on windows 10. Here are 5 ways to fix this issue.
If your mouse cursor keeps disappearing on Windows 10, the first thing that you should do is to carefully check your mouse and the USB port. Sometimes this phenomenon occurs because your mouse is not connected properly. No matter whether you use a wired mouse or a wireless mouse, you can disconnect it first, then wait for a while and reconnect it to see if it helps. Or you can try to plug it to another USB port on your computer to check whether the mouse pointer shows up after doing it. And, if what you use is a wireless mouse, it is very necessary for you to check whether there is something wrong with the battery. If there is, you should install a new battery for your wireless mouse.
Then restart your PC – A simple reboot often restores the cursor. Use Win+D, then Alt+F4 if the cursor isn't visible.
Finally, replace mouse or batteries – Try a different mouse or fresh batteries (for wireless devices).
Way 2: Re-enable Your Mouse Device via Mouse Settings
If your Windows 10 mouse pointer disappeared when you are running your computer, you can try to re-enable the mouse device through Mouse Settings. Here are the instructions:
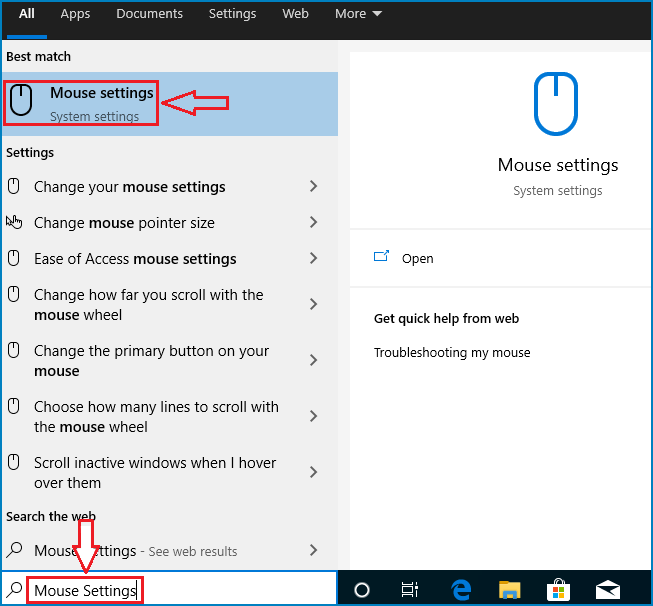
Step 1: Open Mouse settings.
Press the Window icon on your keyboard, enter "Mouse Settings" in the search bar, and then the result will appear at the top the menu. You will find the option is highlighted. Then press the key of Enter to open it.
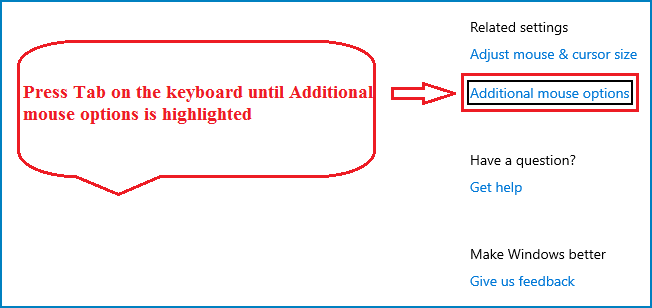
Step 2: Enter Additional mouse options.
When you come to the Mouse Settings, press the key of Tab on your keyboard to select Additional mouse options under the Related settings section, and then press Enter. The Mouse Properties panel will be opened.
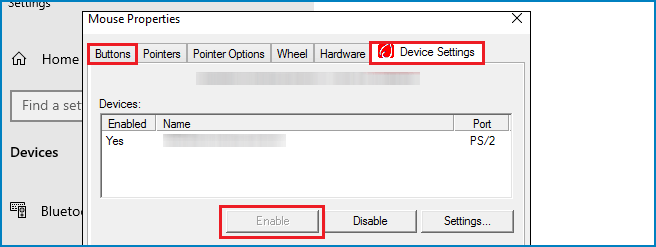
Step 3: Re-enable the Mouse Device.
Press the Tab key until the Buttons tab is selected, and then change to press the right arrow key to go to Device Settings. Check if your mouse device is disabled, press Tab key again to select the Enable button and then hit Enter. This will help you enable your mouse pointer. Then click OK to close the window.
Now you can check whether the cursor not showing on Windows 10 issue has been solved or not. If not, adopt another way.
Way 3: Update the Mouse Driver through Device Manager
You can fix the issue of Windows 10 cursor missing or disappearing by updating the mouse driver through Device Manager. Steps as followed:
Step 1: Open Device Manager.
Press Windows and R on the keyboard simultaneously in order to bring the Run dialog box. Type devmgmt.msc into the blank and tap Enter to open Device Manager.
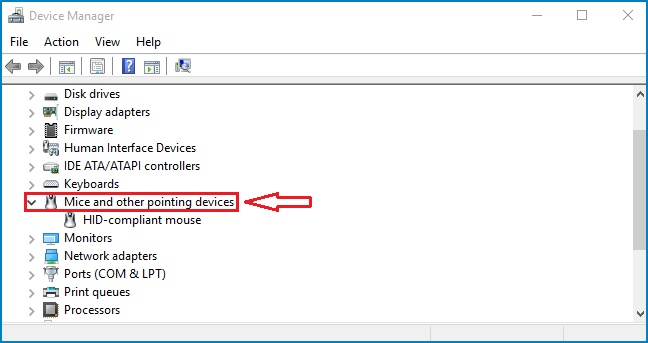
Step 2: Expand Mice and other pointing devices.
When you enter Device Manager, press the Tab key to switch to devices list, use the down arrow key to move to Mice and other pointing devices, and then click the right arrow key to expand it.
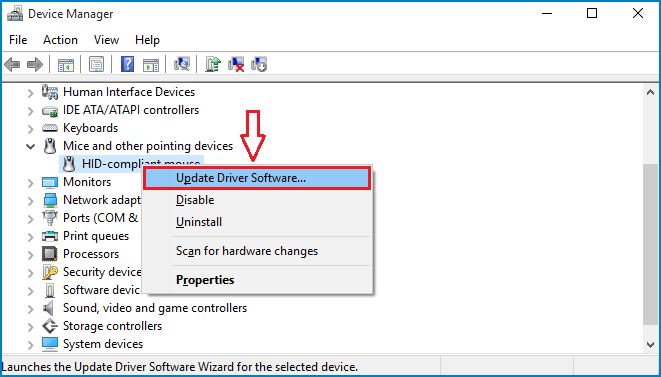
Step 3: Update the Mouse Driver.
Use the down arrow button to select your mouse device, press Shift+F10 to open the context menu, and then choose Update drive software with the down arrow key. Press Enter to open it.
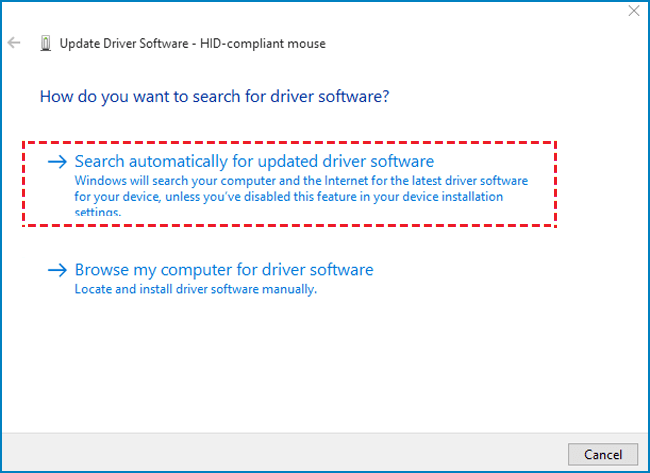
When you are asked "How do you want to search for updated driver software", choose Search automatically for updated driver software and press Enter. Then Windows will search for the latest drive software for your device and wait for it to complete.
If it doesn't find any new updates or the update didn't work, try to roll back the mouse driver.
Way 4: Roll Back the Mouse Driver in Device Manager
Step 1: Open the Mouse Driver's Properties.
After you expand Mice and other pointing devices and select your mouse device in Device Manager, press Enter to open its Properties.
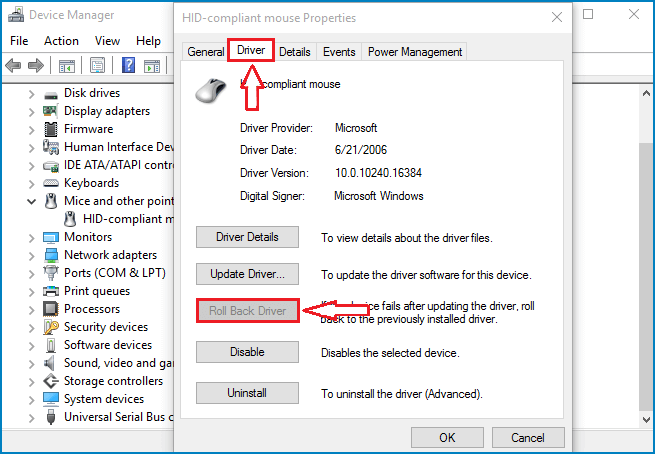
Step 2: Roll Back the Mouse Driver.
Press Tab for a few times until the General is selected, use right arrow key to go to Driver and then press Tab to choose Roll Back Driver. Hit Enter to go ahead. If the button is grayed out, move to another way.
Step 3: Complete the process.
Then you will be asked "Why are you rolling back", use the Tab key to highlight the question and use the up and down arrow keys to select one reason. And then use the Tab key again to go to Yes and press Enter. Then reboot your computer to see if the mouse cursor is back to normal.
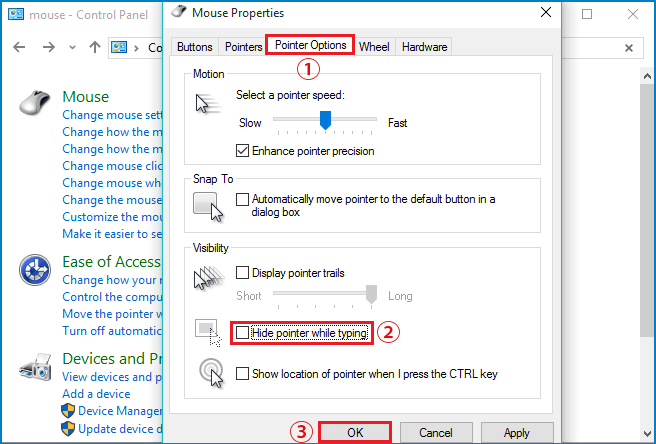
Way 5: Uncheck Hide Pointer While Typing
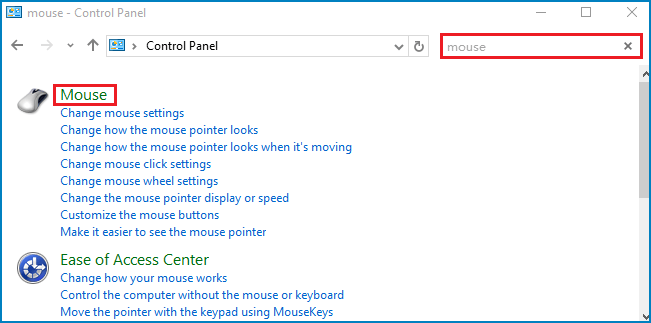
Step 1: Open Mouse Properties.
Hit the Windows icon, input "Control Panel" into the search bar, and then press Enter to open it. Enter "mouse" in the search blank of Control Panel, use the arrow keys to select the Mouse option and hit Enter.
Step 2: Uncheck Hide pointer while typing.
Use Tab and arrow key to locate to the Pointer Options. Under Pointer Options, press Tab again until Hide pointer while typing is selected. Tap the spacebar on the keyboard to uncheck this option. Then go to OK and press the Enter key.
Way 6: Run Hardware Troubleshooter
You can run hardware troubleshooter to help check the hardware or mouse issues.
Step 1: Press Windows + R and input msdt.exe -id DeviceDiagnostic. Press Enter to continue.
Step 2: The troubleshooter comes and you can click the Next button to detect the problem.
Step 3: Wait for minutes until the result comes out. Follow the suggestions to fix the issue.
FAQs on Mouse Pointer Cursor Disappears Issue
Q1: Why does my cursor only disappear temporarily?
This issue is often linked to a temporary driver glitch or specific app. Restarting or disabling accessories often fixes it.
Q2: How do I bring back the cursor using keyboard only?
You can press Windows + R, and input main.cpl, then navigate with Tab/arrow keys to modify pointer settings. Enable "show location on Ctrl key" as a quick detection feature.
Q3: My cursor vanishes only after updates—what now?
Try rolling back the pointed device driver or using System Restore to undo recent system changes.
Conclusion
With these methods—from simple hardware tweaks to advanced driver fixes—you should be able to restore and stabilize your cursor visibility.