If you get a Word document and are unable to edit it, the Word document is in protected mode. Without permission, you can only access as a read only readers. Don’t worry, this article will teach you how to remove read only from Word document and make the Word document editable.
- Method 1: Disable Protected View for the Word Document from the Internet
- Method 2: Change the File’s Properties to Remove Read Only
- Method 3: Remove Editing Restriction Password from Protected Document
- Method 4: Unrestrict Word Document without Password with Third-party Tool
- Method 5: Copy and Paste the Content to New Document for Editing

Method 1: Disable Protected View for the Word Document from the Internet
If you get a Word document from the website or email attachment, it is protected with read-only restriction. But you can easily disable the read-only protection when you open the document for the first time.
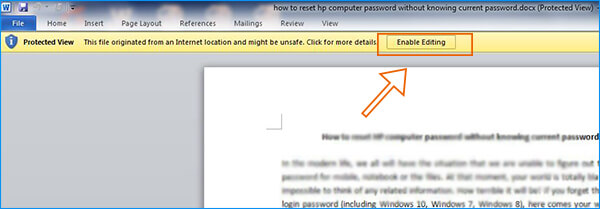
Step 1: Double click to open the Word document which is downloaded from the internet.
Step 2: On the content interface, you will find there is no way to edit the content or change the layout. On the top of the content interface, you will see a yellow banner that tells the readers the document is in protected view.
Step 3: Click the Enable Editing button on the yellow banner. After that, the read-only protection is removed and you can directly edit the content when you open it next time.
Tips: This method can only apply to the Word document downloaded from the Internet. If your Word file does not have the yellow banner, you can check other ways below.
Method 2: Change the File’s Properties to Remove Read Only
If the Word document is set read-only property, you can easily remove the read-only mode within simple clicks.
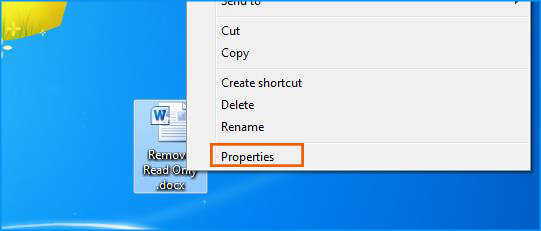
Step 1: Find the Word document in your Windows computer and right-click to choose Properties option from the list.
Step 2: In the Properties window, you can find Attributes settings under the General option. Then, uncheck the read only box and click the Apply button and OK button.
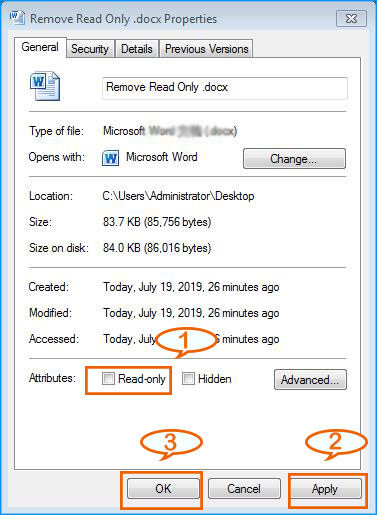
Step 3: Now, the Word file is editable. You can open the Word document and modify the content or layout without restrictions.
Method 3: Remove Editing Restriction Password from Protected Document
In this situation, you need to have the protection password so that you can remove this read-only restriction forever. If you forgot the protection password, you can go to check the last two methods.
Step 1: Double click the Word document with editing restriction which you want to unlock.
Step 2: You have two options here to access Restrict Editing setting. If you fail to find it in Option 1, try another option.
Option 1: Click Review tab and you will find Restrict Editing option.
Option 2: Click File > Info> Protect Document> Restrict Editing.

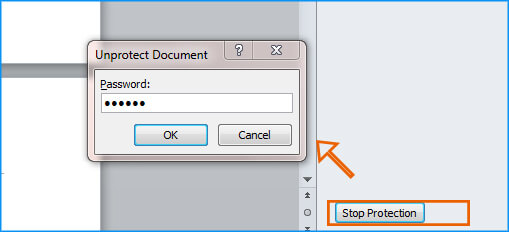
Step 3: At the bottom of the pop-out menu, you will find the Stop Protection button. Click it and you will see the pop up window which asks you to enter the password. You need to enter the password and click the OK button.
Step 4: The Word Document is editable now. At last, you need to save the changes for this Word document.
Method 4: Unrestrict Word Document without Password with Third-party Tool
If you forgot the Word editing restriction password, you can resort to a third-party tool to unrestrict the Word document. Word Unprotect Genius is used here to help you get out of read only mode in Word. It is convenient to make the read-only Word document unprotected with no data loss. No changes to the original content and 100% safe. This Word read-only remove software supports MS Word 97/2000/2003/2007/2010/2013/2016/2019 (*.doc, *.docx) files.
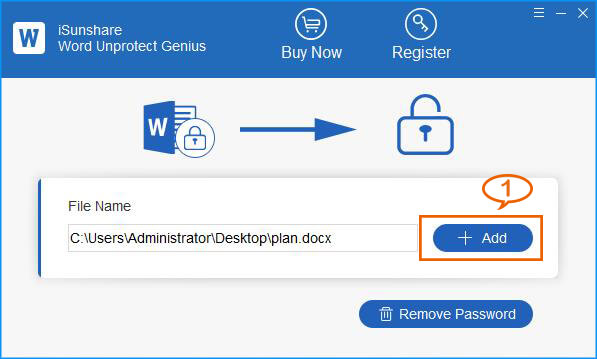
Step 1: Open Word Unprotect Genius if you have installed it on your computer. If not, you can download here.
Step 2: Add the password-protected Word document by clicking the Add button.
Step 3: Click the Remove Password button and you will get the protected password removed in seconds.
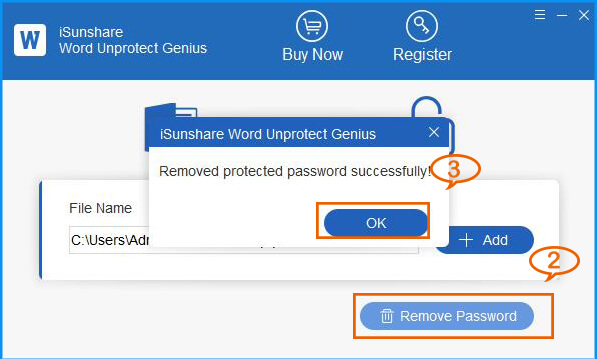
Step 4: After that, you will get the unprotected Word document at the same location of the original read only Word document. And this Word document with “unprotect” suffix is without password restriction. You can directly open and edit as you want.

Method 5: Copy and Paste the Content to New Document for Editing
If you just want to edit the text in read only Word document, you can copy it and paste into a new Word document. But this does not help to remove read only from the original Word document.
Step 1: Double click the protected Word document to open it.
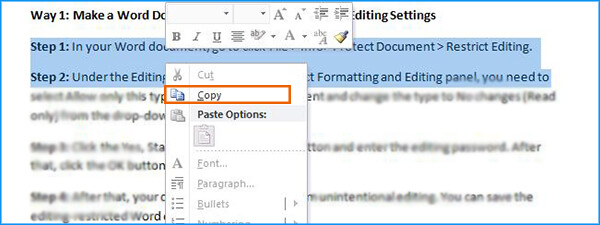
Step 2: Select the texts you want to edit and right-click to choose Copy. Or use the Ctrl +A button on the keyboard to choose all contents.
Step 3: Create a new blank Word document and open it. Then press Ctrl + V button to paste the copied texts into the blank Word document.
Step 4: Next, you can manage the content in your way. Lastly, save the new document with your own name. Then, you can edit this Word document at any time.
Related Articles:
Wonderful! This page provides a helpful way to us, keep it
up. Your method is practical!