We use cookies for personalizing content and ads and providing social media features. Your usage information on our website will be used for social media, advertising, and traffic analytics, or shared with our partners. Clicking "Accept" means you agree to use our cookies .
With the release of Windows 10, Microsoft Edge replaces Internet Explorer as the new default browser. As the core component of Windows 10, Microsoft Edge will surely inherit some of the annoying features of Internet Explorer. In this case, if you want it no longer in your field of vision, you can do the following to manually uninstall Microsoft Edge in Windows 10.
Manually Uninstall Microsoft Edge by Renaming or Deleting Core Files
We recommend that you change your default browser instead of uninstalling it. But if you persist, completely uninstall Microsoft Edge might cause some website cannot compatible, so make sure you have another browser before following the steps below.
Step 1: Click on File Explorer from the taskbar at the bottom of the desktop.
Step 2: At the top of the window, click on View tab. In the Show/hide section, check the boxes of "File name extension" and "Hidden items".
Step 3: Navigate to C:\Users\Isumsoft Li\AppData\Local\Packages folder.
Step 4: Located to Microsoft.MicrosoftEdge_
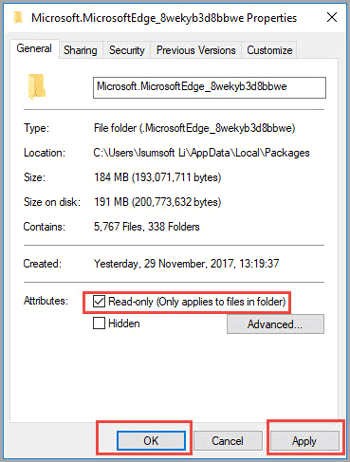
8wekyb3d8bbwe folder, right-click on the folder and select Properties from the options.
Step 5: In the pop-up window, click twice on the checkbox of Read-only, make it ticks with a check mark instead of a square.
Step 6: Tap on Apply button and click OK to finish.
Step 7: Go back to Microsoft.MicrosoftEdge_8wekyb3d8bbwe folder, find out the MicrosoftEdge.exe and MicrosoftEdgeCP.exe file. You can right-click to rename two files to MicrosoftEdge.old and MicrosoftEdgeCP.old or delete them.
Some people may come across such problem when changing the folder extension, maybe you need to change the permission.
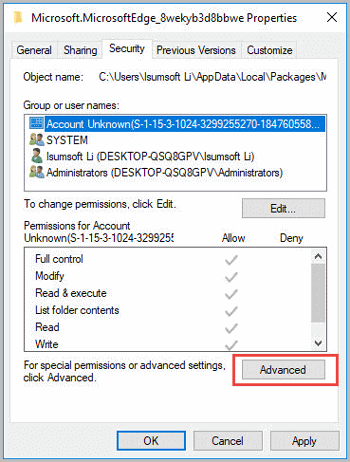
1.Right-click on Microsoft.MicrosoftEdge_8wekyb3d8bbwe folder, choose Properties option.
2. Tap on Security tab, click Advanced. When pop-up the window, click Change behind Owner.
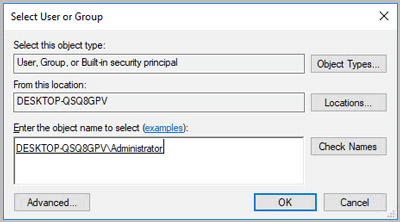
3. In the Select User or Group dialog, input Administrator in the box under Enter the object name to select then click on Check Names and Ok to exit.
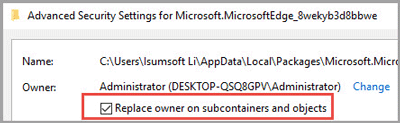
4. Check the box of "Replace owner on subcontainers and objects", hit OK to save changes.
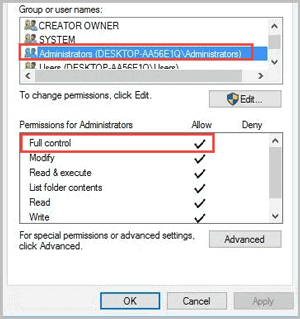
5. Then you will be back to Security tab, click on Edit.
6. Under Group or User names, choose Administrator you have set up above. Check behind the Full control of the Permissions for Administrators partition. Tap on Apply and OK button to save changes you have made.