We use cookies for personalizing content and ads and providing social media features. Your usage information on our website will be used for social media, advertising, and traffic analytics, or shared with our partners. Clicking "Accept" means you agree to use our cookies .
Google Chrome always automatically updates to the latest version by default. Nevertheless, the user experience gets worse in some aspects after updating. Therefore, some users tend to update manually. Worse of all, there does not exit any function to turn off Chrome auto-updating. Worry not: you can do the following to disable Chrome from auto-updating in Windows 10.
Way 1: Stop chrome from updating by disabling Google update service
Step 1: Right click on Start button, select Computer Manager.
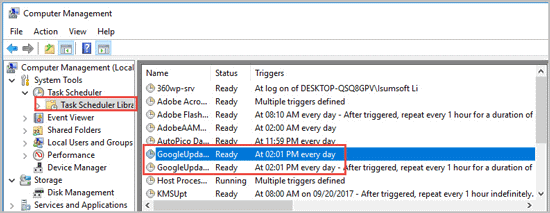
Step 2: In the left sidebar, expand System ToolsTask Scheduler Task Scheduler Library. Find out two schedulers of Google update as the image below, right-click and Disable it.
Step 3: Go back to the left sidebar, navigate to Services and Applications > Services. Disable all services about Google update if you can find from the list.
Way 2: Turn off Chrome auto-updating through Registry Editor
Step 1: Use Windows + R combination key to open Run dialogs box. Type Regedit and press Enter.
Step 2: Once the Registry Editor window is open, located in the folders below:
HKEY_LOCAL_MACHINESOFTWAREPolicies
Step 3: Right-click on Policies folder, select New > Key and rename the key as "Google".
Step 4: Right-click on the new Google folder and choose the New > Key option to create a new folder, name it to Update.
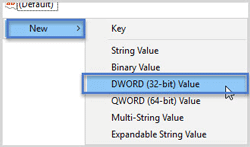
Step 5: In the right sidebar, right-click and select New > DWORD (32-bit) Value While your computer is on the 32-bit operating system. On the other side, you can also choose QWORD (64-bit) Value to create if your computer is on the 32-bit operating system.
Tips: To see your system version, click Start menu and click on the gear icon to open Settings window, then navigate to System > About. Under Device specifications section, located to System type.
Step 6: Name the folder as UpdateDefault. Double-click and input 0 in the box under Value data.
Tips: If you wonder enabling Google Chrome auto-updating, exchange the Value data to 1.
Way 3: Disable Chrome auto-updating from renaming the update application
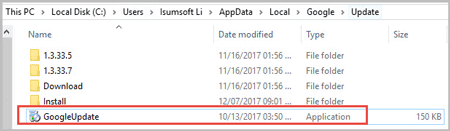
Step 1: Press Windows + E key to open File Explorer, then expand the following folder: C:\Users\USERNAME\AppData\Local\Google
Note: Replace your account name with USERNAME.
Step 2: In the Google folder, you can see the "GoogleUpdate" application, right-click to rename it. For example, you can name it as GoogleUpdate.old.