We use cookies for personalizing content and ads and providing social media features. Your usage information on our website will be used for social media, advertising, and traffic analytics, or shared with our partners. Clicking "Accept" means you agree to use our cookies .
Google Chrome is an efficiency browser that attracts so many people. So you can install it on your desk to give it a try. However, it sometimes went wrong on some computers. Thus you might have to remove it from your computer. So we will guide you to install and remove Google Chrome in a particular way.
Google Chrome is so popular that most of the people like to install and even set it as the default browser. In this part, we provide two methods to install Google Chrome on Windows 10. Decide which plan to use depending on your own circumstances.
Step 1: From any other browser, go to the download center. Click on DOWNLOAD CHROME button.
Step 2: When the prompt show, click Save then double-click the download to install Chrome. Or you can tap on Run to install automatically.
Method 2: Install Google Chrome offline
Step 1: If your Windows computer doesn't support downloading Chrome, try to use a workable computer navigate to the alternate link.
Step 2: Move the download file to the computer you want to install Chrome. The wizard will guide you to install Chrome.
Part 2: Remove Google Chrome Completely from Windows 10
At times, it might as well happen that your Google Chrome is out of work or constantly advertising. Therefore, you wonder to solve these issues by reinstalling Chrome. Unfortunately, always receive prompts that cannot be installed. The reason for that is you didn't remove completely.
Note: Keep in mind that all of your information will be deleted completely, including Bookmarks, Histories, Cookies, etc. So, back up before you follow the steps below.
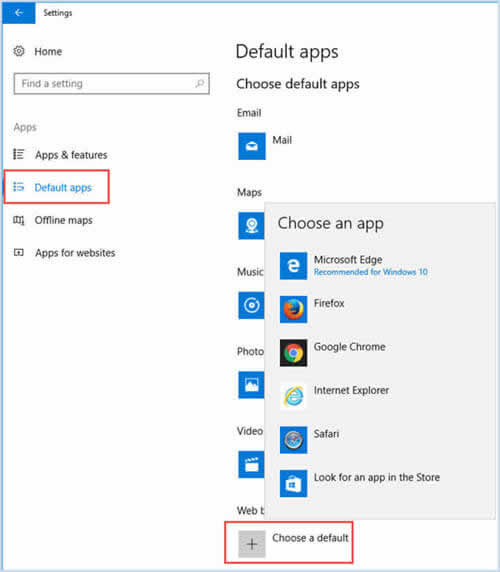
Step 1:Set Chrome as a non-default browser
Click on Start menu, in the left panel tap on Settings.
On the pop-up window, click Apps.
Select Default apps option. Under Web browser, click on Choose adefault. You can choose any browser you like from the options except for Google Chrome.
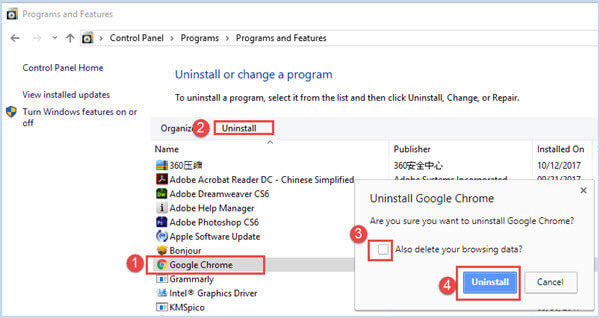
Step 2:Uninstall Google Chrome on your computer
Type Control Panel in the search box on the taskbar and Enter.
Navigate to Programs Programs and Features, select Google Chrome from the program list.
Note: You can also use keyboard shortcuts "Windows" +"R" key to load the Run dialog box. Type "appwiz.cpl" and press Enter to reach the Programs and Features window.
Click Uninstall and check the Also delete your browsing data box. Tap on the Uninstall button to remove Google Chrome from your computer.
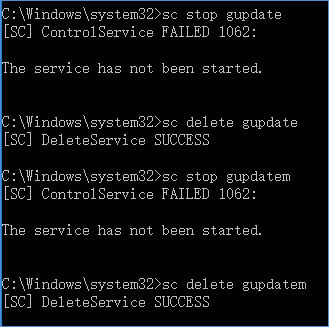
Step 3:Delete the remaining Google Update service
Press the keyboard shortcuts "Windows" +"R" key to open the Run dialog box.
Type "cmd" and press Enter, the Command Prompt window will pop up.
Input the following commands and press Enter.
sc stop gupdate
sc delete gupdate
sc stop gupdatem
sc delete gupdatem
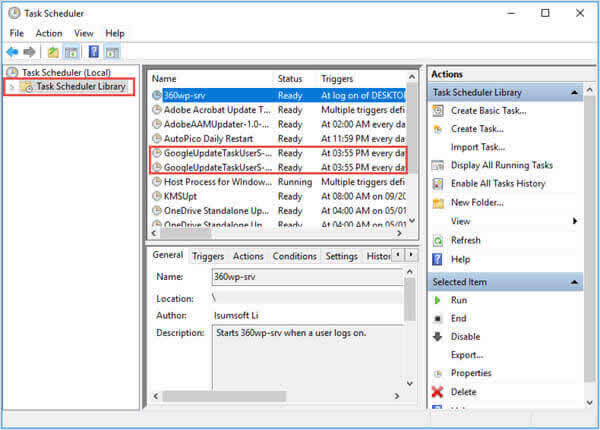
Step 4: Disable Google Update Task User to forbid automatic update
Press Windows + R key to load the Run dialog box.
Type "taskschd.msc" to open the Task Scheduler Window.
Find out two Google Update Task User scheduled tasks, right-click on Ready and set as Disable instead.
Step 5: Delete the remaining Chrome files
On your computer, open This PC on the desktop.
Click View tab, check the Hidden items box in the Show/hide tab.
Find the two files in the following on your computer, right-click to delete.