We use cookies for personalizing content and ads and providing social media features. Your usage information on our website will be used for social media, advertising, and traffic analytics, or shared with our partners. Clicking "Accept" means you agree to use our cookies .
WinGet is one of the most useful command-line tools available for Windows users. Officially known as the Windows Package Manager, it allows you to search for, install, upgrade, and uninstall software using simple commands.
For example, instead of manually opening a browser, downloading an installer, and clicking through the setup process, you can install an app with a command like: winget install Google.Chrome.
But sometimes WinGet is missing, not recognized, stuck, or simply refuses to work.
You may see errors such as:
winget is not recognized as an internal or external command
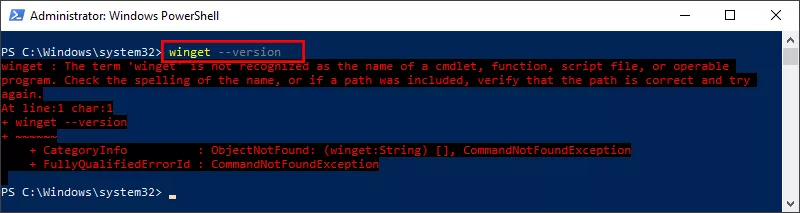
winget is not recognized as the name of a cmdlet
The source requires the current machine's 2-letter geographic region
Failed when opening source(s)
0x80073CFB
WinGet is installed but does not work
WinGet disappeared after a Windows update
This guide explains how to install WinGet on Windows 11 and how to fix common WinGet problems.
WinGet, short for Windows Package Manager, is Microsoft's command-line package management tool for Windows. Its official Windows distribution vehicle is primarily the Microsoft App Installer.
To put it simply: App Installer supplies and hosts WinGet, which enables the winget command‑line utility. Additionally, it handles installation functionalities for Windows application packages such as .appx and .msix files.
It can help you:
Install applications
Search for software
Upgrade installed apps
Uninstall programs
View available packages
Manage multiple applications from the command line
Should WinGet malfunction, repairing or reinstalling Microsoft App Installer may resolve the issue.
Note:
1. The WinGet command‑line tool is only supported on Windows 10 build 17763 (version 1809) and later releases.
2. WinGet will not be accessible prior to a user’s initial Windows sign‑in. During this first‑login sequence, the Microsoft Store registers the Windows Package Manager as part of an asynchronous background process.
3. If you have just logged into a user account for the first time and WinGet remains unavailable, launch PowerShell and run the following command to manually trigger WinGet registration:
Add‑AppxPackage ‑RegisterByFamilyName ‑MainPackage Microsoft.DesktopAppInstaller_8wekyb3d8bbwe
How to Check If WinGet Is Installed
Before installing or repairing WinGet, check whether it is already available.
Step 1: Open Windows Terminal, PowerShell, or Command Prompt. Run it as the administrator.
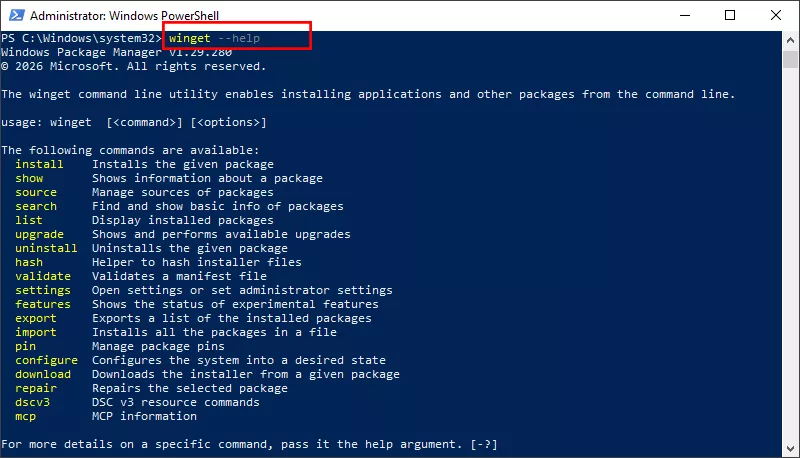
Step 2: Run this command: winget –version. If WinGet is working, you should see a version number.
If the command displays a list of available WinGet commands, it is installed correctly.
If Windows says that winget is not recognized, continue with the solutions below.
Method 1: Reinstall or Fix WinGet with BITS
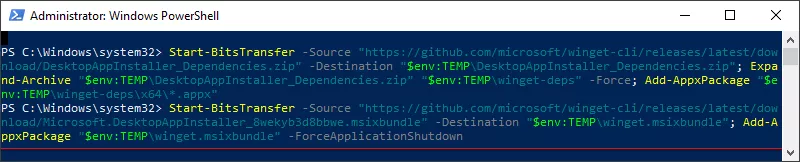
You can redownload the App Installer from BITS online services so as to reinstall or fix WinGet.
Step 1: Open Windows PowerShell as the administrator.
Step 2: Run the below command lines to download mandatory dependencies for WinGet.
Step 3: Wait for the command to finish. Then close PowerShell and open a new terminal window. Check WinGet again: winget –version. If the command works, the App Installer registration was likely the cause of the problem.
How to Use WinGet After Installing It
Once WinGet is working, you can use it to manage software from the command line.
Task
WinGet Command
Description
Search for an application
winget search Chrome
Search for available packages related to Chrome.
Install an application
winget install Google.Chrome
Install the specified application using WinGet.
Install a specific application by ID
winget install --id Google.Chrome
Install an application using its exact package ID to help avoid selecting the wrong package.
Check available upgrades
winget upgrade
View applications that have updates available.
Upgrade a specific application
winget upgrade Google.Chrome
Update the specified application to the latest available version.
Upgrade all supported applications
winget upgrade --all
Update all installed applications that are supported by WinGet.
Uninstall an application
winget uninstall Google.Chrome
Remove the specified application from your computer.
View installed applications
winget list
Display a list of applications installed on your computer.
Common WinGet Errors and Quick Fixes
Problem
Possible Cause
Fix
winget is not recognized
WinGet is missing or the alias is disabled
Install or update App Installer and check App Execution Aliases.
WinGet suddenly stopped working
Corrupted App Installer
Repair or reset App Installer.
WinGet cannot find an app
Outdated or damaged sources
Run winget source update or winget source reset --force.
Microsoft Store cannot install App Installer
Store or Windows issue
Update Windows, reset Microsoft Store, or manually install App Installer.
WinGet commands fail after installation
Terminal session is outdated
Close and reopen Terminal or restart Windows.
App Installer is installed but WinGet does not work
Package registration problem
Re-register App Installer using PowerShell.
Multiple Windows components are malfunctioning
Corrupted system files
Run SFC and DISM to scan and repair corrupted Windows system files.
FAQs on Installing WinGet in Windows 11
Q1: Is WinGet included with Windows 11?
WinGet is commonly available on Windows 11 through Microsoft's App Installer package. If it is missing, updating or reinstalling App Installer usually restores it.
Q2: Why is winget not recognized?
The most common reasons are that WinGet is not installed, App Installer is corrupted, the App Execution Alias is disabled, or you need to open a new terminal session.
Q3: Do I need to restart my computer after installing WinGet?
Not always. Usually, closing and reopening Windows Terminal, PowerShell, or Command Prompt is enough. However, restarting Windows can help if the command is still not recognized.
Q4: Is WinGet safe to use?
WinGet is Microsoft's Windows package manager. However, you should still verify the application and package you are installing, especially when multiple packages have similar names.
Conclusion
If you need to install or fix WinGet, the first thing to check is the App Installer package. You can learn several ways here to make WinGet back to normal. Once it is working, WinGet provides a fast and convenient way to install, update, and manage software on Windows 11.