We use cookies for personalizing content and ads and providing social media features. Your usage information on our website will be used for social media, advertising, and traffic analytics, or shared with our partners. Clicking "Accept" means you agree to use our cookies .
"My computer is running Windows 10 now. I want to do a fresh install of Windows 11 on my computer. What do I need to prepare? Can I clean install Windows 11 without USB?"
A clean install of Windows 11 on your computer will destroy all data on your computer hard drive and then install a fresh copy of Windows 11 operating system to configure your computer. Besides, you can use it to troubleshoot issues on existing Windows 11. In this article, you can learn two easy and effective ways to clean install Windows 11 with or without USB.
If you want to clean install Windows 11 from Windows 10, Windows 8/8.1, or Windows 7, it is better to you to check the device whether meets the Windows 11 minimum system requirements or not. How to check the computer compatibility of Windows 11? Firstly you can go to manually check Windows 11 specs, features and computer requirements from its official website. Then if you want an easy and fast way, you can use free tools to do it. Check this article for details: 2 Free Tools to Check Computer Compatibility for Windows 11.
What's more, before a clean install of Windows 11, you should make a backup of all data in your computer as the clean install will erase everything on your computer. As for the computer data backup, these three articles may help you:
Way 1: Directly Clean Install Windows 11 with ISO Image File
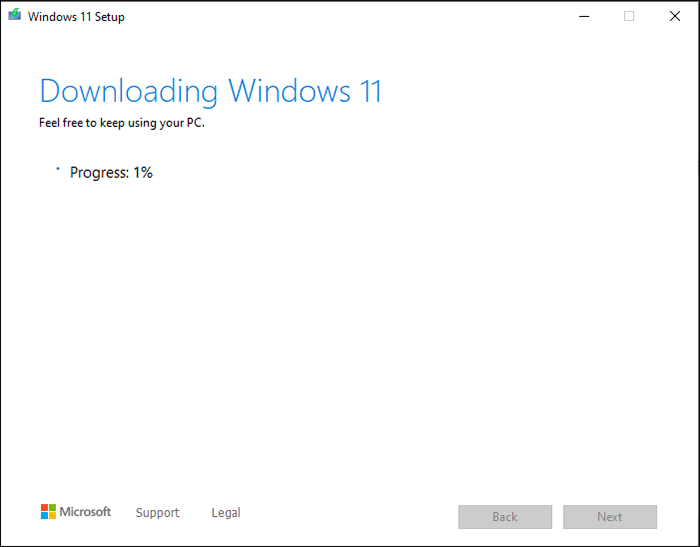
In this way, you can directly download Windows 11 ISO image file from Microsoft website and then begin installing Windows 11 on your computer without USB. But you should make sure that your computer is compatible with Windows 11.
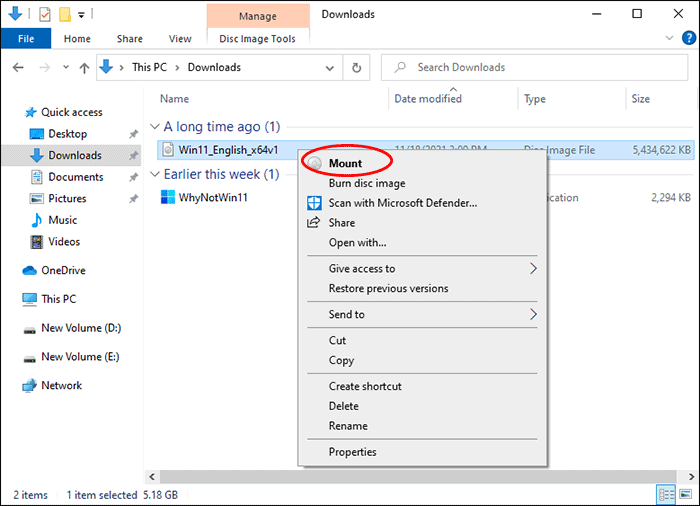
Step 1: Right-click the downloaded Windows 11 ISO image file and then choose the Mount option.
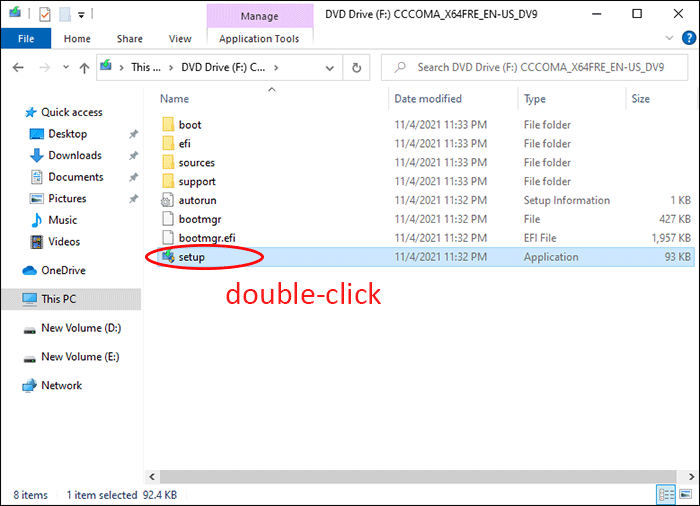
Step 2: Go to where the ISO file is mounted and double-click the setup application.
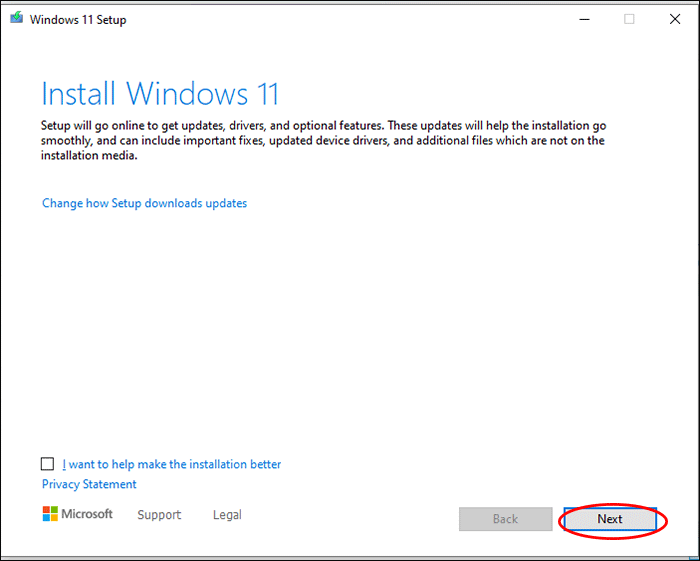
Step 3: Then you will directly get into Windows 11 setup process. Click Next to continue.
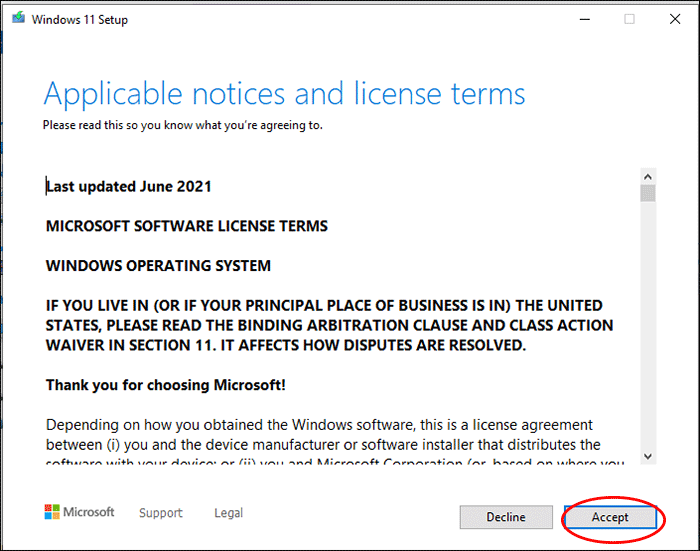
Step 4: Read the application notices and license terms. Click Accept to proceed.
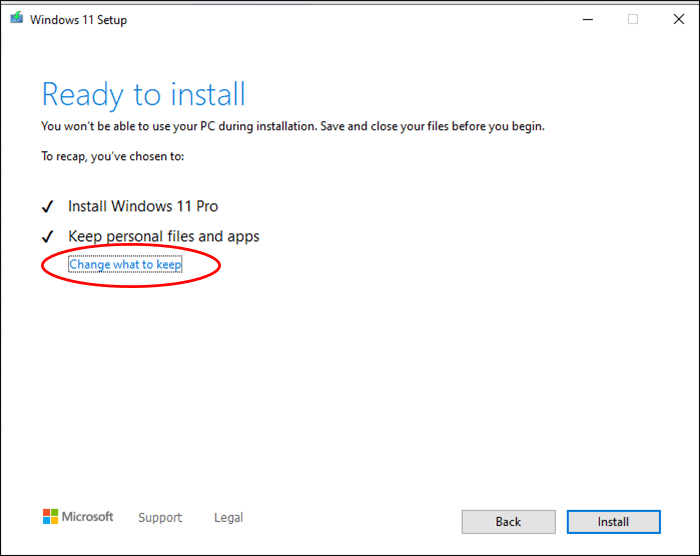
Step 5: In Ready to install screen, click Change what to keep option.
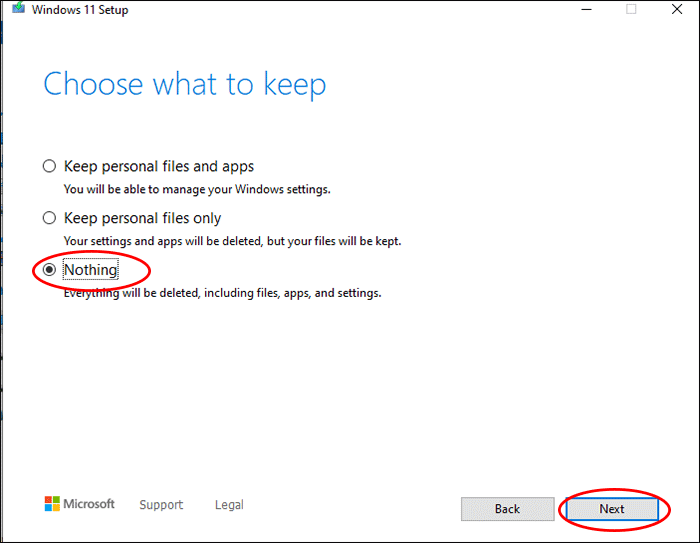
Step 6: As you want to clean install Windows 11, choose Nothing option and then click Next.
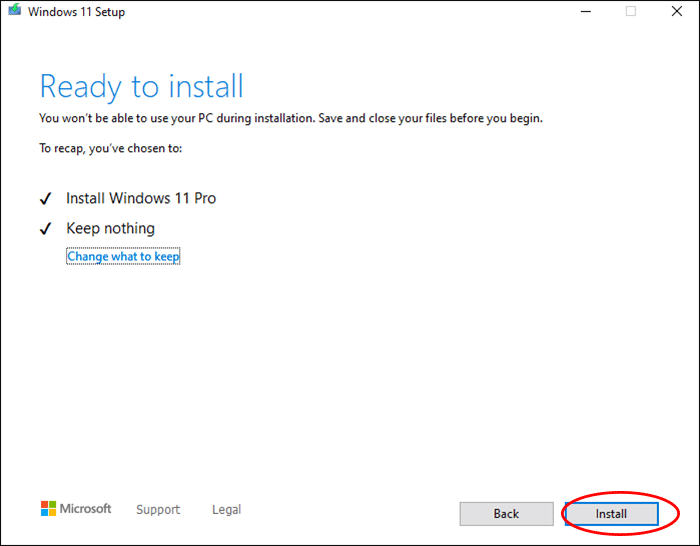
Step 7: Wait for minutes and then click Install button to install Windows 11 on your computer.
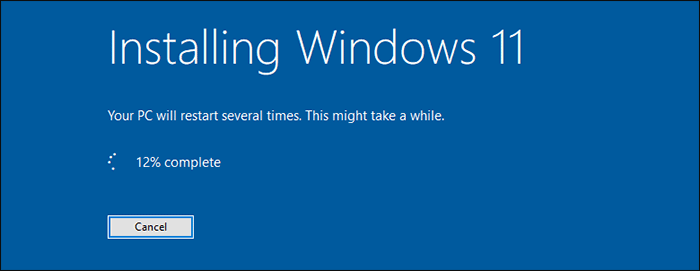
Step 8: During the installation, the computer will restart several times. You just need to wait and then configure your Windows 11.
Way 2: How to Clean Install Windows 11 from USB
You can also download the media creation tool to make a bootable USB to reinstall or clean install Windows 11 on a new or used PC. Once done, this USB can be used repeatedly.
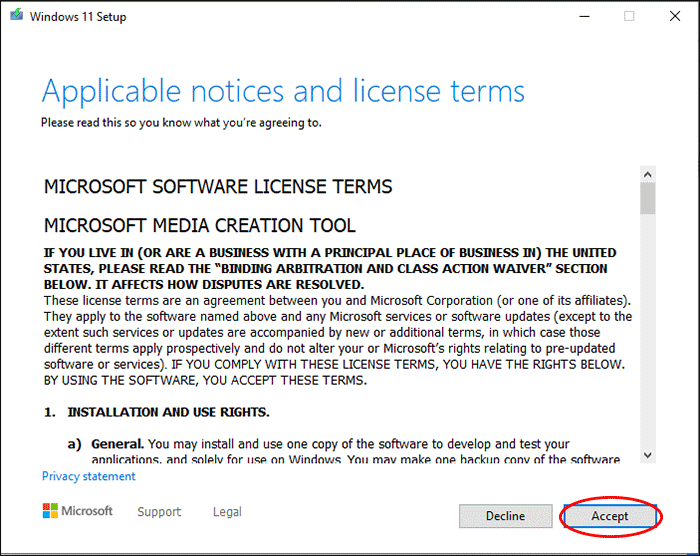
Step 2: Double click the downloaded MediaCreationToolW11 and then click Accept to agree to the applicable notices and license terms.
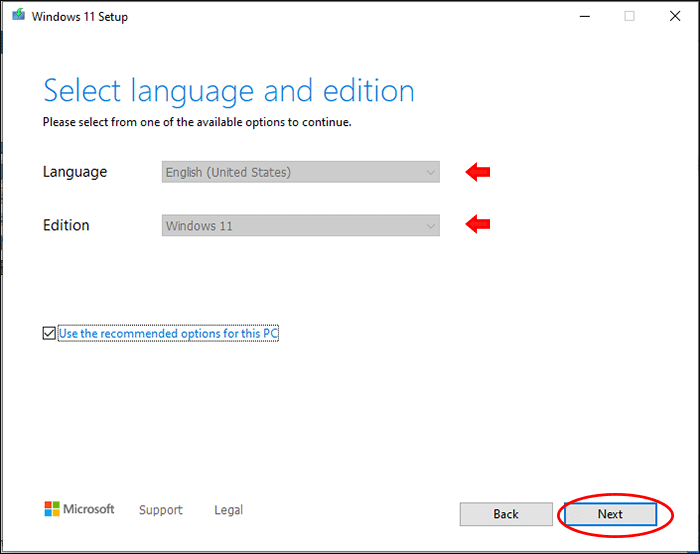
Step 3: Choose the language and edition. Click Next to go ahead.
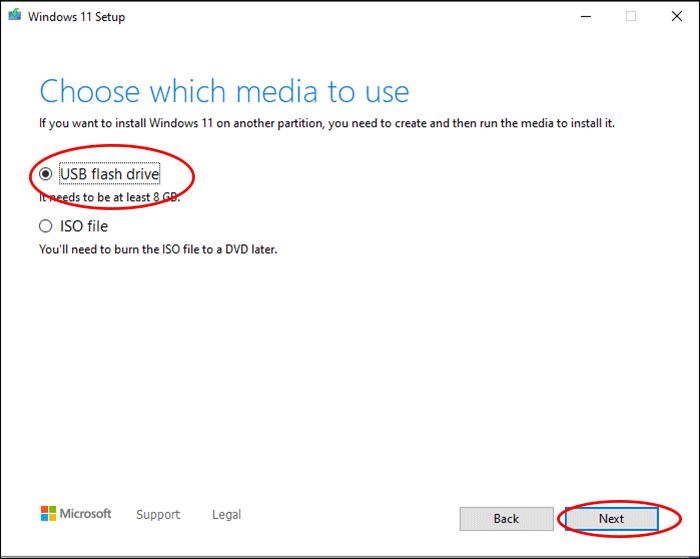
Step 4: Choose the USB flash drive option to create the media. You should make sure that you have a USB drive that should be at least 8GB. Click Next to select the USB drive.
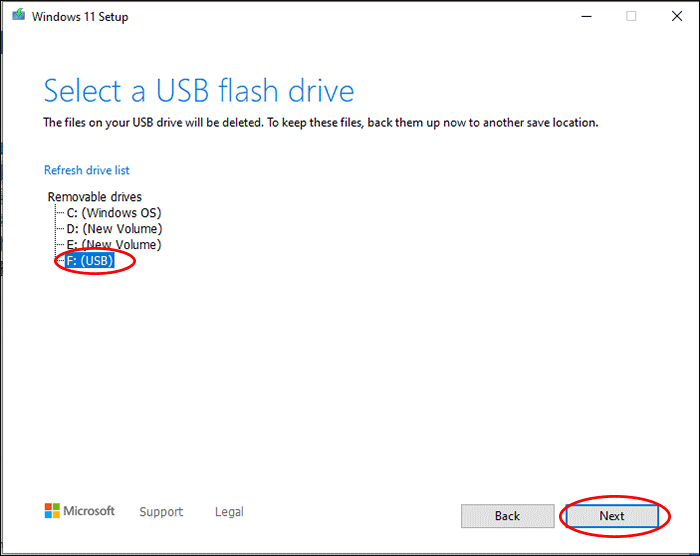
Step 5: Select your USB drive and click the Next button.
Step 6: After that, it will begin burning Windows 11 into the USB. You should wait patiently till its ending.
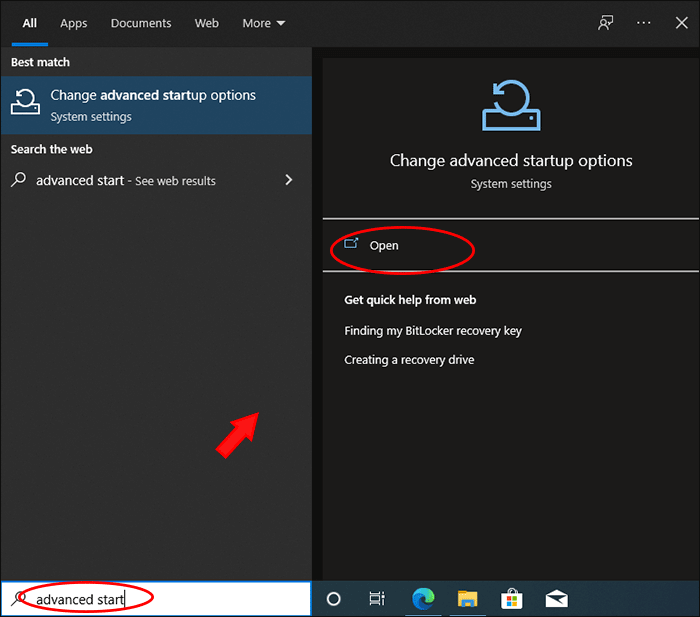
Step 7: When the bootable USB is created, you can go to search advanced startup on Windows search box. Then hit the Open option to open advanced startup settings.
Step 8: Then you can see the Restart now button under Advanced startup section in Recovery interface. Click it to restart the computer.
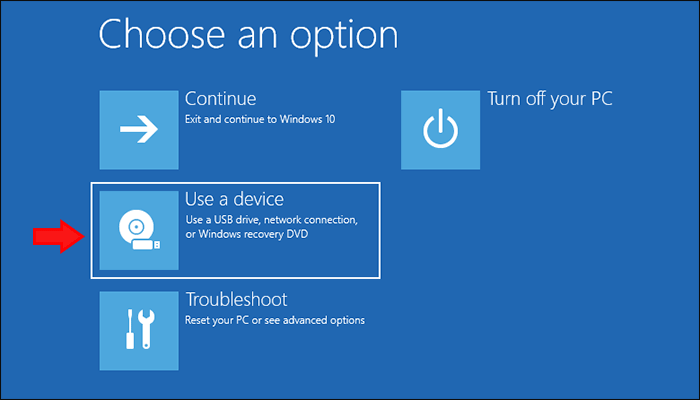
Step 9: After the computer restarts, choose the Option—Use a device.
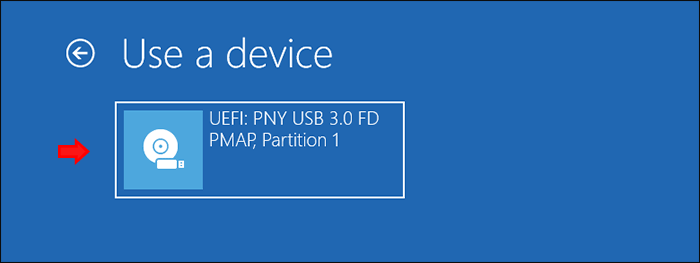
Step 10: Choose your bootable USB to open.
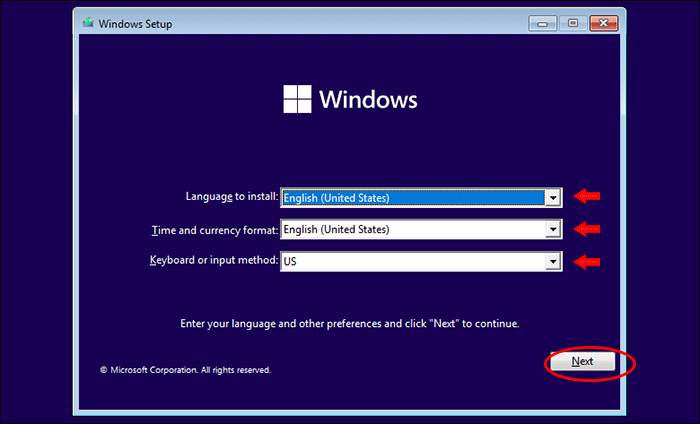
Step 11: Then the computer will restart again and boot from USB. You can go to the Windows Setup wizard to install Windows 11. Enter your language and other preferences and click Next to continue.
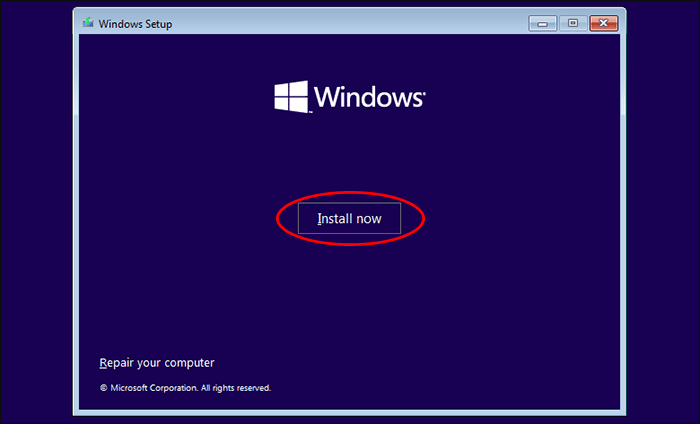
Step 12: Click Install now to go ahead.
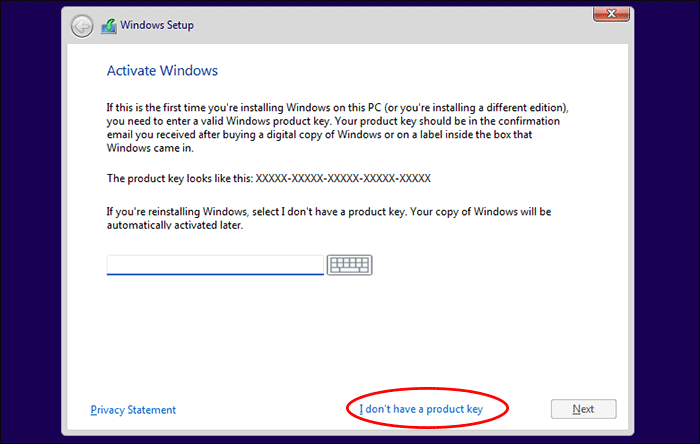
Step 13: Hit the option –I don't have a product key to proceed.
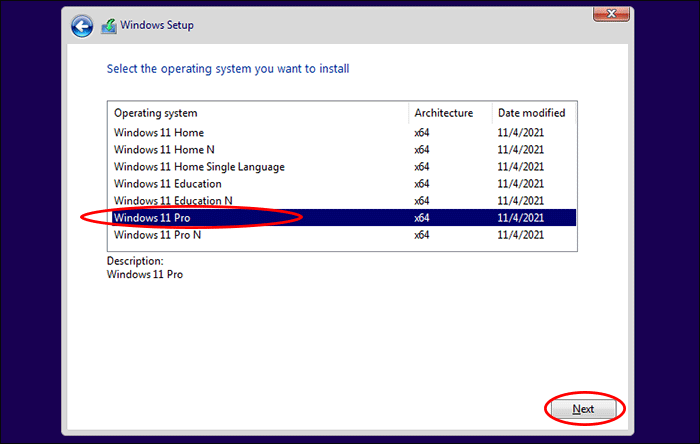
Step 14: Choose the Windows 11 operating system to install.
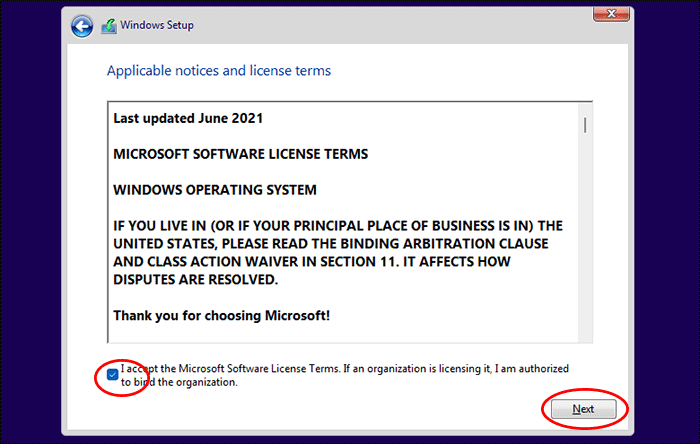
Step 15: Check the box to accept license terms and click Next.
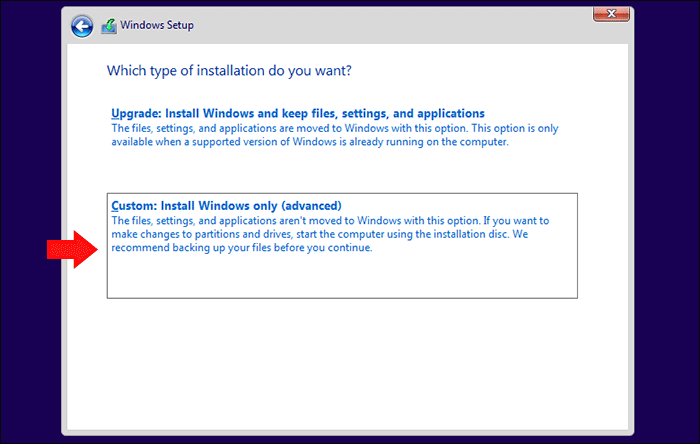
Step 16: Select the option—Custom: Install Windows only(advanced) to install Windows 11.
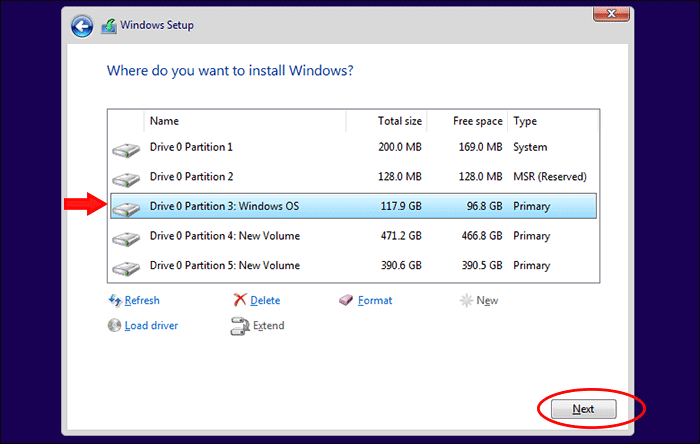
Step 17: Select your Windows OS partition to install Windows and click Next.
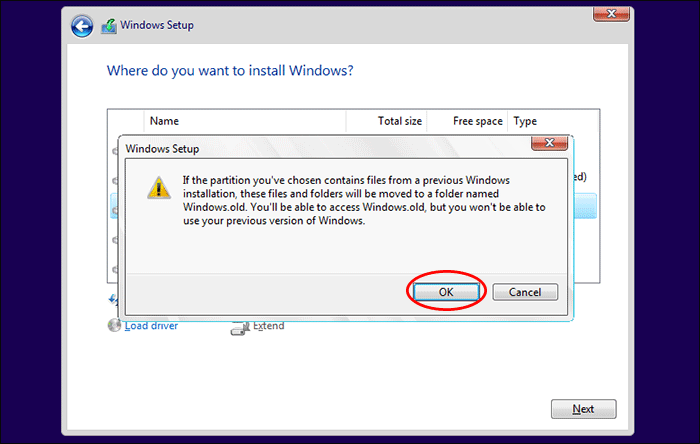
Step 18: Read the warning text carefully and then click the OK button. After that, the Windows 11 will be on installing. You just need to wait for the ending to configure Windows 11.
How to Configure Your Windows 11 after Installing
After Windows 11 is installed on your computer, you will be asked to finish the Windows 11 configuration.
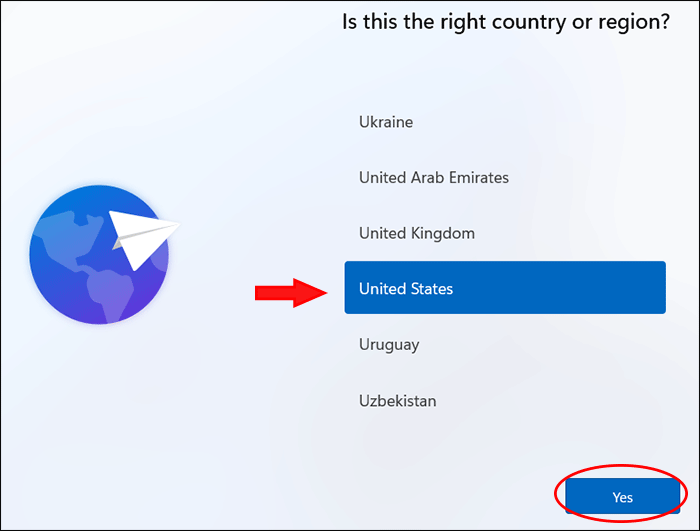
Step 1: Choose your country or region and click the Next button.
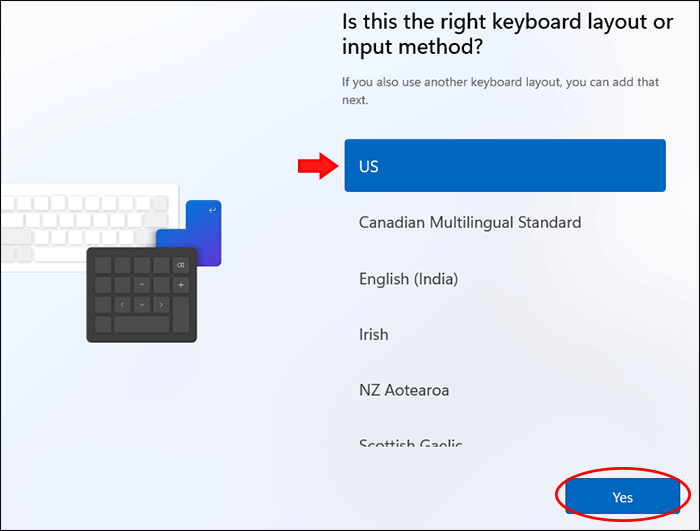
Step 2: Select the keyboard layout.
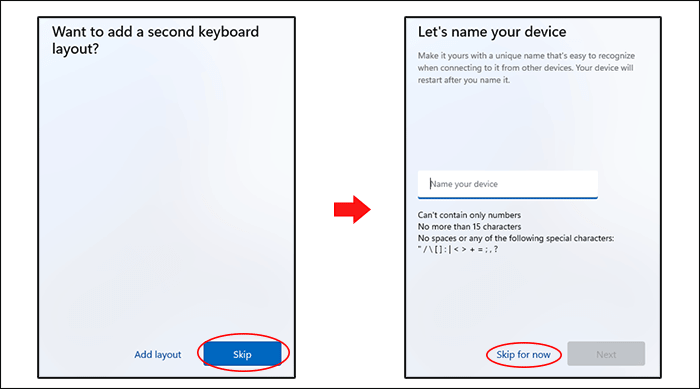
Step 3: Click Skip when it asks you to add a second keyboard layout and then Skip for now button in naming your device window.
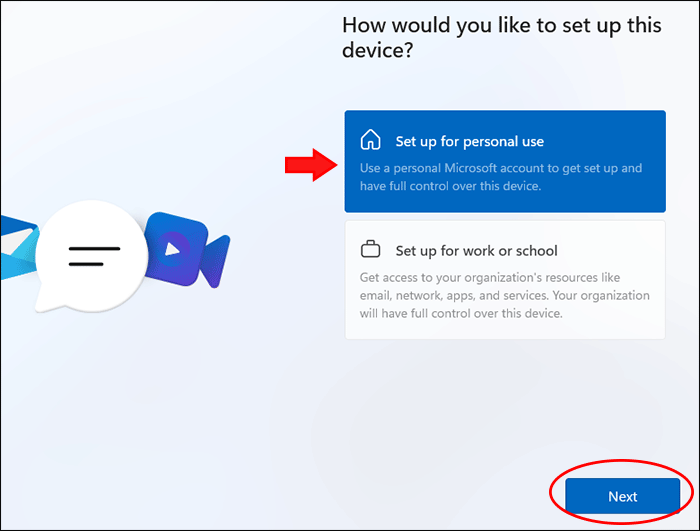
Step 4: Select the purpose you want to set up this device and click the Next button.
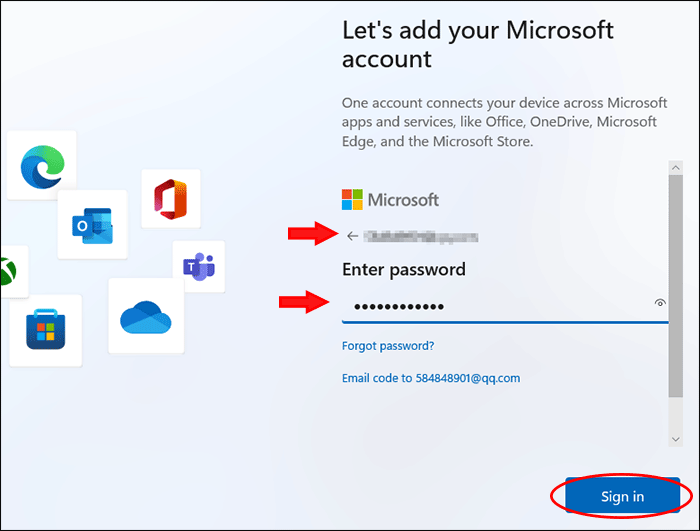
Step 5: Enter your Microsoft account and its password to sign in.
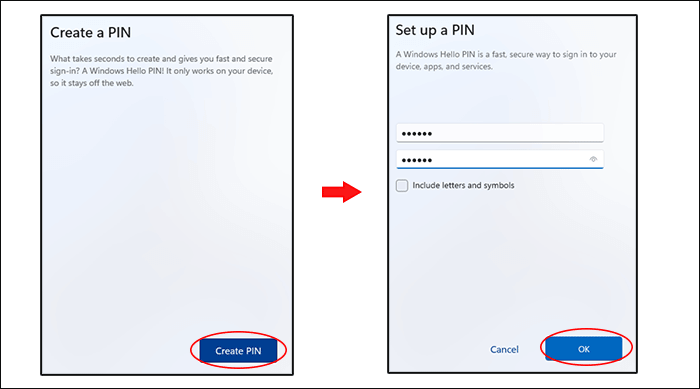
Step 6: Click Create PIN and then you need to enter the PIN password twice. After that, click the OK button.
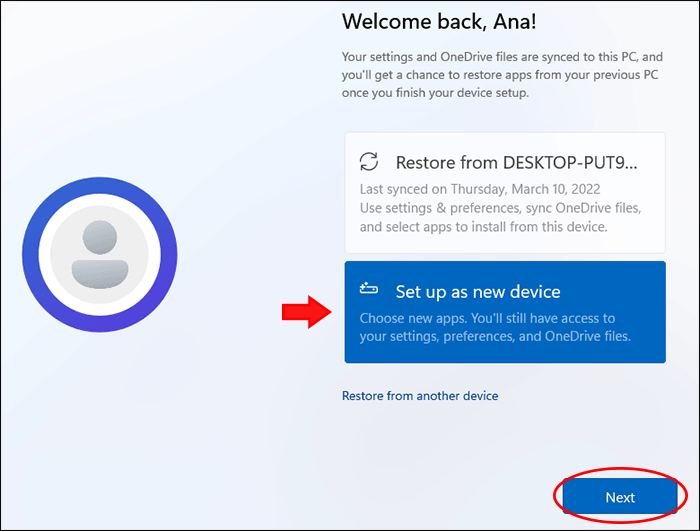
Step 7: Click Set up as new device option and click the Next button.
Step 8: Click Next > Next> Accept in the windows—Choose privacy settings for your device.
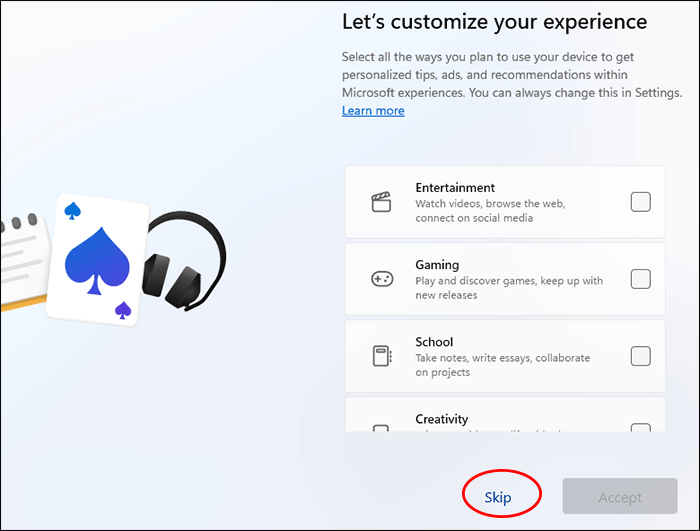
Step 9: Click Skip when it asks you to customize your experience.
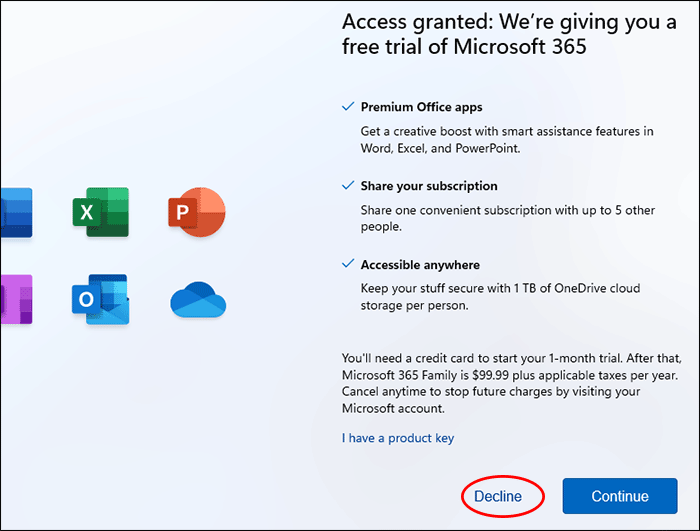
Step 10: Click Decline for accessing the free trial of Microsoft 365.
After that, it will take several minutes to set up your Windows 11.